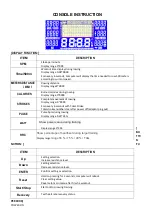
Plug in power supply, computer will power on and display all segments on LCD for 2 seconds. Enter into clock and
calendar setting mode.
After 4 minutes without rowing or pulse input, console will enter into power saving mode. And display clock, calendar
and room temp.
Manual Mode
:
1.
Press START key in main menu may start workout in manual mode.
2.
Press UP or DOWN to select Manual mode and press ENTER to confirm.
3.
Press UP or DOWN to preset Target for RESISTANCE LEVEL, TIME(or Meters), STROKES, CALORIES
and PULSE, and press ENTER to confirm. (Time and Meters can’t preset at the same time.)
4.
Press START/STOP key to start workout. Press UP or DOWN to adjust resistance level.
5.
When preset workout value count down to 0, console will alarm bi-bi and stop.
6.
Press START/STOP key to pause workout. Press RESET to reverse to main menu.
Program Mode
:
1.
Press UP or DOWN to select Program mode and press ENTER to confirm.
2.
Press UP or DOWN to select profile (P1~P12) and press ENTER to confirm.
3.
Press UP or DOWN to preset Target for RESISTANCE LEVEL, TIME(or Meters), STROKES, CALORIES and PULSE, and
press ENTER to confirm. (Time and Meters can’t preset at the same time.)
4.
Press START/STOP key to start workout. Press UP or DOWN to adjust resistance level.
5.
When preset workout value count down to 0, console will alarm bi-bi and stop.
6.
Press START/STOP key to pause workout. Press RESET to reverse to main menu.
H.R.C. Mode
:
1.
Press UP or DOWN to select H.R.C. mode and press ENTER to confirm.
2.
Press UP or DOWN to preset AGE, and press ENTER to confirm.
3.
Press UP or DOWN to select 55%, 75%, 90% and Target (default:100bpm).
4.
Press UP or DOWN to preset TIME(or Meters), STROKES, CALORIES, and press ENTER to confirm. (Time and Meters
can’t preset at the same time.)
5.
Press START/STOP key to start workout.
6.
When preset workout value count down to 0, console will alarm bi-bi and stop.
7.
Press START/STOP key to pause workout. Press RESET to reverse to main menu.
Summary of Contents for 160B-motor
Page 4: ...EXPLODED VIEW ASSMEBLY DRAWING ...
Page 5: ...ASSEMBLY INSTRUCTIONS ...
Page 10: ...STEP5 ...
Page 13: ...PARTS LIST ...
Page 19: ......


