background image


4.7 Mounting the flashlight in the housing 


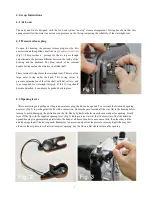
Remove the lens cap and wrist strap. The pressure release plug should be pulled out before inserting the camera. Attach 

the  plastic  slide  tray  to  the  camera

¡

s  tripod  mounting  fixture  with  a  coin,  screwdriver  or  the  end  of  the  universal  tool 

supplied (Fig. 5). Take care not to excessively tighten the screw. Slide the camera into the body along the guide rail (Fig. 

6). Make sure the camera body reach the limit and test the function of the on/of button on the body of the housing. Slide 

the  hot  shoe  plug  into  the  hot  shoe  (Fig.  7)  Note:  If  you  find  that  the  buttons  do  not  align  properly  with  the  controls, 

please check again that the camera is properly seated to the limit of the guide rail. 


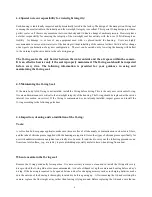
Replace the lid (Fig. 8). Remember to ensure the pressure release plug is pulled all the way out while closing, otherwise 

the air cannot escape.  Squeeze the lid  closed all the way with the  hissing  of expelled air. Screw  home (CLOCKWISE) 

the pressure release plug (Fig. 9). There is no need to excessively tighten this plug. The seal is made by internal O-rings. 

The O-ring on the underside of the plug is just to keep out dirt.   


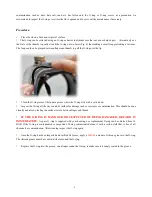
After replacing the lid, make a final visual inspection of the main O-ring for contamination (Fig. 10). 


Note: If the O-ring is in good contact, a thin black line, 
about  0.5-1mm  in  width  should  be  visible,  where  the 
O-ring is in contact with the lid. Follow this line all the 
way round the edge of the seal, as a final check that the 
seal is good. The housing is now ready for the dive.


Important    !!!


Before diving, make sure the pressure 

release  plug  is  pushed  back  inside  and  then  screwed 
home, do not over tighten this plug (finger tight only).


Summary of Contents for 10BAR 450D

Page 1: ...a clear polycarbonate allows for visual inspection of camera condition and the O ring seal 10BAR Housings are designed for the ever increasing variety of models of digital still and video cameras Advanced computer aided design and CNC manufacturing technologies ensure precise dimensions Each housing body is first injection molded and then machined to configure to individual camera model A range of...

Page 2: ...L strobe Standard Zoom Port18 55mm Lens Accessories 450D Opening key Lever Silicone O ring grease Spare main O ring Carrying bag Cleaning Kit Optional accessories Semi Dome Port for 10 22mm Lens 580 EX e TTL Flashlight Housing Flex Arm Ball Joint Arm Synchronous Cord 3 Function Controls 450D 1 ISO speedset 2 Mode Dial Power switch 3 Flashlight syn bulkhead 4 Shutter 5 Main Dial 6 Zoom 7 Pressure r...

Page 3: ...ide shaft with dirt salt etc and is not required for watertight integrity If this O ring should become detached it can simply be pushed back in place 4 3 Opening levers After unscrewing and pulling out the pressure release plug the lid can be opened To overcome the friction of opening use lever Fig 2 to push against the lid with a cam action Be sure they are inserted all the way flat to the housin...

Page 4: ...s not installed install the O ring before diving This is the only user serviceable O ring Its care and maintenance is critical to the watertight integrity of the housing The O ring should be replaced at the service interval see section on service If the O ring is contaminated or not already installed inspect grease and install the O ring according to the following guidelines 4 6 Inspection cleanin...

Page 5: ...ts with a cotton bud Inspect the O ring all the way round its surface for damage such as cuts tears or contamination This should be done visually and also by feeling the surface texture between finger and thumb IF THE O RING IS DAMAGED OR SUSPECTED OF BEING DAMAGED DISCARD IT IMMEDIATELY A spare O ring is supplied with your housing or a replacement O ring can be obtained from 10 BAR If the O ring ...

Page 6: ... the lid Fig 8 Remember to ensure the pressure release plug is pulled all the way out while closing otherwise the air cannot escape Squeeze the lid closed all the way with the hissing of expelled air Screw home CLOCKWISE the pressure release plug Fig 9 There is no need to excessively tighten this plug The seal is made by internal O rings The O ring on the underside of the plug is just to keep out ...

Page 7: ...se allow for the fact that the camera takes a few seconds to power on If the camera does not appear to respond to a control action make sure that no other controls are pressing on the camera i e locking out further actions Wear the wrist strap it is easy to inadvertently let go of the housing especially if you are distracted 5 3 Cleaning Storage The body lid of the housing are made of 6061 Aluminu...

Page 8: ...ves whichever is earlier Please note the terms for servicing the housing posted at our website A full service will include l Inspect all components for wears or damage report if repair necessary l Clean all sealing surfaces l Replace all O ring seals l Hydrostatic pressure test to 10 Bar Note Replacement of damaged components may require additional cost 7 Warranty The warranty is valid within two ...

Page 9: ... 2 F Wing Hin Factory Building 31 33 Ng Fong St San Po Kong Hong Kong Tel 852 2573 3228 Fax 852 2811 9180 Email service 10bar com Web site http www 10bar com Please keep this document for future reference Note due to continuous improvement the latest model housing may differ slightly form those described in this document Copy to be returned to 10 Bar Underwater Housings ...

Reviews: