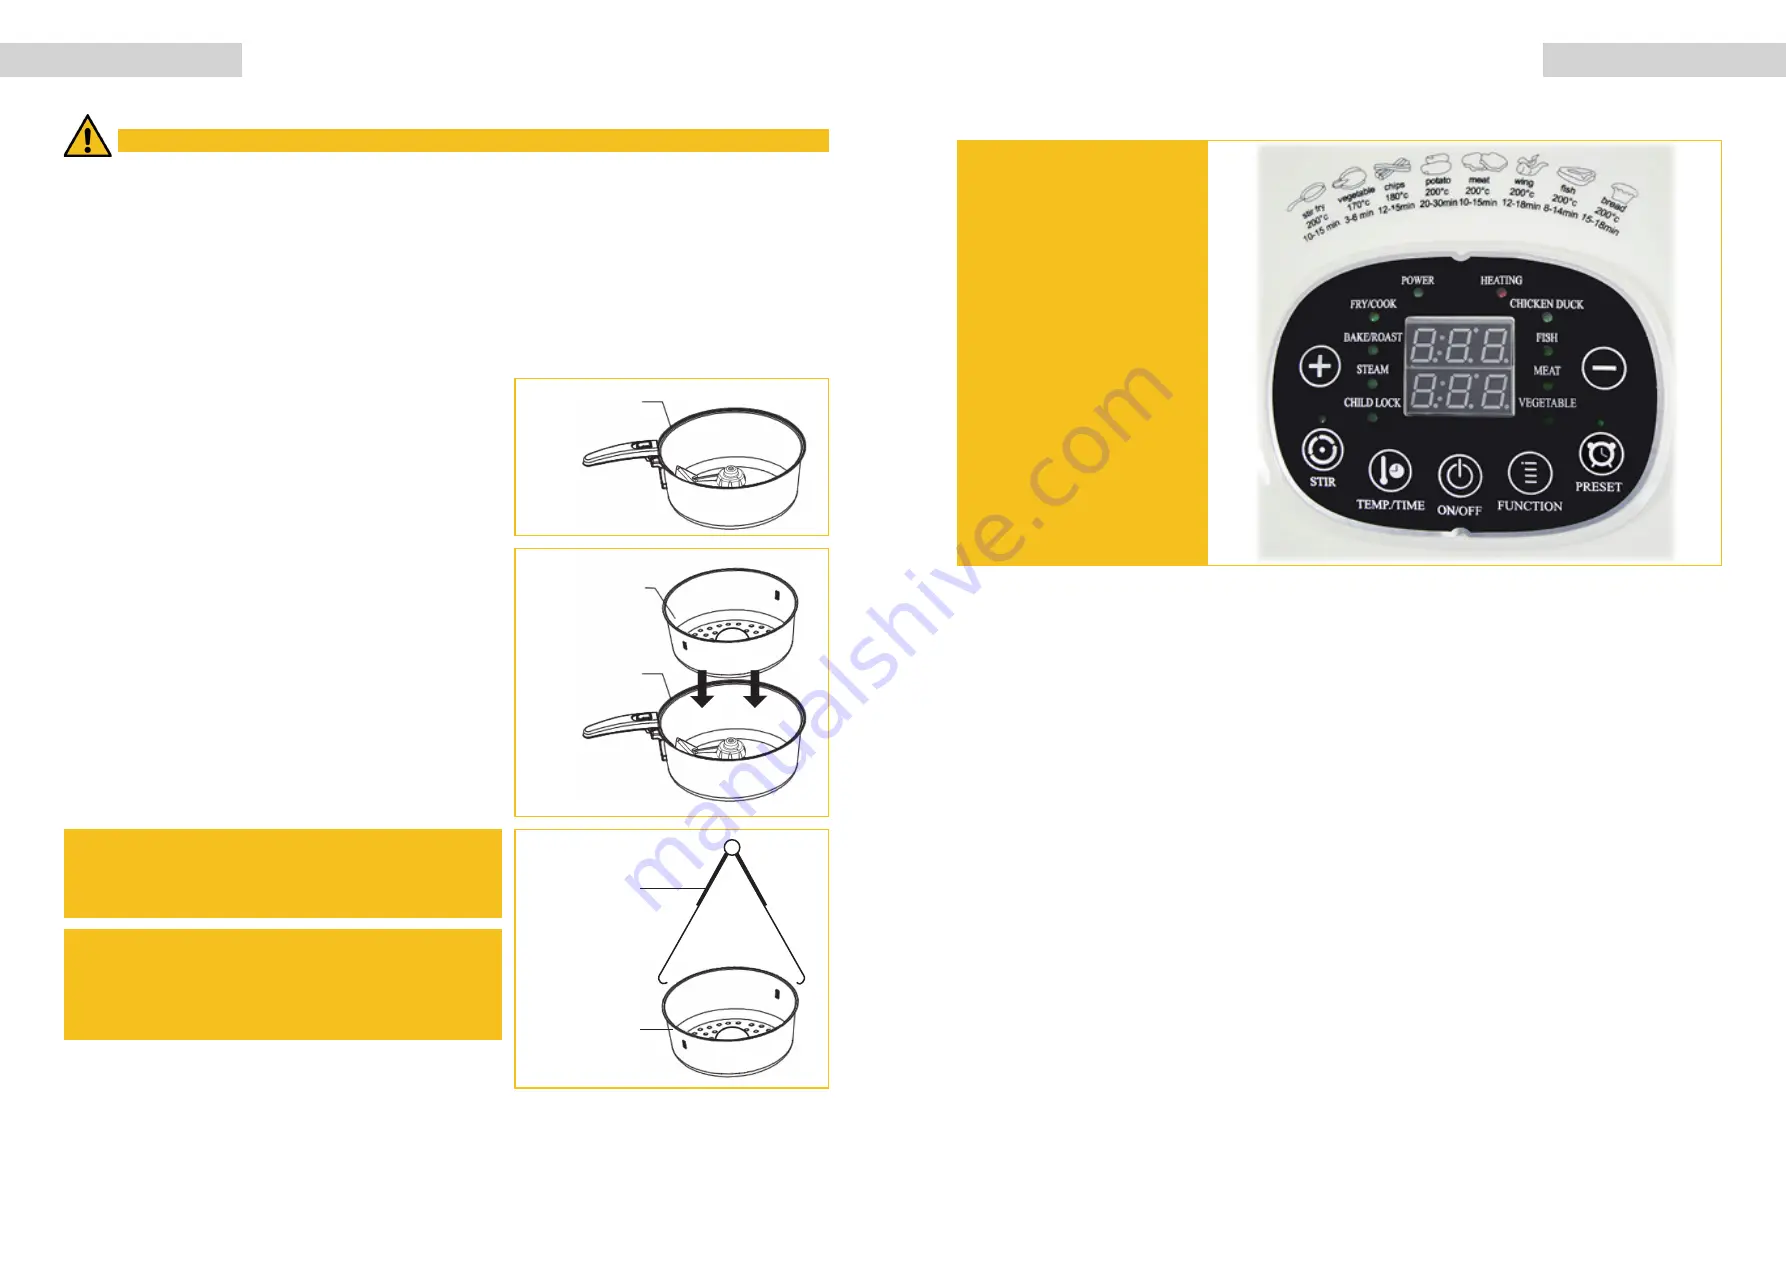
background image


4 English

English 5

5. operaTIon

l


Place the appliance on a stable, horizontal surface. Make sure the power cord is placed at a 

good distance from the socket. Place the appliance away from hot surfaces and any combu-

stible material as shown in this diagram.

l


Assemble the appliance depending on your needs using relevant accessories. See diagrams 

below.

l

     rice/vegetable/meat  cooking  mode.

Take out all the cooking accessories from the 

cooking pan. 

l

    Fry/broil/steam  mode. 

Place the basket directly on the pan as shown in the 

diagram.

cooking pan

with not removable 

mix/stirring paddle

cooking pan

with not removable 

mix/stirring paddle

fry/boil/steam basket

 please use special gripper to carefully remove 

the basket after cooking then place it on a stable 

horizontal surface. Use a gripping tong to take 

out the cooked foods.

Be careful when removing food from the appli-

ance. 

Use pliers to remove the food. Wear well-insula-

ted oven gloves before touching any parts of the 

appliance other than the handle.

fry/boil/steam basket

gripper

l


Please connect the main plug to an earthed wall socket when all cooking ingredients are ready. 

Close the lid. The appliance will be on standby once you hear a beep sound. Press “On/Off” when 

the LCD shows a short horizontal line. After that select the necessary time and temperature. Then 

press the key “On/Off” to switch on the appliance. 

l


On the interface of “timer/temperature” press function displaying “+/-” to select cooking mode (i.e. 

fry, bake,  broil, steam etc.). Thereafter, select the type of food e.g. chicken, fi sh, meat, vegetables 

etc. and then press “On/Off” to automatically start the appliance.

l


A prolonged “beep” signifi es that the appliance has fi nished cooking. However, the fan of the motor 

will to work for the next 60 seconds. This helps cooling the appliance. 

l


If you need to add seasoning or additional ingredients during cooking, simply  open the lid and add 

directly. 

l


If no operation is selected 30 minutes after cooking, there will be a long “beep”. The appliance then 

goes in standby mode. 

l


You can stir when the appliance is in any mode other than “child lock” by simply pressing the “stir” 

button. The appliance will be in stirring mode and the light on stirring will be on.  To turn off stirring, 

simply press the stir button once more. 

l

    Timer/Temperature  Setting

1.) Timer: press the temperature/timer key. The time indicator will be twinkling on the     LCD. Press 

the “+/-” key to adjust time then press “On/Off” to confi rm. Instead of pr/-, you can simply 

wait for 3 seconds and the selection will automatically confi rm. 

2.) Temperature: press the temperature/timer key. The temperature digit will be twinkling on the 

LCD. Set your desired temperature by pressing the “+/-” key. Press “On/Off” to confi rm the selected 

temperature. Alternatively, you can simply wait for 3 seconds and the set temperature will be auto-

matically confi rmed.

l

  child-lock Function

1.) To set child-lock when the appliance is in operation, simply press “Timer/Temperature” and 

“Function” keys at the same time. The child-lock light will be on once this setting has been success-

fully set. All keys on the interface cannot be used anymore till child-lock is disabled. 

ImporTanT!

When you have fi lled in the 

food to be prepared and swit-

ched on the appliance, press 

the „Temp./Timer“ button. 

With the plus/minus keys you 

can select the type of prepa-

ration on the left and the type 

of food or jump to the func-

tions on the right. The indica-

tor light shows which function 

is currently selected.

Time and temperature are 

preset. The plus/minus but-

ton can be used to incre-

ase/decrease the cooking 

time and/or temperature.

6. SeTTIng

Summary of Contents for Eco Air Profi Soup

Page 1: ...s reserved Newest information about our products can be found online Technische Änderungen Druckfehler und Irrtümer vorbehalten Aktuelle Informationen zu unseren Produkten finden Sie auf http www profi pumpe de HeISSlUFT mUlTIFrITTeUSe mUlTIBackoFen SUppenaUTomaT reISkocHer grIll eco aIr proFI SoUp Dc 1400W Rührpaddel nicht herausnehmbar ...

Page 2: ...an eye on food as it cooks 1 Introduction We would like to congratulate you on the purchase of our device We appreciate your trust That s why funtional security and operational safety stands by us on first place To prevent damage to persons or property you should read this user manual carefully Please observe all safety precautions and instructions for proper use of the hot multi fryer Failure to ...

Page 3: ...he fan of the motor will to work for the next 60 seconds This helps cooling the appliance l If you need to add seasoning or additional ingredients during cooking simply open the lid and add directly l If no operation is selected 30 minutes after cooking there will be a long beep The appliance then goes in standby mode l You can stir when the appliance is in any mode other than child lock by simply...

Page 4: ...not immersing the appliance housing in water or rinsing under the tap or keeping in wet sur faces Do not toward the air out to power cord when appliance is working l Do not keep the power cord plugged when not using the appliance in case of any danger l This appliance requires a outlet with separated security current over 10A please do not share with other appliances in case of damage of outlet an...

Page 5: ...om water and moisture Sicherheitshinweise und Warnungen Warnung vor elektri scher Spannung Inhaltsverzeichnis 1 Vorwort 9 2 Allgemeines 9 3 Produktbeschreibung 9 4 Vorbereitung 10 5 Bedienung 11 6 Einstellungen 12 7 Reingung 13 8 Erkennen und Beheben von Fehlern 13 9 Sicherheitshinweise 13 10 Garantiebestimmungen 14 11 Hinweise zur Produkthaftung 15 12 Entsorgungshinweise 15 13 EU Konformitätserkl...

Page 6: ...len mit einem feuchten Tuch innen und außen ab Sperrtaste einrasten lassen Schließen Sperrtaste herunter drücken entsperren 1 Bedienfeld 2 Arretierung 3 Sperrtaste 4 Heißluftauslass 5 Unteres Heizelement 6 Unteres Gehäuse Element 7 Frittierkorb 8 Kochschüssel mit fest montieretm Rührpaddel 9 Anklappbarer Griff 10 Gitter Rost optional 11 Korbzange 12 Greifzange 1 7 8 9 10 11 12 2 3 4 5 6 acHTUng WI...

Page 7: ...tes gelangen kann Dies kann zu einem Kurzschluss Bränden oder zu Stromschlä gen führen l Reinigen Sie Schüssel und Korb mit Wasser etwas Spülmittel und einem nicht scheuernden Schwamm da sie sonst die Beschichtung beschädigen können Problem Mögliche Ursache Lösung Der Multi Kocher arbeitet nicht Das Gerät ist nicht ans Stromnetz angeschlossen Schließen Sie das Gerät an die Stromquelle an und betät...

Page 8: ...ass und Luftauslass nicht abgedeckt werden l Es ist NICHT zu empfehlen selbst Reparaturen oder technische Modifikationen durchzufüh ren Reparaturen dürfen nur in einem autorisierten Fachbetrieb durchgeführt werden l Das Gerät darf nur mit einer Netzspannung von 230 Volt betrieben werden l Bitte überprüfen Sie vor jeder Inbetriebnahme die elektrischen Anschlüsse die Unversehrtheit des Kabels und de...

Page 9: ...essungen in mm 387x340x292 Cable length with Euro plug Kabellänge mit Schuko Stecker 1 2 m Name Function Quantity Gripper To take out the basket 1pc Gripping tong Fetch the materials foods 1pc Lip Be used for steam cooking soup 1set Grate Be used for steam optional 1pc Stirring parts Be used for cooking rice meat vegetables etc 1set Basket Be used for fry bake broil foods such as fry chips fish wi...

Reviews: