background image

4

5

EN

DE
FR

ES

IT

EN

DE
FR

ES

IT

Preparing for Use

•  The fabric shaver can damage delicate fabrics and 

very soft materials such as angora. Before removing 

fluff, always test on a small area of the fabric that 

is not publicly visible to confirm the speed level is 

appropriate for the fabric.

•  Turn the transparent adjustable spacer to the level 

“Thick” and then push the On/Off/Speed Switch to 

Speed Level 1. To test the most suitable speed for 

your fabrics and avoid damaging the garment, it is 

recommended to use Speed Level 1 first, then switch 

up to Speed Level 2.

How to Use Beautural Fabric Shaver?

1. Lay the garment over a hard surface such as a table 

top. This ensures the fabric will not gather and 

accidentally be damaged during shaving.

2. Turn the spacer to the desired level or remove it 

completely.

3. Push the On/Off/Speed Switch to the required speed 

level.

4. Stretch a small area of fabric with one hand during 

shaving and keep the shaving head at a 90 degree 

angle to the fabric.

5. To turn off the shaver, push the On/Off/Speed Switch 

back to Speed Level 0.

Note: 

Empty the fluff collector regularly. The fluff 

collector should never be more than 3/4 full. An 
overfilled fluff collector will slow the cutting blades no 
matter the amount of battery power left.

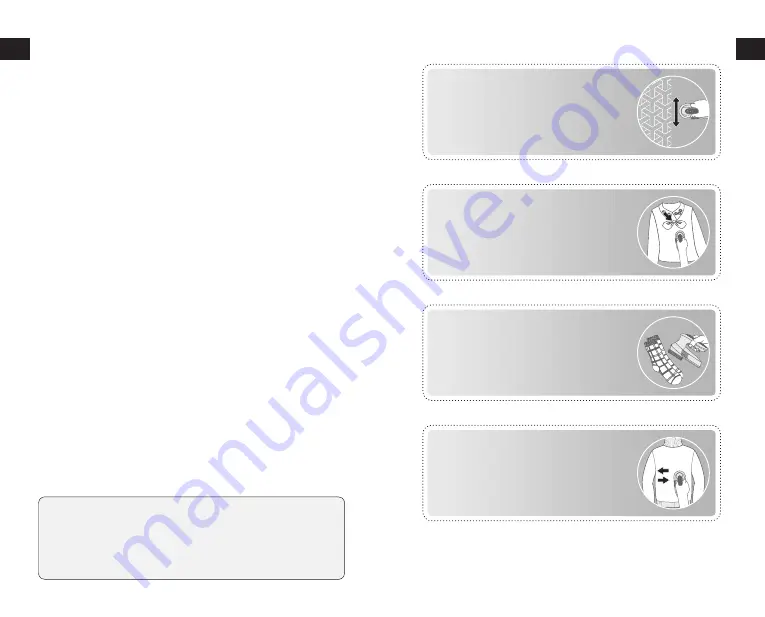
Shaving Tips

For Knitted Fabrics

Guide the shaver in the 
direction of the knitting.

Fabrics with Accessories

Avoid shaving over any 
accessories.

Thin Garments

Fold into two layers and lay 
over an ironing board.

Quick Shaving

Slide the shaver around over the 
top of the garment.

Summary of Contents for Beautural 1-MR02DE02

Page 1: ...Inc 1230 E Belmont Street Ontario CA USA 91761 Customer Service 1 909 391 3888 www 1byonebros com Fabric Shaver Instruction Manual Bedienungsanleitung Manuel d instructions Manual de instrucciones Manuale di istruzioni ...

Page 2: ...ren should not use clean or perform maintenance on the fabric shaver without adult supervision Do not expose or submerge the shaver in water Do not use the fabric shaver on moist fabrics Make sure no foreign objects penetrate the shaver Do not attempt to open the shaver s housing except the battery compartment to replace batteries and shaver foil to clean cutting blades Do not oil or grease the cu...

Page 3: ... 1x Cleaning Brush 1 x Carrying Bag 1 x Instructional Manual Before using the fabric shaver for the first time check the package contents to ensure all parts are free of visible damage Choosing the Power Supply To use with AC adapter Plug one end into the DC socket on the fabric shaver and the other end into an electrical outlet To use with batteries Press the tabs on the battery compartment cover...

Page 4: ... the fabric will not gather and accidentally be damaged during shaving 2 Turn the spacer to the desired level or remove it completely 3 Push the On Off Speed Switch to the required speed level 4 Stretch a small area of fabric with one hand during shaving and keep the shaving head at a 90 degree angle to the fabric 5 To turn off the shaver push the On Off Speed Switch back to Speed Level 0 Note Emp...

Page 5: ...lades When Should I Remove the Spacer from the Shaver Removing the spacer is only for very fine lint virtually no spacing to the cutting blades How to Remove Attach the Spacer To Remove the Spacer Hold the shaver with one hand put your thumb on the top of the spacer pull the spacer forward and remove it To Attach the Spacer Place it on the cutting head and press it firmly Make sure the tab on the ...

Page 6: ...ty the textile fluff 3 Place the fluff collector back on the shaver Maintenance and Care 1 Unscrew the shave foil and spacer and clean them using a slightly damp cloth 2 Use the officially provided cleaning brush to remove fluff and lint remnants from the cutting blades 3 Screw the shaver foil back on when all parts are completely dry 4 Place the spacer back on the shaver Note Never use any corros...

Page 7: ...dklingen zu reinigen Klingen nicht ölen oder fetten Dies wird Ihre Kleidung verschmieren Nehmen Sie die Batterien heraus wenn Sie den Rasierer längere Zeit nicht benutzen Wenn die Batterien auslaufen nehmen Sie sie sofort heraus und reinigen Sie das Batteriefach mit einem trockenen Tuch Verwenden Sie NUR den im Abschnitt Technische Daten dieses Handbuchs angegebenen Batterietyp Disposal Disposal o...

Page 8: ...ürste 1 x Tragetasche 1 x Bedienungsanleitung Überprüfen Sie vor der ersten Verwendung des Textilrasierers den Verpackungsinhalt um sicherzustellen dass alle Teile frei von sichtbaren Beschädigungen sind Netzteil auswählen Verwendung mit dem Netzteil Stecken Sie ein Ende in die Gleichstrombuchse des Stoffrasierers und das andere Ende in eine Steckdose Verwendung mit Batterien Drücken Sie auf die L...

Page 9: ...schplatte Auf diese Weise wird sichergestellt dass sich der Stoff nicht sammelt und beim Rasieren versehentlich beschädigt wird 2 Drehen Sie den Abstandshalter auf die gewünschte Höhe oder entfernen Sie ihn vollständig 3 Schieben Sie den Ein Aus Geschwindigkeitsschalter auf die gewünschte Geschwindigkeitsstufe 4 Dehnen Sie während der Rasur mit einer Hand einen kleinen Bereich des Stoffes und halt...

Page 10: ...h den Abstandshalter aus dem Rasierer nehmen Das Entfernen des Abstandshalters ist nur für sehr feine Flusen geeignet Nahezu kein Abstand zu den Schneidmessern So entfernen befestigen Sie den Abstandshalter Abstandshalter entfernen Halten Sie den Rasierer mit einer Hand fest legen Sie Ihren Daumen auf den Abstandshalter ziehen Sie den Abstandshalter nach vorne und entfernen Sie ihn Abstandshalter ...

Page 11: ... den Flusensammler wieder auf den Rasierer Wartung und Pflege 1 Schrauben Sie die Scherfolie und den Abstandshalter ab und reinigen Sie diese Teile mit einem leicht feuchten Tuch 2 Entfernen Sie mit der mitgelieferten Reinigungsbürste Flusen und Fusselreste von den Schneidklingen 3 Schrauben Sie die Scherfolie wieder auf wenn alle Teile vollständig trocken sind 4 Setzen Sie den Abstandshalter wied...

Page 12: ...ecyclage de ce produit Veuillez utiliser le produit comme décrit et conserver ce manuel pour consultation ultérieure Si vous vendez ou donnez cet appareil veuillez également transmettre ce manuel au nouveau propriétaire Instructions de Sécurité Ce produit est uniquement autorisé pour une utilisation domestique et non pas pour une utilisation commerciale ou industrielle Cet appareil est uniquement ...

Page 13: ...t 1 x Manuel d Instructions Avant d utiliser le Rasoir Anti Bouloche Anti Peluche pour la première fois veuillez vérifier que rien ne manque dans l emballage et que toutes les pièces sont intactes Choisir l Alimentation Electrique A l utiliser avec un Adaptateur AC Veuillez brancher l une des extrémités sur la prise DC du rasoir Anti Bouloche Anti Peluche et l autre extrémité sur la prise électriq...

Page 14: ...ent à plat sur une surface dure tel qu un dessus de table Cela vous assure que le tissu ne sera pas endommagé pendant l utilisation de l appareil 2 Veuillez positionner la cale d espacement ou le retirer complètement 3 Pousser les commandes On Off Vitesse au niveau de vitesse requis 4 Etirer la petite zone de tissu avec une main pendant l utilisation de cet appareil et garder la tête de rasage à 9...

Page 15: ...mm de distance avec les lames de rasoir Quand faut il retirer la cale d espacement du rasoir Retirer la cale est utile pour retirer la peluche très fine virtuellement aucun espace entre les lames Comment retirer installer la cale Pour retirer la cale veuillez tenir le rasoir à une main mettre votre pouce sur le haut de la cale tirer la cale vers l avant et la retirer Pour installer la cale Veuille...

Page 16: ...initial sur le rasoir Maintenance et Entretien 1 Retirer l aluminium et la cale nettoyer les pièces avec un chiffon humide 2 Utiliser une brosse de nettoyage officiellement fournie pour retirer les peluches des lames de rasage 3 Replacer l aluminium à son emplacement initial lors que les composants de l appareil sont secs 4 Placer la cale sur le rasoir Remarques Ne jamais utiliser de liquide corro...

Page 17: ...n importante sobre seguridad uso y eliminación Use el producto tal y como se describe y guarde este manual para futuras referencias Si vende este quitapelusas o lo regala también entregue este manual al nuevo propietario Instrucciones de seguridad Este producto solo está autorizado para su uso doméstico y no para fines comerciales o industriales Solo está destinado para las tareas descritas en est...

Page 18: ...e limpieza 1 x Bolsa de transporte 1 x Manual de instrucciones Antes de usar el quitapelusas por primera vez verifique el contenido del paquete para asegurarse de que todas las piezas estén libres de daños visibles Elegir fuente de alimentación Para usar el adaptador de CA conecte un extremo a la toma de CC del quitapelusas y el otro a una toma de corriente Para usar con pilas presione las pestaña...

Page 19: ...o se junte ni se dañe accidentalmente durante el afeitado 2 Gire el separador al nivel deseado o retírelo por completo 3 Presione el interruptor de encendido apagado velocidad al nivel de velocidad requerido 4 Estire un área pequeña de tela con una mano durante el afeitado y mantenga el cabezal de afeitado en un ángulo de 90 grados con respecto a la tela 5 Para apagar el quitapelusas vuelva a pres...

Page 20: ...uchillas de corte Cuándo debo quitar el separador de la afeitadora Quitar el separador es solo para pelusas muy finas prácticamente sin espacio para las cuchillas de corte Cómo quitar colocar el separador Para quitar el separador sostenga el quitapelusas con una mano coloque el pulgar en la parte superior del separador tire del separador hacia adelante y retírelo Para fijar el separador colóquelo ...

Page 21: ... Vuelva a colocar el recolector de pelusas en la afeitadora Mantenimiento y cuidado 1 Desatornille la lámina de afeitado y el separador limpiando esas partes con un paño ligeramente húmedo 2 Use el cepillo de limpieza provisto oficialmente para eliminar restos de tela y pelusas de las cuchillas 3 Vuelva a atornillar la lámina del quitapelusas cuando todas las piezas estén completamente secas 4 Vue...

Page 22: ...uzione Grazie per aver acquistato il Levapelucchi BEAUTURAL Questo manuale fornisce importanti informazioni sulla sicurezza l uso e lo smaltimento Usa il prodotto come descritto e conserva questo manuale per future consultazioni Se vendi o regali il prodotto dai al nuovo proprietario anche questo manuale Istruzioni per la sicurezza Questo prodotto è adatto al solo uso domestico e non per applicazi...

Page 23: ...dia 1 x Manuale di istruzioni Prima di usare il levapelucchi per la prima volta controlla il contenuto della confezione per accertarti che tutti gli accessori siano privi di danni visibili Scegliere l alimentazione Per usarlo con l alimentatore AC collega un estremità alla presa DC del levapelucchi e l altra estremità a una presa elettrica Per usarlo con le batterie premi le linguette sulla copert...

Page 24: ...erficie ci siano pieghe Altrimenti il tessuto si potrebbe rovinare 2 Gira la ghiera del distanziatore sul livello desiderato o rimuovilo completamente 3 Premi l interruttore On Off Velocità per impostare la velocità desiderata 4 Tira con la mano una piccola area di tessuto mentre passi il levapelucchi e mantieni le lame con un angolo di 90 sull indumento 5 Per spegnere il Levapelucchi premi l inte...

Page 25: ... distanziatore dalle lame Rimuovi il distanziatore solo per tessuti davvero fini non c è in pratica distanza tra le lame e il tessuto Come rimuovere attaccare il distanziatore Per rimuovere il distanziatore impugna il levapelucchi con una mano metti il pollice sulla parte superiore del distanziatore e tira in avanti fino a staccarlo Per attaccare il distanziatore posizionalo sulla testina taglient...

Page 26: ...nel levapelucchi Manutenzione e cura 1 Svita la griglia il distanziatore e il cappuccio protettivo per pulire tutte le parti con un panno leggermente umido 2 Usa la spazzola originale in dotazione per rimuovere residui di pelucchi dalle lame 3 Avvita la griglia quando tutte le parti sono completamente asciutte 4 Rimetti il distanziatore sulle lamette Note Non usare mai detergenti corrosivi Potrebb...

Page 27: ...one di smaltimento del proprio comune o nei negozi attrezzati Le norme per lo smaltimento delle batterie sono fatte per evitare qualsiasi rischio di inquinamento Le batterie vanno smaltite solo quando sono completamente scariche La confezione è fatta di materiale riciclabile e può essere smaltita nell apposita raccolta differenziata Declaration of Conformity We the 1byone Products Inc confirm that...

Page 28: ...r issue please call or email us for assistance Phone 44 158 241 2681 Mon Fri 9 00am 6 00pm UTC Email ukhelp 1byonebros com DE Für eine zügige Bearbeitung ihres Problems melden Sie sich bei uns wie folgt Email euhelp 1byonebros com FR Pour vous assurez une assistance rapide en cas de problème veuillez envoyer un e mail Email euhelp 1byonebros com ES Para garantizar una rápida atención de su problem...

Reviews: