30
EN
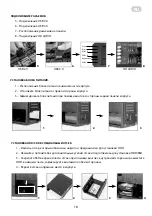
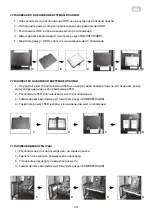
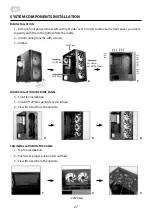
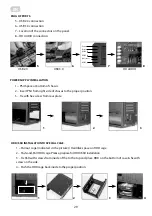
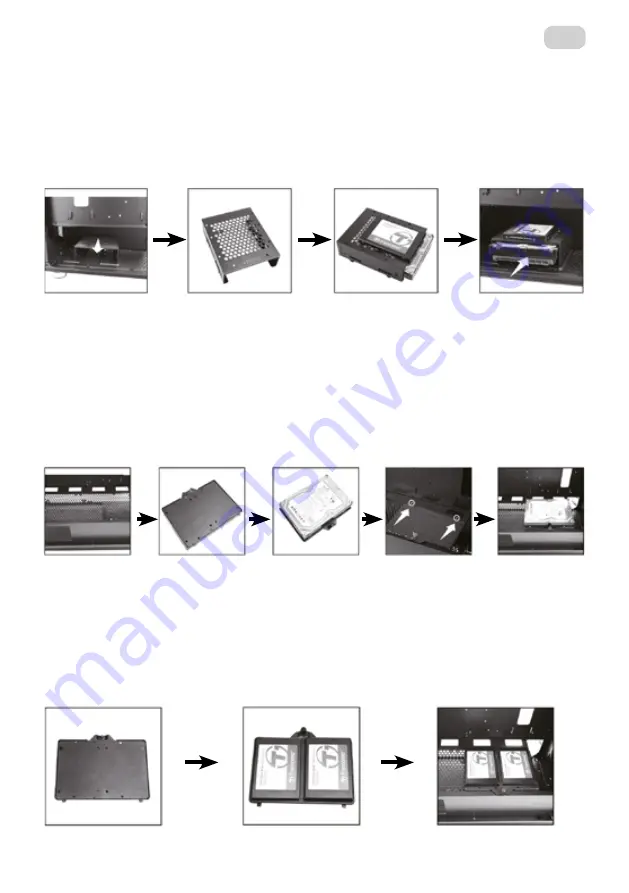
1 – Pull out cage (indicated in the picture) / Harddisk space on HDD cage.
2 – Push-and-Pull HDD cage. Please, prepare for HDD installation.
3 – Fix top HDD with screw from the bottom first, then fix bottom HDD and fix with screw from both sides.
4 – Push inside ( in the picture). Push the HDD cage back inside to the proper position.
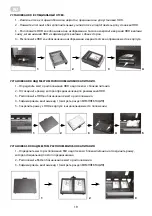
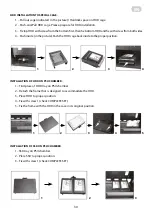
1 – Find place of HDD tray on PSU chamber.
2 – Detach the frame that is designed to accommodate the HDD.
3 – Place HDD to proper position.
4 – Fix with screw 1 (check COMPLETE SET).
5 – Fix the frame with the HDD in the case in its original position.
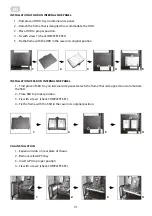
1 – SSD tray on PSU chamber.
2 – Place SSD to proper position.
3 – Fix with screw 1 (check COMPLETE SET).
HDD INSTALLATION TO SPECIAL CAGE.
INSTALLATION OF HDD ON PSU CHAMBER.
INSTALLATION OF SSD ON PSU CHAMBER.
1
1
1
2
2
2
3
3
3
4
4
5
Summary of Contents for GAMING CONTEGO NEO
Page 1: ...RU UA EN COMPUTER CASE OPERATION GUIDE 2E GAMING CONTEGO NEO GW05 2 COMPONENTS...
Page 3: ...3 UA 8 1 6 5 b 5 c 5 2 a 2 2 b 4 4 4 b 4 b 7 3 3 3 b 4 1 c 1 c 1 c...
Page 5: ...5 UA 4 5 6 1 2 3 1 3 1 2 3 1 2 2 120 3 2 3 120 2 140 200 1 120 2 120 2 120 4 5 6...
Page 6: ...6 UA 4 5 6 1 2 3 4 1 2 3 4 4 1 5 2 1 120 6 3 1 2 3...
Page 12: ...12 UA 1 2 3 4 5 6 1 2 3 4...
Page 14: ...14 RU 8 1 6 5 b 5 c 5 2 a 2 2 b 4 4 4 b 4 b 7 3 3 3 b 4 1 c 1 c 1 c...
Page 16: ...16 RU 4 5 6 1 2 3 1 3 1 2 3 1 2 2 120 3 2 3 120 2 140 200 1 120 2 120 2 120 4 5 6...
Page 17: ...17 RU 4 5 6 1 2 3 4 1 2 3 4 4 1 5 2 1 120 6 3 1 2 3...
Page 23: ...23 RU 1 2 3 4 5 6 1 2 3 4...
Page 36: ......
Page 37: ...2 1 2 3 4 5 6 12 ______________________________________________________________...
Page 38: ......
Page 40: ......

