


2N TELEKOMUNIKACE a.s., www.2n.cz
148/377
1.
2.
1.
2.
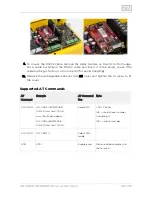
Mounting Completion
Having connected all the wires, check the bushings if used for proper tightening.
Replace the front cover carefully. Make sure that the wire arrangement inside the
device provides enough space for front panel insertion. Tighten the 4 screws
thoroughly to push the panel by 1 mm further to the metal chassis. Use the Torx
20 spanner for tightening, for example.
Caution
An improper mounting may result in the audio unit not being waterproof.
Water leakage may damage the electronics.
2N Lift8 Shaft Antivandal
®
is assembled with stainless steel screws. If
you lose them, never use other screws to avoid corrosion and screw
appearance deterioration!
Summary of Contents for Lift8
Page 1: ...www 2n cz 2N Lift8 Communicator for lifts User Manual Firmware Version 2 3 1 ...
Page 28: ...2N TELEKOMUNIKACE a s www 2n cz 28 377 Indication Elements ...
Page 40: ...2N TELEKOMUNIKACE a s www 2n cz 40 377 Examples of Connection ...
Page 70: ...2N TELEKOMUNIKACE a s www 2n cz 70 377 ...
Page 95: ...2N TELEKOMUNIKACE a s www 2n cz 95 377 ...
Page 136: ...2N TELEKOMUNIKACE a s www 2n cz 136 377 User name Admin Password 2n ...
Page 202: ...2N TELEKOMUNIKACE a s www 2n cz 202 377 Connection two cabin lift ...
Page 210: ...2N TELEKOMUNIKACE a s www 2n cz 210 377 ...


