


2N TELEKOMUNIKACE a.s., www.2n.cz
81/377
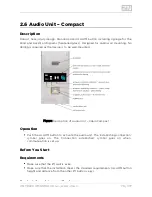
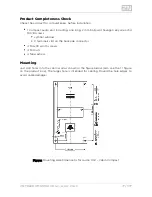
Procedure
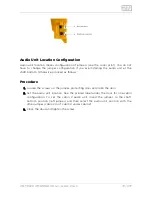
Rotary switch
position
1. Insert the hexagonal spanner (included) in the hole on the product
bottom edge (window lock screw) and turn left (about 10 times) until you
feel resistance.
Position 1 –
ALARM normal,
CANCEL normal,
cabin
2. The window slides down by itself or with a slight aid, revealing its upper
brim.
Position 2 –
ALARM inverted,
CANCEL normal,
cabin
3. Tilt the window forward and remove it.
Position 3 –
ALARM normal,
CANCEL inverted,
cabin
4. Set the required address.
Position 4 –
ALARM inverted,
CANCEL inverted,
cabin
5. Replace the window.
Position 5 – cabin
roof
6. Insert the hexagonal spanner (included) in the hole on the product
bottom edge (window lock screw) and turn right (about 10 times) until the
window slides under the panel edge. Tighten slightly.
Position 6 – cabin
bottom
Position 7 – shaft
bottom
Positions 8, 9, 0 /
not used (red bus
LED flashing)
ALARM and CANCEL Setting (Rotary Switch)
Contact closing/voltage connection control of ALARM and CANCEL
Summary of Contents for Lift8
Page 1: ...www 2n cz 2N Lift8 Communicator for lifts User Manual Firmware Version 2 3 1 ...
Page 28: ...2N TELEKOMUNIKACE a s www 2n cz 28 377 Indication Elements ...
Page 40: ...2N TELEKOMUNIKACE a s www 2n cz 40 377 Examples of Connection ...
Page 70: ...2N TELEKOMUNIKACE a s www 2n cz 70 377 ...
Page 95: ...2N TELEKOMUNIKACE a s www 2n cz 95 377 ...
Page 136: ...2N TELEKOMUNIKACE a s www 2n cz 136 377 User name Admin Password 2n ...
Page 202: ...2N TELEKOMUNIKACE a s www 2n cz 202 377 Connection two cabin lift ...
Page 210: ...2N TELEKOMUNIKACE a s www 2n cz 210 377 ...


