background image

Assembly Instructions Beta Prusa Standard & Deluxe

01/07/14

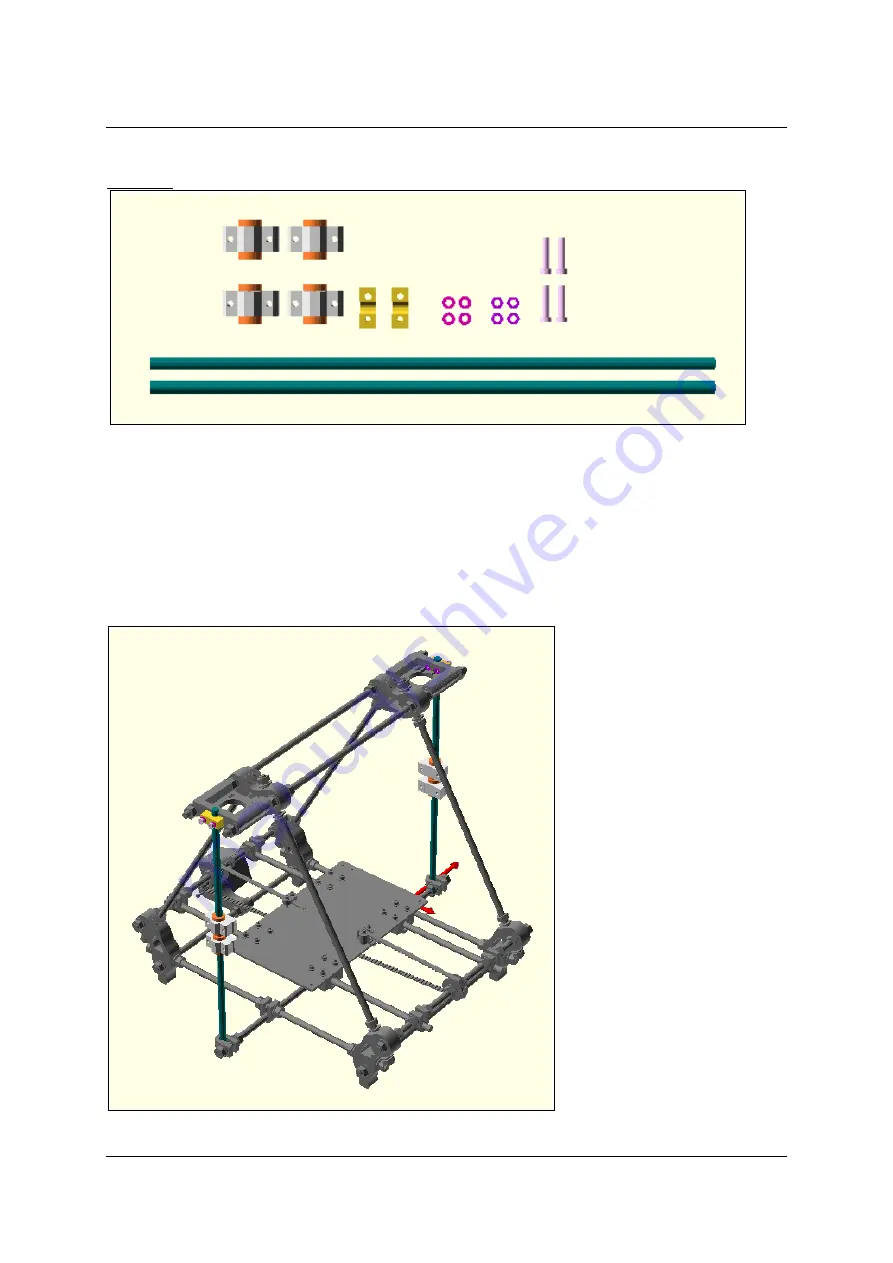
Step 2.3

Needed parts for step 2.3

The following parts are needed for this step:
4x Linear bearings SC8VUU
2x Rod clamps
4x Washer M4
4x Nut M4
4x Screw M4 x 16 mm 
2x Smooth rod 8mm x 350 mm
and the structure from the previous steps

Assembly step 2.3

 Page 24/ 67

Summary of Contents for Beta Prusa Deluxe

Page 1: ...Assembly Instructions Beta Prusa Standard Deluxe 01 07 14 Assembly Instructions Beta Prusa Standard Deluxe 3D Printer Version 2 6 Date 01 07 14 Page 1 67 ...

Page 2: ...inear bearings Year 2012 Conditions that must be met for the incomplete machine so that it can properly and without compromising the safety and health of peoples be assembled with other parts to form a complete machine Condition 1 Let an expert check the electrical connections of the machine Information over the undersigned Name Dominik Wenger Function Shareholder Wenger Krautwasser GbR 01 11 2012...

Page 3: ...ETY INSTRUCTIONS 4 ASSEMBLY OF THE FRAME 5 STEP 1 1 6 STEP 1 2 7 STEP 1 3 9 STEP 1 4 10 STEP 1 5 11 STEP 1 6 12 STEP 1 7 13 STEP 1 8 14 STEP 1 9 17 ASSEMBLY OF THE AXES 18 STEP 2 1 19 STEP 2 2 21 STEP 2 3 24 STEP 2 4 26 STEP 2 5 28 STEP 2 6 30 STEP 2 7 32 ASSEMBLY OF THE EXTRUDER 35 STEP 3 1 36 STEP 3 2 38 STEP 3 3 39 STEP 3 4 41 ASSEMBLY OF THE PRINT BED AND EXTRAS 42 STEP 4 1 43 STEP 4 2 44 STEP...

Page 4: ...f the information is not followed it can result in death or serious injury invalidity Indicates a possible dangerous situation If the information is not followed it can result in death or serious injury invalidity ATTENTION Indicates a potentially dangerous situation If the information is not followed damage to property or light to medium personal injuries are possible NOTICE Indicates general not...

Page 5: ...Assembly Instructions Beta Prusa Standard Deluxe 01 07 14 Chapter I Assembly of the Frame Page 5 67 ...

Page 6: ... 1 1 The following parts are needed for this step 2x Frame vertex with foot 1x Bar clamp 6x Washer M8 6x Nut M8 1x Threaded rod M8 x 370 mm Assembly Step 1 1 Assemble the bar clamp between two frame vertices like its shown in the picture above Don t completely fasten the nuts yet Page 6 67 ...

Page 7: ...d Deluxe 01 07 14 Step 1 2 Needed parts for step 1 2 The following parts are needed for this step 1x Pre assembled part from step 1 1 1x Frame vertex without foot 8x Washer M8 8x Nut M8 2x Threaded rod M8 x 370 mm Assembly Step 1 2 Page 7 67 ...

Page 8: ...e that all sides of the triangle are exactly the same length The distance between the outer edges of the plastic parts should be 291 mm Repeat the previous two steps and build a second triangle NOTICE Make sure all sides of both triangles are exactly the same length Now fasten all nuts on the frame vertices Assembly of step 1 2 repeated Page 8 67 ...

Page 9: ...e 01 07 14 Step 1 3 Needed parts for step 1 3 The following parts are needed for this step 4x Washer M8 4x Nut M8 1x Threaded rod M8 x 294 mm Assembly Step 1 3 Position the nuts and washer on the threaded rod as shown in the picture above Page 9 67 ...

Page 10: ...this step 1x Belt guide 2x Bar clamp 10x Washer M8 2x Big Washer M8 8x Nut M8 1x Bearing 608ZZ 1x Threaded rod M8 x 294 mm Bearing 608zz in belt guide Press the 608ZZ bearing into the belt guide until it s in the middle of the guide Assembly step 1 4 Position the parts on the threaded rod as shown in the picture above Page 10 67 ...

Page 11: ... parts for step 1 5 The following parts are needed for this step 2x Bar clamp 8x Washer M8 2x Big Washer M8 8x Nut M8 1x Belt guide 1x Bearing 608zz 1x Threaded rod M8 x 294 mm Assembly step 1 5 Position the parts on the threaded rod as shown in the picture above Page 11 67 ...

Page 12: ...Deluxe 01 07 14 Step 1 6 Needed parts for step 1 6 The following parts are needed for this step 2x Washer M8 2x Nut M8 1x Threaded rod M8 x 294 mm Assembly Step 1 6 Position the parts on the threaded rod as shown in the picture above Page 12 67 ...

Page 13: ...Deluxe 01 07 14 Step 1 7 Needed parts for step 1 7 The following parts are needed for this step 4x Nut M8 4x Washer M8 2x Threaded rod M8 x 440 mm Assembly Step 1 7 Position the parts on the threaded rod as shown in the picture above Page 13 67 ...

Page 14: ... Washer M8 16x Nut M8 and all previously assembled parts Assembly Step 1 8 Insert the two triangles from the outside into the prepared threaded rods and fix them together with a washer and a nut each The longer threaded rods 440 mm go into the frame vertices without feet the shorter ones 294 mm in the Frame vertexes without feet like it s shown in the picture above Page 14 67 ...

Page 15: ...three sides of the frame Position of the nuts on the outside of the frame Now adjust the distance between the triangles by turning the nuts on the frame vertices until all distances are exactly the same Make sure the triangles are as far out as possible as shown above The distance between the bolts should be around 260 mm Assembly of a z motor holder Page 15 67 ...

Page 16: ...he z motor holders flat side down onto the longer rods as shown above Secure them with a washer and a nut each Assembly of the y motor holder At last push the y motor holder onto the rods besides the belt guide and secure it with the nuts on the threaded rods Page 16 67 ...

Page 17: ... this step 2x Bar clamps 4x Washer M8 4x Nut M8 1x Threaded rod M8 x 440 mm and the structure from the previous step Assembly Step 1 9 Push the threaded rod through the two bar clamps at the bottom of the frame and attach the bar clamps on both sides with washers and nuts as shown in the picture above Assembly detail Page 17 67 ...

Page 18: ...Assembly Instructions Beta Prusa Standard Deluxe 01 07 14 Chapter II Assembly of the Axes Page 18 67 ...

Page 19: ... for step 2 1 The following parts are needed for this step 1x Gear 4x Linear bearing SC8UU 1x Motor Nema17 with cable and plug 3x Washer M3 3x Screw M3 x 10 mm 1x Grub screw M3 x 8 mm 2x Smooth rod 8mm x 406 mm and the structure from the previous step Assembly Step 2 1 Page 19 67 ...

Page 20: ... t forget to add the linear bearings onto the smooth rods Assembly of the Y Axis motor Push the gear onto the motor shaft and secure it with the 8mm grub screw The gear has holes with integrated nuts for this Make sure one grub screw is the flat side of the motor shaft Now attach the motor to the y motor holder with three M3 screws and washers as shown in the picture above Make sure the motor cabl...

Page 21: ...wing parts are needed for this step 1x Belt clamp with channel and screwhole 1x Belt clamp without channel 1x Y carriage 5x Nut M3 8x Washer M3 1x Belt 3x Screw M3 x 20 mm 2x Screw M3 x 16 mm 16x Screw M4 x10 mm 16 Washer M4 and the structure from the previous step Assembly of the Y carriage Page 21 67 ...

Page 22: ...now be exactly parallel and should have the same distance to the threaded rods on both sides of the frame Now carefully fasten the bar clamps until the smooth rods can t be moved any more Now fasten the screws on the linear bearings and check again that the y carriage runs smoothly Assembly of the belt Screw a belt clamp without channel with two M3 x 16 mm screws washers and nuts onto one side of ...

Page 23: ...from the outside a M3 x 20 mm screw into it Depending on your model the nut might already be casted in Now pull the belt over the belt clamp around it and under the clamp to the outside Like it is shown in the picture above Pull the belt tight and fasten the screws on the belt clamp You can now adjust the belt tension with the horizontal screw Cut off the surplus belt very near the belt clamp it w...

Page 24: ...Step 2 3 Needed parts for step 2 3 The following parts are needed for this step 4x Linear bearings SC8VUU 2x Rod clamps 4x Washer M4 4x Nut M4 4x Screw M4 x 16 mm 2x Smooth rod 8mm x 350 mm and the structure from the previous steps Assembly step 2 3 Page 24 67 ...

Page 25: ... associated washers and nuts You can see how that is done on the following pictures Depending on your set the m4 nuts might be already casted in Assembly detail step 2 3 Justage step 2 3 Now adjust the two bar clamps like its shown in the picture above until the new smooth rods are exactly vertical Use a plum line which you can easily create yourself with a M8 nut and a thread to make sure its rea...

Page 26: ... are needed for this step 2x X end 8x Screw M3 x 25 mm 8x Washer M3 1x Screw M8 x 50 mm 6x Washer M8 2x Nut M8 1x Bearing 608ZZ 2x Big Washer M8 1x Belt guide 4x Rod clamps 608ZZ Bearing inside the belt guide Press the 608ZZ bearing into the belt guide until it is centered Belt guide on the x end part Page 26 67 ...

Page 27: ... associated washers and nuts on the x end part without motor holder like it is shown in the picture above Assembly of x end add on parts Place the rod clamp parts onto the x end parts and screw them together with two M3 x 25 mm screws and washers on top like its shown in the pictures above Don t fasten the screws yet Page 27 67 ...

Page 28: ...w M4 x 16 mm 8x Washer M4 2x Smooth rod 8mm x 420 mm and the structure from the previous steps Assembly step 2 5 Slide the four linear bearings onto the smooth rods and push them through both x end parts Insert the assembly into the 3D printer frame and screw the x end parts onto the linear bearings on the vertical rods with the M4x16mm screws and washers like its shown in the picture above Page 2...

Page 29: ...ly detail step 2 5 Secure the smooth rods with rod clamps on each x end part Make sure the rods are centered Check that the construction can smoothly go up and down on the vertical rods without any blocking If necessary vary the tension of the screws on the linear bearings until the construction slides easily Let the z axis slide down until it sits on the y carriage Page 29 67 ...

Page 30: ...ep 2 6 Needed parts for step 2 6 The following parts are needed for this step 2x Z axis coupling 8x Screw M3 x 10 mm 2x Nut M8 2x Motor Nema17 with cable and plug 2x Threaded rod M8 x 210 mm and the structure from the previous steps Assembly step 2 6 Page 30 67 ...

Page 31: ...from the top through them If the M8 nut sits too loose wrap them with a few layers of tape until it fits perfectly Then connect the drive rods with the motor shafts with the z axis couplers Use a z axis coupler on each rod use them to securely clamp together the drive rod and the motor shaft with the integrated grub screws Make sure the drive rods are exactly vertical and parallel to the smooth ro...

Page 32: ...is step 1x x carriage 1x Belt clamp without channel 1x Belt clamp with channel and screw hole 1x Gear 3x Nut M3 7x Washer M3 1x Belt 1x Motor Nema17 with cable and plug 2x Screw M3 x 35 mm 1x Screw M3 x 20 mm 3x Screw M3 x 10 mm 6x Screw M4 x 12 mm 6x Washer M4 and the structure from the previous steps Assembly step 2 7 Page 32 67 ...

Page 33: ...annel teeth downwards and on the lower side mount the belt clamp with channel channel upwards and below a belt clamp without channel teeth upwards Secure the clamps with two M3 x 35 mm screws washers and nuts Additionally put a M3 nut into the deepening in the middle and screw a M3 x 20 mm screw horizontally through the part Depending on your model the nut might be already casted in Now clamp the ...

Page 34: ...Assembly Instructions Beta Prusa Standard Deluxe 01 07 14 Page 34 67 ...

Page 35: ...Assembly Instructions Beta Prusa Standard Deluxe 01 07 14 Chapter III Assembly of the extruder Page 35 67 ...

Page 36: ...d Deluxe 01 07 14 Step 3 1 Needed parts for step 3 1 The following parts are needed for this step 2x thin spring 6mm 4x Washer M4 2x Nut M4 2x Screw M4 x 50 mm 1x Wades body 1x Wades inlet 1x pre mounted Beta Head Assembly step 3 1 Page 36 67 ...

Page 37: ...into the top of the Wades body and screw the prepared screws into the body as shown in the picture above Put the Wades inlet with the conical opening pointing into the extruder into the cavity of the Wades body Next carefully push the prepared Beta Head into the hole on the bottom of the Wades body NOTICE Make sure that the mounting holes of the hotend clamp match the ones of the wades extruder bo...

Page 38: ...needed for this step 1x Bearing 608ZZ 1x Nut M3 1x Bolt M8 x 20 mm 1x Wades Idler Assembly step 3 2 Push the bearing onto the short M8 bolt and click it into the Wades Idler Put the M3 nut into the depression of the Idler as shown in the picture above Depending on your kit the nut might be already casted in Page 38 67 ...

Page 39: ...eeded for this step 1x Big gear 2x Nut M8 1x Nut M8 Nyloc 5x Washer M8 1x Hyena drive screw 3x Screw M3 x 12 mm 1x Screw M3 x 30 mm 1x Small gear 5x Washer M3 1x Nut M3 2x Bearing 608ZZ 1x grub screw M3 x 3 mm 1x Motor Nema17 with cable and plug and all parts from the previous steps Assembly detail step 3 3 Page 39 67 ...

Page 40: ...mbly step 3 3 Push the M8 Nyloc nut into the big gear and screw it onto the longer part of the Hyena drive screw Also put two M8 washers onto the drive screw Then push the small gear onto the motor shaft put the drive screw with the big gear through the bearings on the wades body Check that both gears can turn without problems and adjust the motor so that both gears mesh together and can turn with...

Page 41: ...he extruder onto the x carriage like it is shown in the picture above Then secure it in place with two M4 x 20 mm screws and fitting washers and nuts maybe casted in onto the x carriage It is also possible to mount the extruder turned 180 to the other side Depending on how you mount the extruder you should now add the flag for the X endstop as described in step 5 1 because the screw for this part ...

Page 42: ...Assembly Instructions Beta Prusa Standard Deluxe 01 07 14 Chapter IV Assembly of the Print bed and extras Page 42 67 ...

Page 43: ...on Needed parts for step 4 1 The following parts are needed for this step 16x Cable ties 2x Left frame stabilizer 2x Right frame stabilizer and the structures from the previous steps Assembly step 4 1 Put the frame stabilizer onto each top corner of the frame and secure them with cable ties Page 43 67 ...

Page 44: ...g parts are needed for this step 2x Bearing holders 2x Bearing 608ZZ 2x Screw M3 x 25 mm 2x Nut M3 4x Washer M3 and the structures from the previous steps Assembly step 4 2 Press the bearings into the bearing holders and place them onto the lower end of both Z drive rods Secure the holders with a M3 x 25 mm screw and a washer each Page 44 67 ...

Page 45: ...c 4x Screw M3 x 30 mm 1x Acrylic print bed and the structures from the previous steps Assembly step 4 1 Attach the acrylic print bed onto the y carriage with four screws M3 x 30 mm and springs cut into 4 pieces and associated washers and nuts as shown in the pictures above The M3 Nyloc nut goes at the bottom Make sure the print bed is exactly level you can adjust the height position of it with the...

Page 46: ...sher M3 4x Nut M3 Nyloc 4x Screw M3 x 30 mm 1x Heated print bed 4x Foldback clamps and the structures from the previous steps Soldering of the heated print bed Solder the thermistor onto the contacts in the middle of the heated print bed and secure it with a piece of Kapton tape Then solder the thin two wire cable onto the two inner contacts of the heated print bed and the thicker two wire cable o...

Page 47: ...ape to protect against possible shorts with the aluminium plate After taping the print bed you should pierce through the holes so its possible to put a screw into it later Secure the cables on the heated printbed with kapton tape to make sure they can t bend and fall off Assembly step 4 4 Mount the heated print bed onto the y carriage with four M3 x 30 mm screw the spring which was cut into 4 part...

Page 48: ...tween the PCB of the heated bet and the springs The cables of the heated print bed should point away from the y axis motor Make sure the print bed is exactly level you can use the Nyloc nuts to adjust the height and position of it Place the mirror plate onto the heated printbed and secure it with the four foldback clamps Page 48 67 ...

Page 49: ...Assembly Instructions Beta Prusa Standard Deluxe 01 07 14 Chapter V Assembly of the Electronics Page 49 67 ...

Page 50: ...ing parts are needed for this step 3x Optical end stop 2x curved end stop holder 1x straight end stop holder 3x metal flag 5x Screw M3 x 20 mm 3x Screw M3 x 16 mm 1x Screw M3 x 10 mm 12x Washer M3 5x Nut M3 and the structure of the previous steps Assembly of the optical end stop on the Y axis Page 50 67 ...

Page 51: ...nd stop on the second curved end stop holder as shown in the picture above Use one M3 x 16 mm screws and fitting washers and nuts for this Attach the end stop holder with a M3 x 20 mm screw and one washer onto the smooth rod below the x end part without motor Attach a metal flag onto the outer screw at the bottom of the x end parts using an extra M3 nut and two washers Then bend the flag down and ...

Page 52: ... Then attach the last metal flag at the x carriage with one of the M4 screws securing the linear bearing Bend and cut the flag until it goes into the end stop without any problems when the x axis is moved fully to one side Position of the endstops Page 52 67 ...

Page 53: ... needed for this step 1x RAMPS electronic 1x RAMPS electronic holder 4x Rod clamps 1x Filament guide 1x 40mm Fan 1x Fan director 1x metal Strip 2x Screw M3 x 20 mm 4x Screw M3 x 30 mm 3x Screw M3 x 25 mm 2x Screw M3 x 10 mm 16x Washer M3 8x Nut M3 and the structure from the previous steps Assembly step 5 2 Page 53 67 ...

Page 54: ...the fan with two M3 x 10 mm screws Then attach the strips to a screw of the x carriage and bend them so that the fan blows at the black part of the hotend Assembly RAMPS Attach the RAMPS electronic holder onto the side of the 3D printer with four rod clamps and two M3 x 30 mm screw washers and nuts each Put the RAMPS electronic onto the holder and secure it with three M3 x 25 mm screws washer on t...

Page 55: ...ing parts are needed for this step 30x cable ties 1x twofold terminal block 4x Heat sinks 1x thermal glue tube 3x Three wire cable with plugs 1x Thick two wire cable 1x Thin two wire cable with plug on one side 1x Thin two wire cable without plug 1x ATX power supply 1x ATX Adapter and the structure from the previous steps Assembly step 5 3 Page 55 67 ...

Page 56: ...ting it We start with the Z axis motors Move both cables to the side where the electronic is and run the cables down the rod on this side to the electronics Connection of the z motors Cable management for the z motor The highlighted cable in this picture are the Z motor cables Plug both cables in like it is shown the pictures below Make sure the blue cable is on the right side Page 56 67 ...

Page 57: ...he electronic Put the electronic on the left side of your 3d printer like it is shown in the first picture Connection of the y motor Next run the cable of the Y axis motor alongside the rods to the electronics board Like it is shown in the picture above with the highlighted cable Page 57 67 ...

Page 58: ...e highlighted cable above Again make sure that the blue cable is on the right side Connection of the x motor To connect the x axis motor guide the motor cable in a loose curve onto the diagonal rod and from there on downwards Make sure the is enough cable that the Z axis can move fully up and down Guide the cable below the printbed along the middle rod to the electronics Page 58 67 ...

Page 59: ...otors to the electronic Connection of the x motor to the electronic Plug the cable into the right most motor connector on the electronics as is shown with the highlighted cable in the image above Make sure the blue cable is on the right side Connection of the extruder Page 59 67 ...

Page 60: ...tion to the colour coding Cable management of the Extruder Guide the motor cable the heater cable the fan cable and the already connected thermistor cable in a big loop to the top of the printer and from there down on the side of the printer to the electronic Make sure loop of the cables is big enough so that the extruder can move in x and z direction over its full range without getting in conflic...

Page 61: ... as shown above Here the colour coding also doesn t matter The fan cables go onto the middle screw terminal Here the polarity is IMPORTANT Connection of the x end stop For the end stops we take a three wire cable with the plugs on both sides Plug the cable into the end stop with the marked side pointing to the back and guide it in a small loop to the side of the printer and then down to the electr...

Page 62: ...ater Connection of the z end stop Connect another three wire cable to the z end stop and guide the cable down the vertical rod and plug it into the electronic like the red cable shown in the picture above Make sure to plug it into the correct socket There is always on free row of pins between the end stop plugs Again make sure the marked side of the cable points to the back of the endstop and on t...

Page 63: ... three wire cable and connect it to the end stop Make sure the marked side points to the back of the end stop Guide the cable along the side of the printer till you get to the middle rod From there guide it below the printer alongside the middle rod to the electronic Connection of the y end stop to the electronic Page 63 67 ...

Page 64: ...plug and that the marked side of the cable points to the USB plug Connection of the heated print bed If you have the deluxe set guide the cables of the heated print bed to the electronics as it is shown in the picture above Make sure that the y axis can still move over its full range without any problems and that the cables don t entangle with the belt Connection of the heated print bed to the ele...

Page 65: ...connected to the upper screw terminal of the electronic For both cables the colour coding is not relevant Adding the heat sinks Take the 4 heat sinks and apply a bit of heat thermal glue to the bottom of them Then place each heat sink onto one stepper drive and make sure to leave the potentiometers accessible Connection of the power supply to the electronic Page 65 67 ...

Page 66: ...ure from the previous steps Connect the metal flag with the fan using the M3 x 10 mm screw the corresponding washers and the M3 nut Now bend the metal flag so that you can mount the fan beside the hotend at the bottom of the X carriage Connect the metal flag with one of the M4 screws of the X carriage and add the cables to the terminal block of the primary fan Connection of the additional fan at t...

Page 67: ... and connect the black cables to GND and the yellow ones to plus It is recommended to connect at least two cables each to make good contact Also make sure that the unused red cables stay isolated good and can not make any shorts As a last step secure all cables with cable ties to the rods of the 3D printer and check again if all axes can move freely over their full range It is recommended to bundl...

Reviews: