background image


Quick Installation Guide 

Version 1.0 


Copyright © 2007 2SAN INC.                                      

Release: September 2007


Digital Video Recorder 

ADR-7104


Summary of Contents for ADR-7104

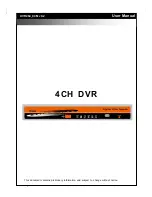
Page 1: ...Quick Installation Guide Version 1 0 Copyright 2007 2SAN INC Release September 2007 Digital Video Recorder ADR 7104 ...

Page 2: ...any errors that may appear in this quick guide 2SAN is the trademark of 2SAN Inc Windows is the trademark of Microsoft Corporation All brands and trademarks are the properties of their respective owners This quick guide contains materials protected under International Copyright Laws All rights reserved No part of this quick guide may be reproduced transmitted or transcribed without the written con...

Page 3: ...N Produkt zu Ihrer örtlichen Sammelstelle bringen AEEA verklaring Dutch Met het doel de stijgende hoeveelheid afgedankte elektrische en elektronische apparatuur te beheersen zonder hiervoor onnodig stortplaatsen en verbrandingsovens te belasten en om de vervuiling van het milieu door vrijkomende stoffen uit de afgedankte apparatuur te voorkomen heeft de Europese Unie EU de richtlijn betreffende af...

Page 4: ...sagés destinés au recyclage veuillez contacter votre mairie votre service de traitement des déchets ménagers ou le magasin où vous avez acheté le produit RAEE Spanish Con la finalidad de reducir el incremento de residuos eléctricos y de material electrónico reduciendo el uso de los vertederos e incineradoras y prevenir el preocupante aumento del contacto de estos residuos con el medio ambiente Por...

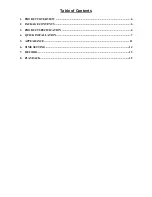
Page 5: ...Table of Contents 1 PRODUCT OVERVIEW 6 2 PACKAGE CONTENTS 6 3 PRODUCT SPECIFICATION 6 4 QUICK INSTALLATION 7 5 APPEARANCE 11 6 TIME SETTING 14 7 RECORD 15 8 PLAYBACK 15 ...

Page 6: ...e Contents Check the following items Digital Video Recorder ADR 7104 Power Adapter Quick Guide IR Remote Controller 3 Product Specification Video Input 4 Video Output CVBS S video VGA optional Recording Resolution NTSC 720 x 480 PAL 720 x 576 Recording Rate 30 25 fps NTSC PAL Recording Mode Manual Motion Detection Alarm Schedule Playback Search Time Event Urgent Search Hard Disk 2 SATA HDDs 1 hot ...

Page 7: ...nstall monitor Connect a monitor to one of the connectors marked CVBS S Video or VGA optional Step 3 Install SATA hard drive Install Hot Swap HDD 1 Slightly press the blue plastic tenon joint downward the silver shaft will spring out 2 Pull the silver shaft forward slightly to the end and the hot swap tray will slide a bit BNC Cable ...

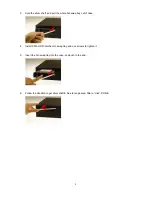
Page 8: ...hole hot swap tray out of case 4 Install SATA HDD into the Hot swap tray and use screws to tighten it 5 Insert the hot swap tray into the case and push to the end 6 Follow the direction to get silver shaft blue tenon geared After a click DONE ...

Page 9: ...le 4 pin HDD power cord 3 Loosen the screws and take the HDD bracket out 4 Install the HDD into the lower part of the HDD bracket and tighten it Make sure the HDD is firmly connected with SATA connector 5 Put the HDD bracket back and make sure to fasten the screws firmly 6 Put the hot swap HDD tray back ...

Page 10: ...SATA RAID Tower ANS 9050E as an example 2 Connect the e SATA RAID Tower to the DVR with an e SATA cable Step 5 Install Power Cord 1 Connect the power adapter to the connector marked DC 12V 2 The DVR system will boot up and then start recording automatically ...

Page 11: ...rchive and firmware update REC Record emergency recording FR Used for quick backward search in playback PLAY PAUSE Pauses and resumes the video recording in playback STOP Ends search during playback FF Used for quick forward search in playback LOCK Press to lock all buttons FREEZE Runs the FREEZE function in live mode SEARCH Popup the search menu to search the video MODE Press to change different ...

Page 12: ...12 Rear panel Video In Loop RS485 Alarm In Out Power Fan Audio In Out Video Input Ethernet e SATA port Power ...

Page 13: ... search during playback 10 REC Emergency recording 11 F F Used for PTZ camera control Focus In Out 12 Z Z Used for PTZ camera control Zoom In Out 13 ROTATE The single channel mode switches according to the specified time on the menu 14 ESC Back to the previous menu 15 Used for changing the settings or for moving the cursor up down left right 16 PTZ Used for PTZ camera contro 17 FF Used for quick f...

Page 14: ...14 6 Time Setting Step 1 Click SETUP on the MENU Step 2 Click SYSTEM Step 3 TIME SETUP NOTE TIME Year Month Hour Minute Second FORMAT ASIA EURO US ...

Page 15: ...ode Follow the instructions below Step 1 Click SETUP on the MENU Step 2 Click RECORD Step 3 Click RECORD MODE to choose one of the recording modes 8 Playback Press SEARCH button on the front panel or remote controller The following message appears on the screen Choose one of the search modes TIME SEARCH EVENT SEARCH or URGENT SEARCH depending on the different circumstances ...

Reviews: