background image


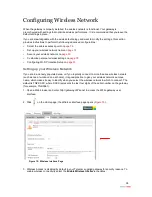
1.  The 

tab

 pane of the user interface contains the following four tabs that are arranged horizontally.   

     Clicking any of these tabs displays a page that enables you to access associated information.  

-   Home: The 

Home

 tab provides the most relevant information about your broadband service at 

a glance. It also provides links to access more detailed information.  

-   Services: The 

Services

 tab provides links to view your broadband applications status.  

-   Settings: The 

Settings

 tab provides the most comprehensive system information. Clicking this 

tab opens a page that provides sub-tabs to access other pages to configure your gateway 

and view system status.  

-   Site Map: The 

Site Map

 tab provides a textual view of the user interface. Clicking any links on 

this page takes you directly to the page of interest.  

2.  The 

Summary

 pane displays the status of each service. Except the fourth icon, gateway, you can  

     click other icons to directly access more information.  

3.  The 

Telecom Quick Links Available

 pane provides a link to a page that displays all available  

     services for subscription.  

4.  The 

Local Network Devices

 pane displays all devices that are connected to the gateway. You can   

     click the links to view the detailed information of the connected devices.  

5.  The 

Top Networking Features

 pane provides shortcuts to directly access the most commonly used   

     pages.  

6.  This 

Quick Service Links 

pane displays shortcuts to services you subscribe. You can click the  

     icons to directly access the page. 


Notes: 

The 

Telecom Quick Links Available

 pane displays service icons to which you 

subscribe. 


Summary of Contents for 2710HGV-TNZ

Page 1: ......

Page 2: ... ARISING OUT OF OR IN CONNECTION WITH THIS MANUAL THE SOFTWARE OR OTHER INFORMATION CONTAINED HEREIN OR THE USE THEREOF 2Wire Inc reserves the right to make any modification to this manual or the information contained herein at any time without notice The software described herein is governed by the terms of a separate user license agreement Updates and additions to software may require an additio...

Page 3: ...ng all Devices 26 Blocking Individual Devices 28 Customize Private Wireless Settings 30 Configuring Wi Fi Protected Setup 31 Configuring Subscribed Services Setting up Access Control 33 Configuring Content Screening 36 Assigning a Computer to a Group 36 Setting Restrictions on Groups 37 Specifying Content Categories 38 Specifying Web Sites 40 Configuring Web Remote Access 42 Accessing Your Local N...

Page 4: ...rts 70 Configuring Broadband Connection Configuring DSL and ATM Settings 74 Adjusting the Upstream Rate 76 Configuring the Connection Type 76 Configuring the PPP Authentication and Settings 77 Modifying Broadband IP 78 Adding New DNS Names 80 Changing to the Bridging Mode 82 Regulatory Information ...

Page 5: ...d changes to green within two minutes of power application Constant green indicates that power is on Red indicates that a Power On Self Test POST failure unbootable or another malfunction for example alarm has occurred Ethernet Solid green indicates that a device such as a computer is connected to an ETHERNET port Flickering green indicates that inbound activity from devices is associated with the...

Page 6: ...on in Internet access Flashing green indicates that the gateway is attempting to establish a broadband connection Flashing green and red indicate that the broadband connection has failed to establish for three consecutive minutes Red indicates that there is no DSL signal Internet Constant green indicates that the gateway has a WAN IP address from DHCP and the broadband connection is up Flashing gr...

Page 7: ...mputer connected to the gateway refer to Meeting Web Browser Requirements on page 2 This page contains six panes The following section describes each pane that is indicated by the numbered red arrow 1 2 3 6 4 5 Figure 2 2Wire Gateway User Interface Notes The Telecom Quick Links Available pane displays service icons to which you subscribe ...

Page 8: ...s a textual view of the user interface Clicking any links on this page takes you directly to the page of interest 2 The Summary pane displays the status of each service Except the fourth icon gateway you can click other icons to directly access more information 3 The Telecom Quick Links Available pane provides a link to a page that displays all available services for subscription 4 The Local Netwo...

Page 9: ...om gateway is preconfigured with a custom Administrator password When accessing any menu options that allow changes to be made to the gateways configuration you will on the first instance be presented with the following page Figure 3 Figure 3 Administration Login Page The custom password setup on the gateway is admin Enter this into the Password field and press the ENTER RETURN key or click on the...

Page 10: ...ssion to do so After setting a system password you will be required to enter it whenever you attempt to access a configuration page for example when you try to change the broadband connection settings To set up a password 1 Open a Web browser and enter http gateway 2Wire net in the address line the Home page opens Figure 4 Figure 4 2Wire Gateway Home Page ...

Page 11: ... Click System Password from the Top Networking Features pane the Administration Password page opens Figure 6 Figure 5 Settings Page Note The above page is for reference only and is not fully displayed here 3 Click Password the Administration Password page opens Figure 6 Figure 6 Administration Password Page ...

Page 12: ...fault system password is printed on the gateway back cover Figure 7 Location of Default Password 6 Enter the current password admin into the Enter Current Password field 7 Enter the new password in the Enter New Password field Note The password is case sensitive and can contain a maximum of 31 alpha numeric characters with no spaces 8 Confirm the new password in the Confirm New Password field Note...

Page 13: ...ves date and time information in Greenwich Mean Time GMT Your local time is set using the Time Zone setting you configured when you set up your system To change your time zone settings 1 Open a Web browser and enter http gateway 2Wire net in the address line the Home page opens Figure 8 Figure 8 2Wire Gateway Home Page ...

Page 14: ...e 9 Figure 9 Settings Page Note The above page is for reference only and is not fully displayed here 3 Click Date Time a page similar to the following opens Figure 10 Figure 10 Current Time Settings Page 4 Select the appropriate time zone from the Time Zone drop down list 5 Click Save ...

Page 15: ...ly change the date and time settings 1 Open a Web browser and enter http gateway 2Wire net in the address line the Home page opens 2 Click Settings the Settings page opens displaying the system information Figure 11 Figure 11 Settings Page Note The above page is for reference only and is not fully displayed here 3 Click Date Time a page similar to the following opens Figure 12 Figure 12 Current Ti...

Page 16: ...g up event notifications enables you to be notified if various service conditions or events occurred You will be redirected to a Web browser where you are notified of the service conditions and provided possible solutions to correct the conditions To receive event notification 1 Open a Web browser and enter http gateway 2Wire net in the address line the Home page opens 2 Click Settings the Setting...

Page 17: ...17 3 Click Event Notifications the following page opens Figure 14 Figure 14 Service Notification and Repair Wizard Page 4 Select the events you want to be notified 5 Click Save ...

Page 18: ... on page 31 Setting up your Wireless Network If you are in a densely populated area or if you regularly connect to more than one wireless network such as one at work and one at home it is good practice to give your wireless network a unique name which makes it easy to identify when you select the wireless network to which to connect The default is TNZ XXXX where XXXX represents the last four digit...

Page 19: ...hat your SSID is visible to anyone who is scanning for a network to which to connect Deselect the Enable checkbox to help secure your wireless network by not announcing its presence Note If you add a PC or device later the wireless client will be unable to scan and connect to your wireless network when the SSID broadcast is disabled You will need to manually add a wireless profile in the client de...

Page 20: ...nd lead to theft of service or loss of bandwidth Using the Encryption Key It is good practice to customize an encryption key for wireless communication When it is defined each wireless client needs to have that encryption key to connect to your wireless network Note Telecom Gateways use the default encryption key option when wireless networking is enabled 1 Open a Web browser and enter http gatewa...

Page 21: ...Pre Shared Key WPA PSK with the same encryption key WPA PSK and WPA2 PSK Default Setting More secure than WPA PSK this setting allows a wireless client to use either WPA PSK or WPA2 PSK to access your network An encryption key must be configured on the AP and the same key must be entered on the wireless client WPA2 PSK This setting requires that wireless clients use only WPA2 PSK to access your ne...

Page 22: ...d all discovered devices are allowed Be default the MAC filtering is disabled that is allowing all devices This section provides instructions to allow all devices To allow individual devices refer to Allowing Individual Devices Note This method is less secure than using the encryption key To disable MAC address filtering to allow all devices 1 Open a Web browser and enter http gateway 2Wire net to...

Page 23: ...To enter the address automatically click Rescan For Devices the MAC addresses of the allowed devices populated in the Allowed Devices pane as shown below To enter the address manually enter the MAC address in its field using this format for example 00 1B 5B 90 F4 80 then click Add to List The address you entered appears in the Allowed Devices pane 6 Click Save Figure 17 Wireless MAC Filtering page...

Page 24: ...http gateway 2Wire net to access the gateway user interface 2 Click on the Home page the Wireless Access Point List and Unique Settings page opens 3 Scroll down to the MAC Filtering pane 4 Click Edit Blocked Allowed Device List the Wireless MAC Filtering page opens Figure 18 Figure 18 Wireless MAC Filtering page Note Make sure that the Enable checkbox is selected otherwise the device will not be a...

Page 25: ...Click the list s you selected appears in the Blocked Devices pane as shown below 7 Click Save Blocking Devices with MAC Address Filtering The MAC address is a factory programmed address assigned to each hardware device By default the gateway uses its built in hardware address When enabled the wireless connection is blocked to the MAC address listed in the Allowed Devices pane Using the MAC address...

Page 26: ...ng to block all devices 1 Open a Web browser and enter http gateway 2Wire net to access the gateway user interface 2 Click on the Home page the Wireless Access Point List and Unique Settings page opens 3 Scroll down to the MAC Filtering pane 4 Click Edit Blocked Allowed Device List the Wireless MAC Filtering page opens Figure 19 Figure 19 Wireless MAC Filtering page ...

Page 27: ...ed Devices pane now appear on the Blocked Devices pane Figure 20 For example Note Make sure to click Save to keep the transaction persistent otherwise the transaction is only a one time event Figure 20 Wireless MAC Filtering Page with MAC Addresses Displayed 7 Optionally select the devices from the Blocked Devices pane click Delete to remove them from the pane ...

Page 28: ...vidual devices 1 Open a Web browser and enter http gateway 2Wire net to access the gateway user interface 2 Click on the Home page the Wireless Access Point List and Unique Settings page opens 3 Scroll down to the MAC Filtering pane 4 Click Edit Blocked Allowed Device List the Wireless MAC Filtering page opens Figure 21 Figure 21 Wireless MAC Filtering page ...

Page 29: ...ansaction persistent otherwise the transaction is only a one time event 7 Select the device you want to block from the Allowed Devices pane Note To select multiple addresses hold down the Shift or Ctrl keys while making your selections Using the Shift key lets you make your selections in a contiguous order while the Ctrl key selects the groups in a random order 8 Click the list s you selected appe...

Page 30: ...anced Settings pane Figure 22 Figure 22 Wireless Advanced Settings Page 4 Select a power setting from its drop down list 5 Select a wireless mode from its drop down list 6 Enter a value in the range from 1 to 3 seconds in the DTIM Period field The default is 1 This Delivery Traffic Indication Message DTIM value determines the interval at which the access point sends its broadcast traffic 7 Select ...

Page 31: ... AP the gateway issues and revokes credentials to a network The gateway provides a push button on the front panel Figure 23 to enable the synchronization between the AP and the client analogous to the pairing of the garage door opener and remote control Note For the WPS to work the wireless client device must support the WPS function The installation and configuration vary among the device manufac...

Page 32: ...t see or have access to these links This section provides instructions to Set up Access control on page 33 Configure Content screening on page 36 Configure Web remote access on page 42 Access local network with Web remote access on page 44 Access local computer files from a remote location on page 46 ...

Page 33: ...not subscribed to the service To configure time of day access 1 Open a Web browser and enter http gateway 2Wire net to access the gateway user interface 2 Click on the Quick Service Links page the Access Control Summary page opens 3 Click on Time Schedule Or Click Services Select Access Control The Access Control page opens displaying a list of connected devices and any access restrictions for eac...

Page 34: ...allow on the device If you select Full access click Save If you select Based on allowed time schedule continue with the next step Note By default the device is set to Full Access 7 Click to select the type of access that you allow and the days and time you want to restrict from the corresponding drop down lists Note You can block two different schedules for each access category ...

Page 35: ...lick Summary the Access Control page opens displaying the current configuration Figure 26 for example Figure 26 Access Control Page Note To change restricted access to full access select Full access and click Save You do not need to deselect the access type or days and time ...

Page 36: ...s Assign a computer to a group on page 33 Set restrictions on groups on page 34 Specify Web sites on page 37 Assigning a Computer to a Group To assign a computer to a group 1 Open a Web browser and enter http gateway 2Wire net to access the gateway user interface 2 Click on the Quick Service Links page Or Click Services Select Access Control The Access Control page opens displaying a list of conne...

Page 37: ...ither the Level 1 or Level 2 group 5 Click Save a message appears informing you the configuration status Setting Restrictions on Groups There are two ways to restrict the type of programs each group can access by category or by Web sites Specifying Web sites override the content category settings ...

Page 38: ...ck content categories 1 Open a Web browser and enter http gateway 2Wire net to access the gateway user interface 2 Click on the Quick Service Links page Or Click Services Select Access Control The Access Control page opens displaying a list of connected devices and any access restrictions for each device Figure 29 Figure 29 Access Control Page 3 Click Content Screening the Content Screening page o...

Page 39: ...9 4 Scroll down to the Customize Content Screening Groups pane Figure 30 Figure 30 Customize Content Screening Groups Pane 5 Select or deselect the checkbox to block or unblock the category 6 Click Save ...

Page 40: ...er interface 2 Click on the Quick Service Links page Or Click Services Select Access Control The Access Control page opens displaying a list of connected devices and any access restrictions for each device Figure 31 Figure 31 Access Control Page 3 Click Content Screening the Content Screening page opens ...

Page 41: ...e in the Site URL field for the intended group for example Yahoo com 6 Select the intended access type Block or Allow 7 Click Add to List a message appears informing you the configuration status The Web site you entered appears under the corresponding list for example 8 Click Enable Blocked List to block or Enable Allowed List to allow access to all sites on the list ...

Page 42: ...shared files on PCs manage services view cameras or remotely administer your system from anywhere To set up remote access 1 Open a Web browser and enter http gateway 2Wire net to access the gateway user interface 2 Click on the Quick Service Links page Or Click Services Select Remote Access The Remote Access page opens Figure 33 Figure 33 Remote Access Page ...

Page 43: ...nter new password field Note You will need to enter this password when you access your system remotely 7 Confirm your password in the corresponding field 8 Select the Enhanced login protection checkbox to prevent repeated guessing of the Web Remote Access password Note It is recommended to leave the added security value as enabled the default value 9 Select from the corresponding drop down lists t...

Page 44: ...using a personal domain name through your ISP free Dynamic DNS provider you can access your Network by entering the IP address currently assigned to you by your ISP If you receive a website security certificate error click on Continue to this website Figure 34 Figure 34 Internet Explorer Security certificate error The Welcome to the Remote Access Center page opens Figure 35 Figure 35 Welcome to th...

Page 45: ...e prompted with this message click Yes to proceed to the Remote Access Center To gain access to your home network 2 Enter the Web Remote Access password you chose during application set up click SUBMIT the Web Remote Access Center page opens Figure 36 Figure 36 Web Remote Access Center Click on 2701HGV W Gateway to access the modem interface menu where you can make any changes to the configuration...

Page 46: ...on the 2Wire gateway home page 1 Click the computer name link for example windows xp next to the small computer icon to access your local computer files from the Remote Access Center the 2Wire user log in page opens Figure 37 Figure 37 User Log in Page Note Only computers with Windows file sharing enabled will appear on the list To refresh the list of computers click REFRESH LIST 2 Click on Guest ...

Page 47: ...e browser Save function to save the file to your computer hard disk before accessing it For Internet Explorer users this is done by right clicking the file link and choosing the Save As option When you signed in as guest user you may receive a message indicating that you do not have permission to perform the requested action This message originates at the home computer not from Web Remote Access I...

Page 48: ...48 Ending Your Remote Access Session To end your Remote Access session return to the Remote Access Center page and click End Session ...

Page 49: ... section provides instructions to Host an application on your network to allow users access on page 50 Removing Hosted Applications on page 53 Define an application profile on page 55 Add multiple definitions to a profile on page 58 Allow all applications DMZplus on page 59 Stop DMZplus on page 61 Note For the WPS to work the wireless client device must support the WPS function The installation an...

Page 50: ...connected with your gateway If you cannot find a listing for your application you can define an application with the protocol and port information refer to Defining a New Application Profile on page 54 To host an application 1 Open a Web browser and enter http gateway 2Wire net to access the gateway user interface 2 Click on the Home page the Firewall Status page opens Figure 40 Figure 40 2Wire Ga...

Page 51: ...lect Applications Pinholes and DMZ a page similar to the following opens showing the computers that are connected to the gateway and the application list Figure 41 Figure 41 Applications Pinholes and DMZ Page ...

Page 52: ...oose 5 Select the hosting computer if you do not see the pinhole you want to remove in the list 6 Scroll to the Edit firewall settings for this computer pane Figure 41 7 Select from the Application List panel the application s you want to host Note To select multiple applications hold down the Shift or Ctrl keys while making your selections Using the Shift key lets you make your selections in a co...

Page 53: ...en a Web browser and enter http gateway 2Wire net to access the gateway user interface 2 Click on the Home page the Firewall Status page opens displaying the current hosted application settings Figure 42 Figure 42 2Wire Gateway Home Page ...

Page 54: ...o view all port forwarding rules for the selected PC 7 Select the application s you want to remove from the Hosted Applications panel click Remove Note To select multiple applications hold down the Shift or Ctrl keys while making your selections Using the Shift key lets you make your selections in a contiguous order while the Ctrl key selects the groups in a random order 8 Click Save a message app...

Page 55: ... given computer is new or has been recently updated to a new version To add a new application profile 1 Open a Web browser and enter http gateway 2Wire net to access the gateway user interface 2 Click on the Home page the Firewall Status page opens displaying the current hosted application settings Figure 42 3 Select Applications Pinholes and DMZ a page opens showing hosted applications 4 Scroll d...

Page 56: ...ck returns to the Allow device application traffic to pass through firewall page 7 Create a definition for your application that is to be allowed through the firewall In the Protocol field select the TCP or UDP radio button If the application you are adding requires both you need to create a separate definition for each In the Port or Range field enter the port or port range the application uses F...

Page 57: ...mputer For example if you set the value to 4000 and the port range being opened is 100 to 108 the forwarded data to the first value in the range will be sent to 4000 Subsequent ports will be mapped accordingly 101 will be sent to 4001 102 will be sent to 4002 and so forth From the Application Type drop down list select the application type If you do not know the application type select nothing 8 C...

Page 58: ... adding all ports to your Application profile click on Back to return to Applications Pinholes and DMZ where you can select the new profile Notes You can edit an existing profile if you require additional ports to be opened but the profile cannot be edited while it is active eg already in use and visible in the Hosted Applications field Remove using steps in Removing Hosted Applications before edi...

Page 59: ...n receive unsolicited network traffic from the Internet Caution Use the DMZplus mode with caution A computer in the DMZplus mode is less secure because all available ports are open and all incoming Internet traffic is directed to this computer 1 Open a Web browser and enter http gateway 2Wire net to access the gateway user interface 2 Click on the Home page the Firewall Status page opens 3 Select ...

Page 60: ...60 Figure 48 Applications Pinholes and DMZ Page 4 Select the computer that you want to allow all applications 5 Select Allow all applications DMZplus mode 6 Click Save ...

Page 61: ...s it receives a special IP address from the system and all unassigned TCP and UDP ports are forwarded to it Stopping DMZplus 1 Open a Web browser and enter http gateway 2Wire net to access the gateway user interface 2 Click on the Home page the Firewall Status page opens 3 Select Applications Pinholes and DMZ a page opens showing hosted applications Figure 48 ...

Page 62: ... section provides instructions to Configuring DHCP on page 63 Allocating IP addresses on page 66 Configuring Ethernet ports on page 70 Note Configure these settings only if you are very familiar with computer networking technologies ...

Page 63: ...you cannot modify the related DHCP settings The gateway is a DHCP server to your local network devices such as the computers connecting to it Note If you change the local network IP address range you must renew the DHCP lease on all devices on the gateway s local network and manually reconfigure all devices configured with static IP addresses To configure the default DHCP information used as a loc...

Page 64: ...em Information page opens Figure 50 Figure 50 Settings Page 3 Click LAN a page similar to the following opens displaying the private network information and LAN devices connected to your network Figure 51 Figure 51 LAN Status Page ...

Page 65: ...65 4 Click Private Network the DHCP Configuration page opens Figure 52 Figure 52 DHCP Configuration Page 5 Select Configure manually if you want to set up a range for the DHCP address IP pool ...

Page 66: ...ddress pool that is assigned via DHCP on the local area network Note Change to the Public IP address only when used in conjunction with DMZplus or secondary subnet functionality that allows you to have public IP addresses routed through the device 9 Click Save Allocating IP Addresses You can allocate specific IP addresses to devices that are running in the DHCP mode and map devices to particular s...

Page 67: ...rowser and enter http gateway 2Wire net in the address line the Home page opens Figure 53 Figure 53 2Wire Gateway Home Page 2 Click Settings the System Information page opens Figure 54 Figure 54 System Information Page ...

Page 68: ...ivate network information and LAN devices connected to your network Figure 55 Figure 55 LAN Status Page 4 Click IP Address Allocation a page similar to the following opens displaying the devices in your network Figure 56 Figure 56 NAT Mapping and Device IP Allocation page ...

Page 69: ...verride the default DHCP settings Select the address or address pool from which you want to select an IP address from the WAN IP Mapping drop down list Select the specific address or address type to assign from the Address Assignment drop down list 6 Click Save ...

Page 70: ... 100 Mbits 100BASE T network devices on the same interface port adjusting their speed automatically You can change to a different mode When you have a device that requires a unique setting To configure Ethernet port settings 1 Open a Web browser and enter http gateway 2Wire net in the address line the Home page opens Figure 57 Figure 57 2Wire Gateway Home Page ...

Page 71: ...formation page opens Figure 58 Figure 58 System Information Page 3 Click LAN a page similar to the following opens displaying the private network information and LAN devices connected to your network Figure 59 Figure 59 LAN Status Page ...

Page 72: ... Switch Page 5 Select the Ethernet Networking checkbox to enable the switch setting 6 Select one of the following values from the drop down lists to the match the intended Ethernet port Auto detect 100BaseTX Full Duplex 100BaseTX Auto 10BaseT UDP Full Duplex 10BaseT UDP Auto 7 Click Save ...

Page 73: ...etwork Circuit identifier VPI VCI 0 100 Encapsulation method Routed VC Mux Connection Type PPPoA PPP username Default user xtrabb co nz PPP password anything you like with 6 or more characters WARNING Modifying the gateway broadband configuration settings may impede or interrupt your broadband service Modify these settings only if you are thoroughly familiar with networking technology This section...

Page 74: ...igure this setting is provided by your service provider To configure DSL or ATM settings 1 Open a Web browser and access the gateway user interface by entering http gateway 2wire net 2 Click the Summary Status page opens Figure 61 Figure 61 Broadband Summary Status Page ...

Page 75: ...r Line 2 outer pair 5 Enter the VPI and VCI you want the gateway to use in connecting to the ISP VPI VCI 6 Select the encapsulation method from the ATM Encapsulation drop down list Bridged LLC Bridged VC Mux Routed LLC Routed VC Mux 7 Select either Enabled or Disabled checkbox In the ATM PVC Search field 8 Select the DSL standard from its corresponding drop down list Auto ADSL1 ADSL2 ADSL2 9 Click...

Page 76: ... Traffic Shaping checkbox 2 Enter the upstream rate at which you want the gateway to connect in the New Upstream Rate field 3 Click Save Configuring the Connection Type The connection type identifies the method by which the gateway connects to the ISP To configure the connection type 1 Open a Web browser and access the gateway user interface by entering http gateway 2wire net 2 Click the Summary S...

Page 77: ...tinue with the Configuring the PPP Authentication and Settings section to set up your username and password 6 Click Save Configuring the PPP Authentication and Settings The PPPoE or PPPoA connection type requires authentication to be connected To configure the PPP authentication settings 1 Open a Web browser and access the gateway user interface by entering http gateway 2wire net 2 Click the Summa...

Page 78: ...emain active in the PPP on Demand field Setting the value to 0 indicates that the PPP session will remain on all the time Setting the value between 1 to 10080 minutes the PPP session will time out accordingly if the gateway does not detect outbound traffic destined for the Internet in the specified time 9 Click Save Modifying Broadband IP Note This feature is NOT currently supported on the Telecom...

Page 79: ...ane Figure 66 Figure 66 Broadband IP Network Pane 5 Click the Manually specify IP address settings radio button 6 Enter the following information In the IP Address field enter the IP address you want the gateway to use In the Subnet Mask field enter the subnet mask you want the gateway to use In the Default Gateway field enter the default gateway address you want the gateway to use 7 Click Save ...

Page 80: ...ttings 1 Open a Web browser and access the gateway user interface by entering http gateway 2wire net 2 Click the Summary Status page opens Figure 67 Figure 67 Broadband Summary Status Page 3 Click Link Configuration the Link Configuration page opens 4 Scroll down to the Broadband IP Network pane Figure 68 Figure 68 Broadband IP Network ...

Page 81: ...er the specific domain name to be used by the gateway 7 Click Save Note Skip the following steps if you do not want to add the new DNS information to the resolution table at this time 8 Add the new DNS information by clicking the DNS Resolution tab on the Link Configuration page the Domain Name Server Resolution page opens Figure 69 Figure 69 Domain Name Server Resolution Page 9 Enter the name of ...

Page 82: ...re also disabled To change the 2Wire gateway to the bridging mode 1 Open a Web browser and access the gateway user interface by entering http gateway 2wire net 2 Click the Summary Status page opens Figure 70 Figure 70 Broadband Summary Status Page 3 Click Link Configuration the Link Configuration page opens 4 Scroll down to the Routing pane Figure 71 Figure 71 Broadband Routing Pane 5 Deselect the...

Page 83: ...ur outlet or adapter is properly grounded you should consult a licensed electrician CAUTION Due to risk of electrical shock or terminal damage do not use the terminal near water including a bathtub wash bowl kitchen sink or laundry tub in a wet basement or near a swimming pool Also avoid using this product during electrical storms Avoid locations near electrical appliances or other devices that ca...

Page 84: ...equested this information may be provided to the telephone company The REN is used to determine the quantity of devices that may be connected to the telephone line Excessive RENs on the telephone line may result in the device not ringing in response to an incoming call In most but not all areas the sum of the RENs should not exceed five 5 0 L indice d équivalence de la sonnerie IES sert à indiquer...

Page 85: ... must be maintained between the radiating antenna inside the Equipment Under Test EUT and the bodies of all persons exposed to the transmitter in order to meet the FCC RF exposure guidelines Making changes to the antenna or the device is not permitted Doing so may result in the installed system exceeding RF exposure requirements This device must not be co located or operated in conjunction with an...

Page 86: ......

Reviews: