background image

Release 1.0

i

NID 

User Guide

Summary of Contents for i38HG

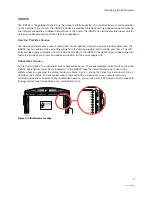
Page 1: ...Release 1 0 iNID User Guide ...

Page 2: ... ARISING OUT OF OR IN CONNECTION WITH THIS MANUAL THE SOFTWARE OR OTHER INFORMATION CONTAINED HEREIN OR THE USE THEREOF 2Wire Inc reserves the right to make any modification to this manual or the information contained herein at any time without notice The software described herein is governed by the terms of a separate user license agreement Updates and additions to software may require an additio...

Page 3: ...Configuring Local Date and Time 21 Configuring Wireless Network Selecting the Wireless Access Point 24 Setting up the Wireless Network Name 25 Securing your Wireless Network 26 Using the Encryption Key 26 Allowing Devices with MAC Address Filtering 28 Allowing all Devices 28 Allowing Individual Devices 30 Blocking Devices with MAC Address Filtering 31 Blocking all Devices 32 Blocking Individual De...

Page 4: ... Configuring DHCP 72 Allocating IP Addresses 75 Finding Solutions Viewing Statistics 84 Viewing the Wireless AP Statistics 86 Viewing the HPNA Coax Statistics 86 Viewing the HPNA Phone LIne Statistics 87 Viewing Individual DSL and Aggregate Bandwidth 88 Viewing the VoIP Service Status 89 Viewing Logs 91 Viewing Events Logs 91 Viewing System Logs 93 Viewing Firewall Logs 96 Viewing Upgrade Logs 98 ...

Page 5: ...ice 2Wire high powered wireless technology virtually eliminates wireless coldspots in the home The i38HG high power 400mW transmitter ensures that you benefit from increased wireless bandwidth throughout the coverage area In addition the i38HG employs a special triple antenna design The third antenna is used only for transmitting packets thus mitigating the power loss associated with switching the...

Page 6: ...s that inbound activity from devices is associated with the Ethernet port The flickering of the light is synchronized to the actual data traffic WIRELESS Solid green indicates that there is wireless activity associated to a specific access point Flickering green indicates that there is inbound activity The flickering of the light is synchronized to the actual data traffic LINE 1 and LINE 2 Solid g...

Page 7: ...ce the backup battery Figure 2 shows the location of the two indicators and two buttons on the power supply unit Table 2 lists and describes their functions Figure 2 iPSU Indicators and Buttons Location BROADBAND This indicator shows the i3802V VDSL status Constant green indicates successful broadband connection and no interruption in Internet access Flashing green indicates that the i3802 is atte...

Page 8: ...ning on AC power Off indicates that the power supply is not receiving power from either AC or the battery Flashing red indicates that the power is provided by the backup battery or that the outside unit is not yet communicating with the iPSU SILENCE ALARM Button The SILENCE ALARM button is located between POWER and BATTERY indicators If AC power is interrupted for any reasons a continuous tone ind...

Page 9: ...e service provider to the i3802V The right entry provides wiring that feeds the inside of your home and power connection for the power supply unit Subscriber Access As the name implies the subscriber area is accessible by you This panel displays indicators that show the i3802V operational status Some indicators on the i3802V have the same functions as those on the i38HG where you can view the stat...

Page 10: ...broadband connection is successfully established Flashing red indicates that there is no DSL signal on the line Note The BROADBAND indicator on the i38HG mirrors one or both of the VDSL indicators whichever is in the best state DATA Solid green indicates that an IU i38HG is connected via HPNA Flashing green indicates that the iNID is attempting IEEE 802 1b g authentication or attempting to obtain ...

Page 11: ...kering of the light is synchronized to the actual data traffic BATTERY Solid green indicates that the AC power is connected and healthy Flashing red indicates that the backup battery is used for power Note Call your service provider if any i3802V indicators signify failures Do not attempt to repair the i3802V as the unit must be serviced by your provider Table 3 i3802V Outside Unit Indicators Stat...

Page 12: ...iNID User Guide 8 ...

Page 13: ...rmation on these topics Determine a wireless location on page 10 Connect the data cable on page 11 Connect the power cable on page 12 Connect your computer to the i38HG on page 12 Configure non 2Wire wireless adapter on page 12 Note The i38HG and the stand are packaged separately in the container You should place the i38HG on the stand i38HG Data Cable Power Adapter Ethernet Cable NID ETHERNET WIR...

Page 14: ...cing your i38HG In a single story building place the i38HG as high and as close to each wireless computer as possible To minimize interference do not place the i38HG behind large objects or other obstructions Place the i38HG in an open area where wireless range will not be directly affected by surroundings Wireless signal strength will be much stronger in an open area as opposed to an area with ob...

Page 15: ...e 1 outlet Figure 5 2 Connect the other end of the data cable to the DATA port green of your i38HG 3 Observe NID BROADBAND and SERVICE indicators they light green when the communication is established between the i38HG and i3802V within 1 minute Note Refer to the Finding Solutions section if the indicator does not stay green DATA POWER RESET LOCAL ETHERNET i38HG AC Power Primary Main Phone Wall Ou...

Page 16: ... Ethernet Ports You can directly connect up to four computers to the i38HG using the Ethernet connection Connect one end of the Ethernet cable yellow to any available ETHERNET port yellow on the i38HG and the other end to the computer s Ethernet port Figure 6 You are now ready to start your system refer to the Setting up System Information section Figure 6 Ethernet Connection Note For safety reaso...

Page 17: ... internal card you can install an external wireless adapter for wireless networking The 2Wire wireless adapter provides a 2Wire Setup Wizard that automatically configures it to communicate with the i38HG during setup If you are using a non 2Wire wireless adapter you must manually configure it to communicate with the i38HG Refer to the Configuring non 2Wire Wireless Adapters section to install a wi...

Page 18: ...19627022 Note For Mac OS X users you may need to enter the character at the beginning of the encryption key for example 4119627022 SN 543811999110 4119627022 4200 000XXX 000 i38HG Made in USA Patent Pending DC 5 1V 2A 2Wire Gateway www 2W ire com Complies with 47 CFR Part 68 US 6KRDL01BiNIDI FCC ID PGR2Wi38HG T ested T o Comply With FCC Standards F L X 239068 SN XXXXXXXXXX XX XXXXXXXXXX 4200 000X ...

Page 19: ...ace it is a good idea to set up the basic system information such as password date and time and so forth This section provides instructions to change the following information Password on page 18 Date and time page 21 Meeting Web Browser Requirements Microsoft Internet Explorer 6 0 or higher Firefox 1 5 or higher Safari 2 0 ...

Page 20: ... 2Wire net as the URL into a compatible browser on a computer connected to the i38HG or i3802V refer to Meeting Web Browser Requirements on page 15 This page contains 5 panes The following section describes each pane that is indicated by the numbered red arrow Figure 8 i3802V User Interface 1 2 3 4 5 ...

Page 21: ...p tab provides a textual view of the user interface Clicking any links on this page takes you directly to the page of interest 2 The Summary pane displays the status of each service Except the fourth icon i3802V you can click other icons to directly access more information 3 This pane displays the backup battery status You can click Battery Info to directly access the page 4 The Home Network Devic...

Page 22: ...ing a system password protects your i3802V settings from being modified or changed by someone who has not been given permission to do so After setting a system password you will be required to enter it whenever you attempt to access a configuration page for example when you try to change the broadband connection settings To set up a password 1 Enter http gateway 2Wire net as the URL the Home page ...

Page 23: ...on 19 2 Click Settings or System Password from the Top Networking Features pane the Settings page opens displaying the system information and more sub tabs Note The above page is for reference only and is not fully displayed here ...

Page 24: ... opens 4 Select the password option When Use Default System password is selected no further action is required go to Step 7 When Create or Edit a Custom Password is selected continue with the next step Note The default system password is printed on the iPSU front cover ...

Page 25: ...System Information page Configuring Local Date and Time You do not need to adjust the local date and time as they are set nightly by the service provider Note The password is case sensitive and can contain a maximum of 31 alpha numeric characters with no spaces Note Although it is optional it is strongly recommended that you enter a password hint to remind you if you forget your password ...

Page 26: ...iNID User Guide 22 ...

Page 27: ... default settings in place If you are knowledgeable with the wireless technology and want to modify the settings this section provides instructions to perform the following advanced configurations Select the wireless access point on page 24 Set up your wireless network name on page 25 Secure your wireless network on page 26 Customize personal wireless settings on page 36 Configuring Wi Fi Protecti...

Page 28: ...ings are synchronized across the managed APs to create a single wireless network for easier device connectivity To select the access point 1 Open a Web browser and enter http gateway 2Wire net to access the 2Wire i3802V user interface 2 Click on the Home page the Wireless Access Point List and Unique Settings page opens Figure 9 Wireless Access Point List and Unique Settings Page If you have multi...

Page 29: ...r interface 2 Click on the Home page the Wireless Access Point List and Unique Settings page opens Figure 9 3 Enter a name assigned to your wireless network in the Network Name SSID field This name appears next to on the Home page 4 Enable or disable the broadcast of the SSID over the wireless network by selecting or deselecting the checkbox Enabled is the default setting which means that your SSI...

Page 30: ...o your wireless network 1 Open a Web browser and enter http gateway 2Wire net to access the 2Wire i3802V user interface 2 Click on the Home page the Wireless Access Point List and Unique Settings page opens Figure 9 3 Scroll down to the Security pane Caution Wireless Security is enabled by default Do not disable the security authentication and security features they protect your private data trans...

Page 31: ...ing requires that an encryption key to be set on the AP and that the wireless client be configured to use Wi Fi Protected Access Pre Shared Key WPA PSK with the same encryption key WPA PSK and WPA2 PSK This is the default setting More secure than WPA PSK this setting allows a wireless client to use either WPA PSK or WPA2 PSK to access your network An encryption key must be configured on the AP and...

Page 32: ...d Be default the MAC filtering is disabled that is allowing all devices This section provides instructions to allow all devices To allow individual devices refer to Allowing Individual Devices To disable MAC address filtering to allow all devices 1 Open a Web browser and enter http gateway 2Wire net to access the 2Wire i3802V user interface 2 Click on the Home page the Wireless Access Point List a...

Page 33: ... addresses of the allowed devices populated in the Allowed Devices pane as shown below To enter the address manually enter the MAC address in its field using this format for example 00 1B 5B 90 F4 80 then click Add to List The address you entered appears in the Allowed Devices pane 6 Click Save Note Make sure that the Enable checkbox is not selected ...

Page 34: ...wing all Devices To allow individual devices 1 Open a Web browser and enter http gateway 2Wire net to access the 2Wire i3802V user interface 2 Click on the Home page the Wireless Access Point List and Unique Settings page opens 3 Scroll down to the MAC Filtering pane 4 Click Edit Blocked Allowed Device List the Wireless MAC Filtering page opens ...

Page 35: ...in hardware address When enabled the wireless connection is blocked to the MAC address listed in the Allowed Devices pane Using the MAC address filtering feature enables you to block wireless connection to all devices or an individual device Note Make sure that the Enable checkbox is selected otherwise the device will not be allowed Note To select multiple addresses hold down the Shift or Ctrl key...

Page 36: ...Devices To enable MAC filtering to block all devices 1 Open a Web browser and enter http gateway 2Wire net to access the 2Wire i3802V user interface 2 Click on the Home page the Wireless Access Point List and Unique Settings page opens 3 Scroll down to the MAC Filtering pane 4 Click Edit Blocked Allowed Device List the Wireless MAC Filtering page opens ...

Page 37: ...nfiguration is changed The MAC addresses on the Allowed Devices pane now appear on the Blocked Devices pane For example 7 Optionally select the devices from the Blocked Devices pane click Delete to remove them from the pane Note Make sure to click Save to keep the transaction persistent otherwise the transaction is only a one time event ...

Page 38: ...king all Devices To block individual devices 1 Open a Web browser and enter http gateway 2Wire net to access the 2Wire i3802V user interface 2 Click on the Home page the Wireless Access Point List and Unique Settings page opens 3 Scroll down to the MAC Filtering pane 4 Click Edit Blocked Allowed Device List the Wireless MAC Filtering page opens ...

Page 39: ... to block from the Allowed Devices pane 8 Click the list s you selected appears in the Blocked Devices pane as shown below 9 Click Save Note Make sure to click Save to keep the transaction persistent otherwise the transaction is only a one time event Note To select multiple addresses hold down the Shift or Ctrl keys while making your selections Using the Shift key lets you make your selections in ...

Page 40: ...a wireless mode from its drop down list 2 Enter a value in the range from 1 to 3 seconds in the DTIM Period field The default is 1 This Delivery Traffic Indication Message DTIM value determines the interval at which the access point sends its broadcast traffic 3 Select the maximum rate at which your wireless connection works For 802 11b g based models select 1 2 5 5 6 9 11 12 18 24 36 48 or 54 Mbp...

Page 41: ...kes credentials to a network The i38HG provides a push button on the front panel Figure 10 to enable the synchronization between the AP and the client analogous to the pairing of the garage door opener and remote control Figure 10 WPS Location Note For the WPS to work the wireless client device must support the WPS function The installation and configuration vary among the device manufacturers ref...

Page 42: ...iNID User Guide 38 ...

Page 43: ...st an application on your network to allow users access on page 40 Remove an application on your network to block users access on page 40 Define an application profile on page 43 Add multiple definitions to a profile on page 47 Delete a user defined application profile on page 50 Allow all applications DMZplus on page 52 Stop DMZplus on page 54 Customize firewall settings on page 55 Caution You sh...

Page 44: ...plication s with a computer connected with your i3802V If you cannot find a listing for your application you can define an application with the protocol and port information refer to Defining a New Application Profile on page 43 To host an application 1 Open a Web browser and enter http gateway 2Wire net to access the 2Wire i3802V user interface 2 Click on the Home page the Firewall Status page op...

Page 45: ...Configuring Firewall 41 3 Select Applications Pinholes and DMZ a page similar to the following opens showing the computers that are connected to the i38HG i3802V and the application list ...

Page 46: ...ser and enter http gateway 2Wire net to access the 2Wire i3802V user interface 2 Click on the Home page the Firewall Status page opens displaying the current hosted application settings Note If the computer you want to select is unlisted because it is powered off and the hide inactive devices option is enabled you still can select it as long as it is on the same network and you know its IP address...

Page 47: ...ications panel and returned to the Application List panel Defining a New Application Profile An application profile configures your system s firewall to pass through application specific data You can define an application profile that is not included in the Application List This feature is typically used if the application for which you would like to pass through data to a given computer is new or...

Page 48: ...3802V user interface 2 Click on the Home page the Firewall Status page opens 3 Select Applications Pinholes and DMZ a page opens showing the computers that are connected to your i38HG i3802V and the application list 4 Scroll down and click Add a new user defined application the Firewall Application Profile Definition page opens ...

Page 49: ...ues 8400 seconds for the TCP protocol 600 seconds for the UDP protocol In the Map to Host Port field enter a value that maps the port range you established in the Port field to the local computer For example if you set the value to 4000 and the port range being opened is 100 to 108 the forwarded data to the first value in the range will be sent to 4000 Subsequent ports will be mapped accordingly 1...

Page 50: ...iNID User Guide 46 7 Click Add to List a message appears informing you of the status and the information appears in the Definition List pane For example ...

Page 51: ... when it has not been added to the hosted application list If the profile is added to the hosted application list and you want to modify it you need to first remove it from the Hosted Applications panel 1 Open a Web browser and enter http gateway 2Wire net to access the 2Wire i3802V user interface 2 Click on the Home page the Firewall Status page opens 3 Select Applications Pinholes and DMZ a page...

Page 52: ...48 4 Scroll to the Edit firewall settings for this computer pane 5 Click Edit or delete user defined application a page similar to the following opens Note If you have not created any profiles the link will not appear ...

Page 53: ...rming you of the status and the information appears in the Definition List pane Note The application you created will not appear here if it has been added to the Hosted Applications Return to the previous page select the application intended for modification click Remove to return the application to the available application list Note You are prompted to enter your password if one is set up ...

Page 54: ... defined profile make sure to remove it from the Hosted Applications pane 1 Open a Web browser and enter http gateway 2Wire net to access the 2Wire i3802V user interface 2 Click on the Home page the Firewall Status page opens 3 Select Applications Pinholes and DMZ a page opens showing hosted applications ...

Page 55: ...ll 51 4 Scroll to the Edit firewall settings for this computer pane 5 Click Edit or delete user defined application a page similar to the following opens Note If you have not created any profiles the link will not appear ...

Page 56: ... user interface 2 Click on the Home page the Firewall Status page opens 3 Select Applications Pinholes and DMZ a page opens showing hosted applications Note The application you created will not appear here if it has been added to the Hosted Applications Return to the previous page select the application intended for modification click Remove to return the application to the available application l...

Page 57: ...ications DMZplus mode button Note If the computer you want to select is unlisted because it is powered off and the hide inactive devices option is enabled you still can select it as long as it is on the same network and you know its IP address Replace Enter IP address with the intended IP address then click Choose ...

Page 58: ...ss the 2Wire i3802V user interface 2 Click on the Home page the Firewall Status page opens 3 Select Applications Pinholes and DMZ a page opens showing hosted applications 4 Select the computer that you want to stop the DMZplus mode Note The above presentation shows half of the screen only Note If the computer you want to select is unlisted because it is powered off and the hide inactive devices op...

Page 59: ...he computer Customizing Firewall Configuration The i3802V comes with a set of default firewall settings that you can change to adapt to your environment You can change the timeout sessions and protocol that you want to go through the firewall 1 Open a Web browser and enter http gateway 2Wire net to access the 2Wire i3802V user interface 2 Click on the Home page the Firewall Status page opens ...

Page 60: ...iNID User Guide 56 3 Click Advanced Configuration the following page opens displaying the default settings ...

Page 61: ... Session Timeout Transmission Control Protocol TCP is a connection oriented protocol which means that a connection is established and maintained until such time as the message s to be exchanged by the application programs at each end have been exchanged The maximum timeout is 24 hours 5 Select the protocol s from the Outbound Control pane that you allow the traffic from the network to pass through...

Page 62: ...r invalid TCP flag settings and drops the packet to prevent SYN FIN NULL and XMAS attacks Invalid ICMP Detection The firewall checks for invalid ICMP code types and drops the packets Miscellaneous The firewall checks for the following and drops the packets or terminates the associated session Unknown IP protocol drop packet Port 0 attack detected drop packet TCP SYN packet drop packet Not a start ...

Page 63: ... unit The switchover between the power supply unit and the battery is automatic and instantaneous This section provides instructions to Replace the battery on page 60 Enable the audio alert on page 63 Disable the audio alert on page 65 Note Reserve the battery charge during a power outage Do not access the Internet when the power is running on the battery Doing so will discharge the battery at a m...

Page 64: ...ed to use with the iNID system Contact your service provider for battery replacement information To replace the battery 1 Use a Phillips screwdriver to unfasten two screws one on each side securing the power supply battery cover and put them in a safe place Figure 11 Figure 11 Power Supply Unit Cover Removal 2 Bring the battery cable and battery cable connector to visibility located on top of the ...

Page 65: ...e battery cable 8 Observe the BATTERY indicator on the iPSU it should light green when the i38HG and i3802V are communicating properly Note Be careful when you remove the battery it is heavy Note Be sure to place the battery inside the raised bottom edge of the case Note A faulty battery is indicated if the BATTERY indicator does not light green within 5 minutes assuming the iPSU is plugged into A...

Page 66: ...he safety strap 10 Place the housing cover over the unit and press gently on it until it snaps into place 11 Fasten the cover with the two screws you removed earlier Note If you have disabled the alert earlier make sure to enable the alert page 63 ...

Page 67: ...Working with the Power Supply Unit 63 Enabling the Alert To enable the alert 1 Enter http gateway 2Wire net as the URL the Home page opens ...

Page 68: ...iNID User Guide 64 2 Click Battery Info the Emergency Battery Backup page opens 3 Click Enable to enable the battery audible alert 4 Click Save ...

Page 69: ...he battery is exhausted and needs replacing The duration of the chirping sound is 0 2 seconds and happens once every 5 seconds You can turn off the chirping sound to disable the alert for 12 hours or permanently To disable the alert 1 Enter http gateway 2Wire net as the URL the Home page opens Caution Disable the audio alert with caution If you disabled the alert and did not replace the backup bat...

Page 70: ...66 2 Click Battery Info the Emergency Battery Backup page opens 3 Click Disable Alert for 12 hours to turn off the low battery notification or deselect the Enable checkbox to disable the alert permanently 4 Click Save ...

Page 71: ...ces There is no user configuration needed for VoIP service All server and line configuration are performed by your service provider Refer to Table 5 in the Finding Solutions section if you encounter VoIP services related issues ...

Page 72: ...iNID User Guide 68 ...

Page 73: ...nces The availability of static IP addresses is usually an additional service offered by service providers In addition changes from the default behavior of the gateway for private IP addressing may also be used by some users Configure these settings ONLY if you are very familiar with computer networking technologies This section provides instructions to set up your private network that includes Co...

Page 74: ...e is typically used in conjunction with broadband service that provides a range of available IP addresses Once enabled the public IP addresses can be assigned to local computers 1 Open a Web browser and enter http gateway 2Wire net in the address line the Home page opens 2 Click the Broadband Status page opens Note Set up your LAN publicly routed subnet first if you want to use the public address ...

Page 75: ...d by the service provider Subnet Mask Enter the subnet mask this is the router mask from the secondary subnet provided by the service provider 4 Select the Auto Firewall Open checkbox if you want to automatically disable the firewall for all devices using addresses from this subnet By default the firewall protection is enabled 5 Click Save Note You can individually enable the firewall on a per dev...

Page 76: ...t when it communicates to your service provider over the Internet using the IP address For this communication you cannot modify the related DHCP settings The i3802V is a DHCP server to your local network devices such as the i38HG and computers connecting to it To configure the default DHCP information used as a local server 1 Open a Web browser and enter http gateway 2Wire net in the address line ...

Page 77: ...2 Click Settings the System Information page opens Figure 14 Figure 14 System Information Page 3 Click LAN a page similar to the following opens displaying the private network information and LAN devices connected to your network ...

Page 78: ...he first IP address in the DHCP address pool that you will be distributing over the private network Last DHCP Address The last IP address in the DHCP address pool that you will be distributing over the private network 7 Enter a numerical value in the DHCP Lease Time field This value represents the number of hours you can use the assigned IP address before the DHCP lease expires 8 Select a public I...

Page 79: ... you can map a device to a specific public fixed IP address or to the next unassigned address from the public pool The default public IP device mapping is to the Router WAN IP address 1 Open a Web browser and enter http gateway 2Wire net in the address line the Home page opens Figure 13 Figure 16 Home Page Note Alternatively you may also statically configure public or private IP addresses on the d...

Page 80: ...ick Settings the System Information page opens Figure 14 Figure 17 System Information Page 3 Click LAN a page similar to the following opens displaying the private network information and LAN devices connected to your network ...

Page 81: ... network 5 Go to the intended device and select the following to override the default DHCP settings Select the address or address pool from which you want to select an IP address from the WAN IP Mapping drop down list Select the specific address or address type to assign from the Address Assignment drop down list 6 Click Save ...

Page 82: ...iNID User Guide 78 ...

Page 83: ...NG trace route DNS query and so forth This section provides helpful information to solve common issues It also provides instructions to view various statistics and logs Connection on page 80 VoIP on page 82 iPSU on page 83 System information on page 83 Statistics on page 84 Logs on page 91 ...

Page 84: ... 10 seconds 2 Call your service provider if the i38HG does not power up into a normal state No connection to the Internet via the Ethernet connection No communication between the iNID and i38HG 1 Check the data cable is properly connected Connecting the Data Cable on page 11 2 Check the NID BROADBAND and SERVICE indicators on the i38HG they should light green 3 Call your service provider if proble...

Page 85: ...e Setting up the Wireless Network Name on page 25 2 Verify the encryption key Securing your Wireless Network on page 26 3 View the wireless AP status Viewing the Wireless AP Statistics on page 86 4 Check the SERVICE indicator on the i38HG it should light green 5 Call your service provider if problem persists Weak wireless signals Hissing or static sounds Radio interference 1 Change the wireless se...

Page 86: ...ble 5 VoIP Services Issues Symptoms Problems What to Do No VoIP service VoIP services are not subscribed 1 Check your line status Viewing VoIP Service Status on page 89 2 Call your service provider for VoIP service No dial tone Service is down 1 Check your line status Viewing VoIP Service Status on page 89 2 Verify if the phone is in the Active mode If yes click Ring Now to test the ring tone If t...

Page 87: ...r is switched back 2 If the home is not experiencing a power outage check to make sure that the iPSU is plugged into a working outlet 3 No action is required Table 7 System Information Issues Symptoms Problems What to Do Cannot change the i38HG settings Incorrect password 1 Go to the Home page 2 Click System Password at the bottom of the Home page the Login page opens 3 Click I forgot the password...

Page 88: ...reless access points on page 86 HPNA coax on page 86 HPNA phone line on page 87 DSL bandwidth on page 88 VoIP on page 89 To access the statistics page 1 Enter http gateway 2wire net The user interface Home page opens displaying the aggregate upstream and downstream bandwidths Figure 18 Figure 18 The Home Page ...

Page 89: ...Finding Solutions 85 2 Click Home Networking the LAN Status page opens 3 Click Statistics the page opens displaying the wireless access point information Figure 19 Figure 19 The LAN Statistics Page ...

Page 90: ...ed to the AP This pane shows the total received and transmitted packets and bytes as well as the total errors and discarded packets Viewing the HPNA Coax Statistics The HPNA coax statistics shows the IPTV status 1 Scroll down on the LAN Statistics page until you reach the HomePNA Network Coax pane Figure 20 Figure 20 The HPNA Coax Statistics Pane Note The information under the Private Network pane...

Page 91: ... HPNA phone line statistics shows the status of your phone lines and Internet speed throughout your home 1 Scroll down on the LAN Statistics page until you reach the HomePNA Network Phoneline pane Figure 21 Figure 21 The HPNA Phoneline Statistics Pane 2 Scroll down to the HomePNA Network Phoneline pane and view the HPNA Physical Link status Up indicates that the operation is normal Down indicates ...

Page 92: ...ress line the user interface Home page opens Figure 18 2 Click the Broadband icon on the Home page the Broadband Status page opens 3 Scroll down the page to view the physical line 1 and physical line 2 detailed information Note The number of physical lines displays is dependent on the number of lines in use ...

Page 93: ...n the address line The user interface Home page opens displaying the aggregate upstream and downstream bandwidths Figure 18 2 Click Services the following page opens 3 Click Voice the Status page opens Note The voice over IP service is disabled if you have not subscribed to the service ...

Page 94: ...iNID User Guide 90 4 Click Line the Lines page opens displaying the line status as well as the phone and port numbers associated with each line ...

Page 95: ...are helpful for troubleshooting and diagnostics purposes Viewing Events Logs 1 Enter http gateway 2wire net on the address line the user interface Home page opens displaying the aggregate upstream and downstream bandwidths Figure 18 2 Click Settings the System Information page opens ...

Page 96: ...and displays the logs of your selection 7 View the log Type The type of the event INF for information ERR for errors WRN for warning and so forth Date Time The date and time when the event occurs listing from the latest date on the top Event Description Includes the source and destination IP addresses as well as their ports and a brief description of the event Note The log starts from the oldest t...

Page 97: ...ewing System Logs 1 Enter http gateway 2wire net on the address line the user interface Home page opens displaying the aggregate upstream and downstream bandwidths Figure 18 2 Click Settings the System Information page opens ...

Page 98: ...iNID User Guide 94 3 Click Logs the Event Log page opens 4 Click System Log the System Log page opens ...

Page 99: ...tion WRN for warning 8 Click Submit the page refreshes and displays the logs of your selection 9 Click Insert Mark if you want to insert a delimitation point in the logs 10 View the log Type The type of events ERR for errors INF for information WRN for warning and so forth Date Time The date and time when the event occurs listing from the latest date on the top Event Description Includes a brief d...

Page 100: ...ing Firewall Logs 1 Enter http gateway 2wire net on the address line the user interface Home page opens displaying the aggregate upstream and downstream bandwidths Figure 18 2 Click Settings the System Information page opens ...

Page 101: ...Finding Solutions 97 3 Click Logs the Event Log page opens 4 Click Firewall Log the Firewall Log page opens ...

Page 102: ...ate on the top Severity ERR for errors INF for information WRN for warning and so forth Details Includes the source and destination IP addresses as well as their ports and a brief description of the event Viewing Upgrade Logs 1 Enter http gateway 2wire net on the address line the user interface Home page opens displaying the aggregate upstream and downstream bandwidths Figure 18 2 Click Settings t...

Page 103: ...Finding Solutions 99 3 Click Logs the Event Log page opens 4 Click Upgrade Log the Upgrade Log page opens displaying the software versions information ...

Page 104: ...iNID User Guide 100 ...

Page 105: ...Cord Location Electrical Considerations Caution To reduce the risk of fire use only No 26 AWG or larger UL Listed or CSA Certified Telecommunication Line Cord Warning The electrical cord of this product must be plugged into a properly grounded outlet or adapter Failure to comply could result in an electric shock hazard If you do not know whether your outlet or adapter is properly grounded you shou...

Page 106: ...ul interference and 2 This device must accept any interference received including interference that may cause undesired operation This equipment has been tested and found to comply with the limits for a Class B digital device pursuant to part 15 of the FCC Rules These limits are designed to provide reasonable protection against harmful interference in a residential installation This equipment gene...

Page 107: ...ny may make changes in its facilities equipment operations or procedures that could affect the operation of this equipment If this happens the telephone company will provide advance notice in order for you to make the necessary modifications to maintain uninterrupted service If trouble is experienced with this equipment please contact 2Wire or your local 2Wire distributor or service center in the ...

Page 108: ...iNID User Guide 104 ...

Reviews: