
Qonnex
33
Quick start 2-Wire v3.0
ML.016 MiLo Webserver
MiLo is a wireless energy consumption
manager primarily intended for use in
homes. From the web browser on your
tablet or PC you surf to the website in the
MiLo module and so you can view energy
consumption and costs from anywhere in
the world up to 1 year ago whether to
operate individual consumers manually or
via time clocks.
Total consumption is read out: via the P1
port to the digital meter or with the optional set P1 via the two pulsing
inputs at the back of the MiLo module. Individual appliances are
measured via switchable energy plugs while with the RF gateway Modbus
energy meters are connected to measure large partial consumers directly
in the fuse box. The ECF.08, on the other, is good for directly reading
wired consumers via wireless CT coils.
1. Connect:
Connect the MILO with the supplied USB charger. The LED will first light
up constantly, and after 3 seconds permanent flash with a 1 second
interval. This means that the MILO is not yet linked to your WiFi network.
At the top is a 'reset button', press it for about 5
seconds until the LED is constantly lit. The MILO is
now a 'WiFi access point', with the name '2-WIRE
MILO'.
Choose 'WiFi networks' on your
laptop or tablet or
smartphone
and if it works properly, the list
should now contain: '2-WIRE MILO'. Select this
network and connect to it. If you are asked for a
key (password): '
adminMILO
'.
Automatically you will be connected to a REDIRECT
page
after 1-2 minutes (or surf yourself via
PC,
tablet or smartphone
to the IP address 8.8.8.8)
Note: if it does not work immediately, try again
with smartphone or tablet. If it still does not work, the Wi-Fi
signal may be too weak,if necessary try to pair MiLo first near
the WiFi router before you connect to P1.
Note: If you want to change an existing WiFi link, milo starts
again and press the reset button within 3 seconds until the LED
is continuously lit to enter the WiFi access point mode.
REDIRECT page
:
Click on 'Configure WiFi' and a list of networks will
appear in your perimeter. You can now select
your WiFi network from the list (SSID), and also
enter the password of this network.
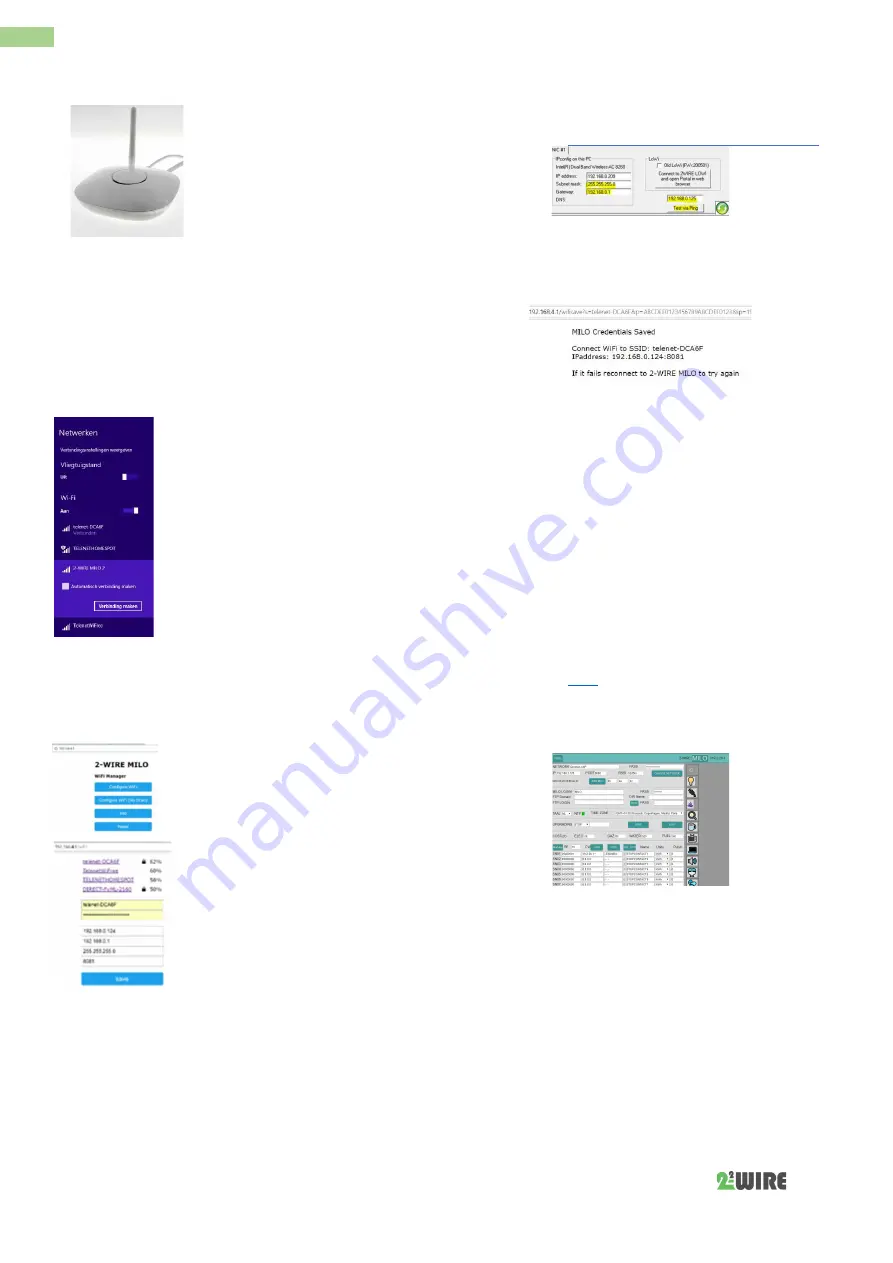
Default settings
:
1.
IPadres: 192.168.0.124 (your MILO web
page)
2.
Gateway: 192.168.0.1 (needed for
internet access!)
3.
Subnet mask: 255.255.255.0
4.
Port No: 8081 (needed for port
forwarding in remote control)
These default IP addresses must be adjusted according to the settings of
your own WiFi network, it is important that all are
in the same 'range'
as
your PC.
Note: Optionally take over the IP address, subnet mask and
gateway from your PC, or from the proposal from the IP server
scanner tool, or you can temporarily set MiLo to DHCP to get a
free and fixed IP address. See online manual.
Note:
With the server scanner tool of 2-WIRE which you install
on your PC you already get a proposal of the MiLO network
settings for this WiFi network. You can also test whether the
suggested IP address is still free with the 'Test via Ping' button.
Subnetmask and Gateway can be taken over from the PC
setting, as port number you choose e.g. 8081
Please note that setting MILO's
IP address is not possible from
the IP server
scanner.
Download
:
https://www.2-wire.net/product/ip-serverscanner/
And if not familiar with networking, better ask for help
from a
network specialist!
After entering
SSID,
password
and
IP address,
SUBNETMASK,
Gateway
and port number,press SAVE and you will get the confirmation of the set
fixed MiLo IP address.
The laptop should now be brought back to the existing WiFi network. To
do this, go to WiFi networks and select your default WiFi network again if
this has not been done automatically.
Switching networks can sometimes take about 10 seconds.
Once on your standard WiFi network, surf to the set FIXED IP address and
port number (enter in the address bar of your browser, e.g.
192.168.0.226:8082)
The port number must
follow with a
':'
decimal sign
after the IPadres!
And that's how you get to the home page of your MiLo web server.
Note: In your browser you may have to check whether
'SETTINGS - JAVASCRIPT' is on !
Note: It is best to make a shortcut on your PC, tablet or
smartphone so that you have an immediate connection to
consume you.
Link with the P1 port:
With the included RJ11 4P/4C cross-cable you can connect the MiLo to the
P1 port on the Dutch or Flemish digital meter.
And with the optional
set P1
you can use the 2 impulse inputs of the MiLo
web server in addition to the P1
2. Configuration from tablet or PC:
Once on the MiLo webpage you will enter the
MILO
button at the top of
the setup screen:
The configuration is done on the basis of entering the correct serial
numbers which
1.
or on the module FIX printed are: type EP.16A
2.
or described in the module manual: type BC.002, ECF.08
3.
Either be generated in the
GW_TOOL button
of the web
server: type RG.016 and ML.016
GW_TOOL
BUTTON
:
Example:
Serial numbers P1 port measurements via MiLo:
Select the type of measurement on the left (e.g. P1 MiLo IMPORT), on the
right you get an internal serial number (02p0001).
The (internal) serial number must always start with '
02p
', '04p' or '05p' or
'06p' which determines the type of digital meter:
1.
Nederland DSMR2.x:02p; DSMR 4.x :04p, of DSMR 5.x
:05p,België DSMR 5.x :06p
The last character determines the type of measurement:


