background image

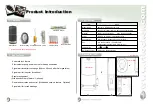
Interior Body

Exterior Body

RF 

Contactless Card Latch

4 AA Batteries

Bolts & Screws

Included User Manual & Paper Pattern.

nDolphin Sticker

Item 

Spec.

Model Name

nDolphin

RF Digital Locker Lock

Dimension 

z

Front: 17(D) x 50(W) x70(H)mm,  Back: 31(D) x 63(W) x47(H)mm

Material 

z

Front : Iron Die Casting/ABS    

Back : Iron Die Casting/ABS

Power 

DC 6V(1.5V AA Size) 4 Alkaline Batteries 

Temperature

- 30

~ + 

80

Construction 

Dual Deadbolt (Deadbolt, Deadbolt for center) 

Key

ISO 15693/14443-A 13.56MHz Card,  

Online network (option), USB PDA (option) 

Emergency Power 

External 9V Alkaline Battery

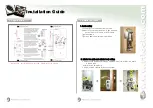
Interior Body

Exterior Body

Latch

63

147

5

10

31

25

20

74

11

50

70

17

Not to Scale

- Automatic lock feature 

- External emergency power source for battery exhaustion 

- Signal alert for battery exchange (Approx. 40x use after first signal alert) 

- Signal alert for irregular locked door 

- Event management. 
(With added network feature.  Optional) 

- Remote observation and control. (With added network feature.  Optional) 

- Signal alert for forced breakage

Product Introduction

Product Introduction

1. Contents 

2. Key Features

3. Specification 

4. Dimension (mm)

1

2

Summary of Contents for nDolphin

Page 1: ......

Page 2: ...SO 15693 14443 A 13 56MHz Card Online network option USB PDA option Emergency Power External 9V Alkaline Battery Interior Body Exterior Body Latch 63 147 5 10 31 25 20 74 11 50 70 17 Not to Scale Automatic lock feature External emergency power source for battery exhaustion Signal alert for battery exchange Approx 40x use after first signal alert Signal alert for irregular locked door Event managem...

Page 3: ...ocks and using exterior body as a handle open door 1 Use one 9V Alkaline battery 2 Apply battery to pop out terminal See Picture 3 3 When LED turns Green bring card key to near exterior body 4 After a beep door unlocks Caution For emergency power source please only use 9V Alkaline battery 1 Press initiation button about 2 4 seconds until you hear a beep See Picture 1 2 After a beep LED turns to Or...

Page 4: ...om screws Adjust to fit to proper location Align popped out portion to fit to end of door frame Tighten screws Tighten 2 additional screws in between 2 Interior iron plate and exterior body setting Cables should be passed through cable hole before interior iron plate is joined with exterior body using bolts Using 3 screws tighten interior iron plate 2 Installation Steps ...

Page 5: ...pplying sticker Insert 4 AA batteries Cover the batteries with case and fasten bolt Apply sticker to cover bolts Installation Guide Installation Guide 7 8 1 Connect 3 cables to proper slots Please refer to below pictures 2 Please make sure cables are connected properly and organized so will not be too Squeezed when closing the case Interior Body Interior Iron Plate Exterior Body A B C 3 Cable Sett...

Page 6: ... and interior body φ5Hole 2 z To join Interior body and interior iron plate 4 z To install Latch 4 z To tighten Interior iron plate 3 z Battery cover 1 Installation Guide Installation Guide 4 Bolts and Screws 9 10 5 Colors Available ...

Reviews: