background image

2


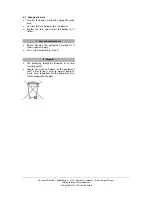
Never cover the ventilation slots in the housing. 
This is necessary in order to ensure sufficient cir-
culation of air required for cooling the internal 
components of the equipment. 


Do not place the power supply unit on damp or 
wet surfaces. 


Do not subject the power supply unit to extreme 
humidity or dampness and extreme temperatures 
(direct sunlight), shocks or strong vibrations. 


The equipment may only be opened/repaired by 
qualified and trained personnel.   
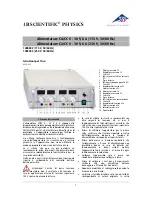
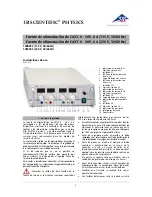
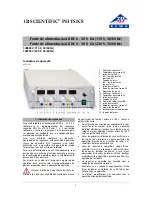


2. Description  

The AC/DC Power Supply 0 - 30 V, 6 A provides AC and 
DC voltages up to 30 V with a current up to 6 A. 
The unit may be used as constant voltage supply with 
current limiting or as constant current source with 
voltage limitation for DC outputs. The AC output is 
equipped with a current limiter. 
The AC and DC output voltages and currents are con-
tinuously adjustable and are tapped from the corre-
sponding output sockets. The unit is equipped with 
separate digital volt- and ammeters (3 digits LCDs). 
Cooling of the internal components is provided by a 
ventilator. The DC voltage is stabilised. The AC and DC 
outputs are electrically isolated from each other, and 
have short-circuit protection. 
The 1008692 AC/DC power supply is for operation 
with a mains voltage of 115 V (

±

10%), and the 

1003593 unit is for operation with a mains voltage of 
230 V (

±

10%). 


3. Technical data  

DC output:


Voltage: 

0 – 30 V, continuously ad-
justable 

Current: 

0 – 6 A 

Ripple & noise: 

CV 1 mVrms, CC 3 mArms 

Display accuracy: 

Voltmeter ± (0,2% +2 digits) 


Ammeter ± (1% +2 digits) 

AC output: 


Voltage: 

0 – 30 V, continuously ad-
justable 

Current: 

0 – 6 A 

Display accuracy: 

Voltmeter ± (1% +2 digits) 


Ammeter ± (1% +2 digits) 

Mains voltage: 

220 V – 240 V AC ± 10% 

Terminals: 

4 mm safety sockets 

Dimensions: 

380 x 140 x 300 mm

3


Weight: 

12 kg approx. 


4. Operation  

4.1  Obtaining a DC voltage 

Used as a constant voltage source (CV) in general the 
current regulator (CC) should be set to maximum.  
To set the current limiting protection point: 


Switch on the power supply and turn the current 
regulator (CC) counter clockwise to minimum. 


Short circuit the positive and negative output 
sockets and rotate the current regulator (CC) 
clockwise until the output current equals the re-
quired current limiting value. 

4.1.1  Using the power supply as a constant voltage 

source (CV) 


Turn the current regulator (CC) clockwise to 
maximum. 


Switch on the power supply and adjust the volt-
age to the required value by turning the voltage 
regulator (CV). The CC-LED goes out and the CV-
LED lights up. 


Switch off the power supply. 


Connect the load to the DC output sockets and 
turn on the power supply again. 


4.1.2  Using the power supply as a constant current 

source (CC) 


Switch on the power supply and turn the voltage 
regulator (CV) to maximum. 


Turn the current regulator (CC) counter clockwise 
to minimum. 


Connect the load to the DC output sockets and set 
the required current value by turning the current 
regulator (CC) clockwise. The CV-LED goes out and 
the CC-LED lights up. 


4.2  Obtaining an AC voltage 


Switch on the power supply and turn the current 
regulator clockwise to maximum. 


Adjust the voltage to the required value by turn-
ing the voltage regulator. 


Switch off the power supply. 


Connect the load to the AC output sockets and 
turn on the power supply again. 

Alternatively: 


Switch on the power supply and turn the voltage 
regulator clockwise to maximum. 


Turn the current regulator counter clockwise to 
minimum. 


Switch off the power supply. 


Connect the load to the AC output sockets and 
turn on the power supply again. 


Adjust the current to the required value by turn-
ing the current regulator. 

The power supply automatically will switch off, if the 
current exceeds the set value and the OC LED lights 
up. The power supply turns on after a short period 
and will switch off again, if no corrective measures 
are taken. In this case set a higher current limit or 
lower the voltage. 


Summary of Contents for 1008692

Page 1: ...m glich ist z B bei sichtbaren Sch den ist das Ger t unverz glich au er Betrieb zu setzen In Schulen und Ausbildungseinrichtungen ist der Betrieb des Ger tes durch geschultes Personal ver antwortlich...

Page 2: ...mbegrenzungswert einzustellen Netzger t einschalten und Stromsteller CC gegen den Uhrzeigersinn auf Minimum drehen Positive und negative Ausgangsbuchse kurzschlie en und den Stromsteller CC im Uhrzeig...

Page 3: ...endreher herausschrauben Sicherung ersetzen und Halter wieder einschrauben 5 Pflege und Wartung Vor der Reinigung Ger t von der Stromversorgung trennen Zum Reinigen ein weiches feuchtes Tuch benut zen...

Page 4: ......

Page 5: ...possible e g visible damage the equipment should be switched off immediately and se cured against any unintended use In schools and other educational institutions the operation of the power supply un...

Page 6: ...eneral the current regulator CC should be set to maximum To set the current limiting protection point Switch on the power supply and turn the current regulator CC counter clockwise to minimum Short ci...

Page 7: ...with a screwdriver Replace the fuse and reinsert the holder in its socket 5 Care and maintenance Before cleaning the equipment disconnect it from its power supply Use a soft damp cloth to clean it 6...

Page 8: ......

Page 9: ...aniement inappropri ou s il est manipul avec imprudence S il s av re que son utilisation ne peut plus se faire sans danger par ex dans le cas d un endommagement visible l appareil doit tre imm diateme...

Page 10: ...continue En g n ral en cas d utilisation de l alimentation en tant que source de tension constante CV le r gulateur de courant CC doit tre r gl sur le maximum R glage de la valeur du limiteur de coura...

Page 11: ...en marche mais se coupe imm diatement si aucune mesure corrective n a t prise Dans ce cas le limiteur de courant peut tre r gl sur une valeur sup rieure ou la tension peut tre r duite 4 3 Remplacemen...

Page 12: ......

Page 13: ...l apparecchio deve essere messo immediatamente fuori servizio ad es in caso di danni visibili Nelle scuole e negli istituti di formazione il personale istruito responsabile del controllo dell uso dell...

Page 14: ...ilizzo dell alimentatore come sorgente di tensione costante CV il regolatore di corrente CC deve essere impostato sul massimo Per impostare il valore di limitazione della corrente Accendere l alimenta...

Page 15: ...alimentazione elettrica ed estrarre assolutamente la spina Svitare il portafusibili con un cacciavite Sostituire il fusibile e riavvitare il supporto 5 Cura e manutenzione Prima della pulizia scollega...

Page 16: ......

Page 17: ...Si es de suponer que ya no es posible un funcionamiento libre de peligro por ejemplo por da os visibles se debe poner el equipo fuera de servicio inmediatamente En escuelas e instalaciones educativas...

Page 18: ...r lo general al utilizar la unidad como fuente de tensi n constante CV se debe fijar el ajuste de corriente CC en su m ximo Para ajustar el valor del l mite de la corriente Se conecta la fuente de ali...

Page 19: ...a correctiva En este caso se puede ajusta un l mite mayor de la corriente o se reduce la tensi n 4 3 Reemplazo de fusibles Desconecte la alimentaci n de corriente Es im prescindible que tambi n descon...

Page 20: ......

Page 21: ...necess rios cuidados Caso seja determinado que um funcionamento sem perigo n o seja mais poss vel por exemplo em caso de danifica o do aparelho deve se imediatamente deixar de utilizar o mesmo Em esc...

Page 22: ...es conectoresdeseguran ade4mm Dimens es 380 x 140 x 300 mm3 Massa aprox 12 kg 4 Utiliza o 4 1 Retirada de uma tens o cont nua Em geral na utiliza o da fonte de alimenta o como fonte de tens o constant...

Page 23: ...rrente pode ser aumentado ou pode se diminuir a tens o 4 3 Troca de fus veis Desligue a alimenta o el trica e retire em todo caso o fio da tomada Desenrosque o suporte do fus vel com uma chave de fend...

Page 24: ......

Reviews: