background image


3B SCIENTIFIC® PHYSICS


Microphone box (230 V, 50/60 Hz)   1014520 

Microphone box (115 V, 50/60 Hz)   1014521 


Instruction sheet 

01/14 SD/ALF 


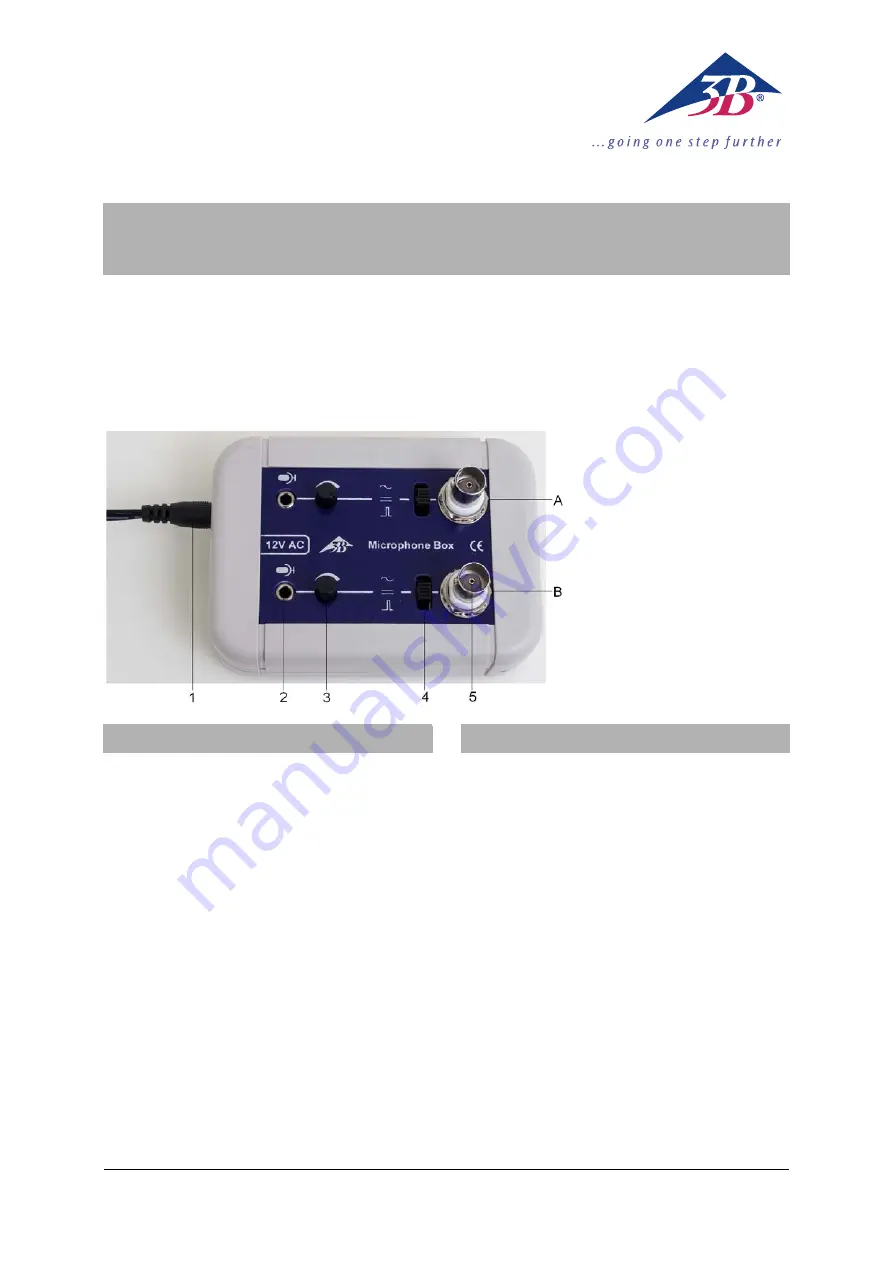
1 Plug-in 

power 

supply 

Input socket  

Amplitude adjustment knob 

4  Selector switch: Signal, Level, 

Pulse 

5 Output 

socket 

 
A Channel 

B Channel 


1. Safety instructions 

The microphone box conforms to all safety regu-
lations for electrical measuring, control, moni-
toring and laboratory equipment, as specified 
under DIN EN 61010, Section 1. It is intended 
for operation in a dry environment, suitable for 
the operation of electrical equipment and sys-
tems. 
Safe operation of the equipment is guaranteed, 
provided it is used correctly. However, there is 
no guarantee of safety if the equipment is used 
in an improper or careless manner. 
If it may be assumed for any reason that non-
hazardous operation will not be possible (e.g. 
visible damage), the equipment should be 
switched off immediately and secured against 
any unintended use. 

  Use the equipment in dry rooms only. 

  Only operate using the supplied plug-in 

power supply. 

  Do not apply any external voltage to the 

output sockets. 

2. Description 

The microphone box is a universal, dual-channel 
amplifier for electret microphones with a band 
width of 10 Hz to 40 kHz. Both channels (A und B) 
can be switched between Signal, Level and Trig-
ger modes. The sensitivity of the pre-amp is ad-
justable and allows measuring instruments and 
oscilloscopes to be connected directly. The 
threshold for the trigger is also adjustable. The 
microphone box is particularly suitable for use with 
long and short microphone probes and the micro-
second counter in order to carry out experiments 
on the speed of sound. 
The microphone box with order number 
1014521 is intended for a mains voltage of 
115 V (±10%), whereas the one numbered 
1014520 is for 230 V (±10%). 


Summary of Contents for Microphone box 1014521

Page 1: ...lich ist z B bei sichtba ren Schäden ist das Gerät unverzüglich außer Betrieb zu setzen Gerät nur in trockenen Räumen benutzen Nur mit dem mitgelieferten Steckernetzgerät in Betrieb nehmen Keine Fremdspannung an die Ausgangs buchsen legen 2 Beschreibung Die Mikrofonbox ist ein universeller Zweikanalver stärker für Elektretmikrofone mit einer Bandbreite von 10 Hz bis 40 kHz Beide Kanäle A und B sin...

Page 2: ...bereich stellen und an Ausgang anschließen Gewünschte Verstärkung mit Amplituden regler einstellen 6 3 Betriebsart Trigger Laufzeitmessung Beide Umschalter auf _ _ Trigger stellen und Elektretmikrofon zur Detektierung des Start Impulses an Eingang Kanal A anschließen Mikrofon zur Detektierung des Stopp Impulses an Eingang Kanal B anschließen Start Eingang des Zählers an Ausgang Kanal A Stop Eingan...

Page 3: ...Mikrofon am Zähler ablesen Aus dem Abstand der beiden Mikrofone und der gemessenen Zeit lässt sich die Schallge schwindigkeit bei Raumtemperatur bestimmen 8 Aufbewahrung Reinigung Entsorgung Gerät an einem sauberen trockenen und staubfreien Platz aufbewahren Vor der Reinigung Gerät von der Stromver sorgung trennen Zur Reinigung keine aggressiven Reiniger oder Lösungsmittel verwenden Zum Reinigen e...

Page 4: ......

Page 5: ...t non hazardous operation will not be possible e g visible damage the equipment should be switched off immediately and secured against any unintended use Use the equipment in dry rooms only Only operate using the supplied plug in power supply Do not apply any external voltage to the output sockets 2 Description The microphone box is a universal dual channel amplifier for electret microphones with ...

Page 6: ...equired gain with the amplitude knob 6 3 Trigger pulse mode measurement of time in motion Set both switches to _ _ Trigger or Pulse and connect an electret microphone to the input of Channel A to detect the start pulse Connect another microphone to the input of Channel B to detect the stop pulse Connect the start input of the counter to the output of Channel A and the stop input of the counter to ...

Page 7: ...akes for the sound to propagate from the long micro phone probe to the short one Use the distance between the two microphones and the time measured to calculate the speed of sound in the tube at room temperature 8 Storage cleaning disposal Keep the microphone box in a clean dry and dust free place Before cleaning the equipment disconnect it from its power supply Do not clean the unit with volatile...

Page 8: ......

Page 9: ...r ex en présence de domma ges apparents mettez l appareil immédiate ment hors service N utilisez l appareil que dans des endroits secs N utilisez l appareil qu avec l alimentation enfichable fournie Ne pas appliquer de tension externe sur la broche de sortie 2 Beschreibung L amplificateur de microphone est un amplificateur bi canal universel pour microphones électret avec une largeur de bande de 1...

Page 10: ...uton de réglage de l amplitude 6 2 Mode Niveau Mettre le commutateur sur Niveau brancher le microphone électret sur Entrée Régler l appareil de mesure sur la plage de mesure de tension continue et le brancher sur Sortie Régler l amplification souhaitée avec le bouton de réglage de l amplitude 6 3 Mode Impulsion Mesure du temps de propagation Mettre les deux commutateurs sur _ _ Impulsion et branch...

Page 11: ...u milieu pour les deux canaux Brancher les blocs d alimentation au comp teur microsecondes et à l enceinte à mic rophone et les relier au secteur À l aide de l enceinte à impulsion déclen cher une impulsion soudaine et sur le comp teur relever le temps de propagation du son du microphone long vers le microphone court L écart entre les deux microphones et le temps mesuré donne la vitesse du son à t...

Page 12: ......

Page 13: ...anni visibili l apparecchio deve essere messo immediatamente fuori servizio Utilizzare l apparecchio solo in ambienti asciutti Utilizzare unicamente con l alimentatore a spina fornito in dotazione Non applicare alcuna tensione esterna alle prese di uscita 2 Descrizione La scatola microfono è un amplificatore a due canali universale per microfoni a elettrete con una larghezza di banda compresa tra ...

Page 14: ...dalità operativa trigger misurazione della durata Posizionare entrambi i commutatori su _ _ trigger e collegare il microfono a elettrete per il rilevamento dell impulso di start all in gresso del canale A Collegare il microfono per il rilevamento dell impulso di stop all ingresso del canale B Collegare l ingresso Start del contatore all u scita del canale A l ingresso Stop del conta tore all uscit...

Page 15: ...al mi crofono lungo a quello corto Dalla distanza dei due microfoni e dal tempo misurato è possibile determinare la velocità del suono a temperatura ambiente 8 Conservazione pulizia smaltimento Conservare l apparecchio in un luogo puli to asciutto e privo di polvere Prima della pulizia scollegare l apparecchio dall alimentazione Non impiegare detergenti o soluzioni ag gressive per la pulizia Per l...

Page 16: ......

Page 17: ...o con el aparato p ej en caso de daños visibles se debe poner inmediatamente fuera de servicio Se usa el aparato sólo en recintos secos Se pone a funcionar sólo con la fuente de alimentación enchufable que se entrega con el aparato No conectar ninguna tensión externa en los casquillos de salida 2 Descripción La caja de micrófono es un amplificador de dos canales de uso universal para micrófonos de...

Page 18: ...licación deseada con el regulador de amplitud 6 2 Modo de funcionamiento Nivel Se ajusta el conmutador en Nivel y se conecta el micrófono de electrete en la entrada Se ajusta el aparato de medida en el alcance de medida de tensión correspondiente y se conecta en la salida Se ajusta la amplicación deseada con el regulador de amplitud 6 3 Modo de funcionamiento Disparo Medición de tiempo de recorrid...

Page 19: ... en una posición intermedia Las fuentes de alimentación enchufables se conectan en el contador de microsegundos y en la caja de impulsos a continuación se conectan a la red Con la caja de impulsos se libera un impulso de chasquilo y se lee el tiempo de duración para la propagación del sonido desde el micrófono largo al micrófono corto Tomando como base la distancia entre los dos micrófonos y el in...

Page 20: ......

Page 21: ... considerar que a operação segura não é mais possível por exemplo no caso de danos visíveis deve se desligar imediatamente o aparelho Utilizar o aparelho somente em lugares secos Por em operação somente com a fonte de alimentação fornecida Não conectar tensão externa aos conectores de saída 2 Descrição A caixa de microfone é um amplificador universal de dois canais para microfones eletretos com la...

Page 22: ...lificação desejada com o regulador de amplitude 6 2 Operação Nível Ajustar seletor para Nível e conectar o microfone eletreto na entrada Ajustar o aparelho de medição para o âmbito de medição de corrente contínua correspondente e conecta lo à saída Ajustar a amplificação desejada com o regulador de amplitude 6 3 Operação Disparo medição de tempo decorrido Ajustar ambos os seletores para _ _ Dispar...

Page 23: ...justar a amplificação de ambos canais para a metade Conectar as fontes no contador de microssegundos e na caixa de microfones e ligá las à rede Causar um impulso de choque com a caixa de impulso e ler o tempo necessário para a propagação do som do microfone longo até o curto no contador A partir da distância entre ambos os microfones e o tempo medido pode ser medida a velocidade do som à temperatu...

Page 24: ......

Reviews: