Copyright © 2009-2011, 3Com Corporation. All Rights Reserved. 3Com and the 3Com logo are registered trademarks and VCX is trademark
of
3Com
Corporation.
3101A0AX
6P101-20110119
3COM
®
350x SERIES IP PHONES WALL MOUNT INSTALLATION GUIDE
Introduction
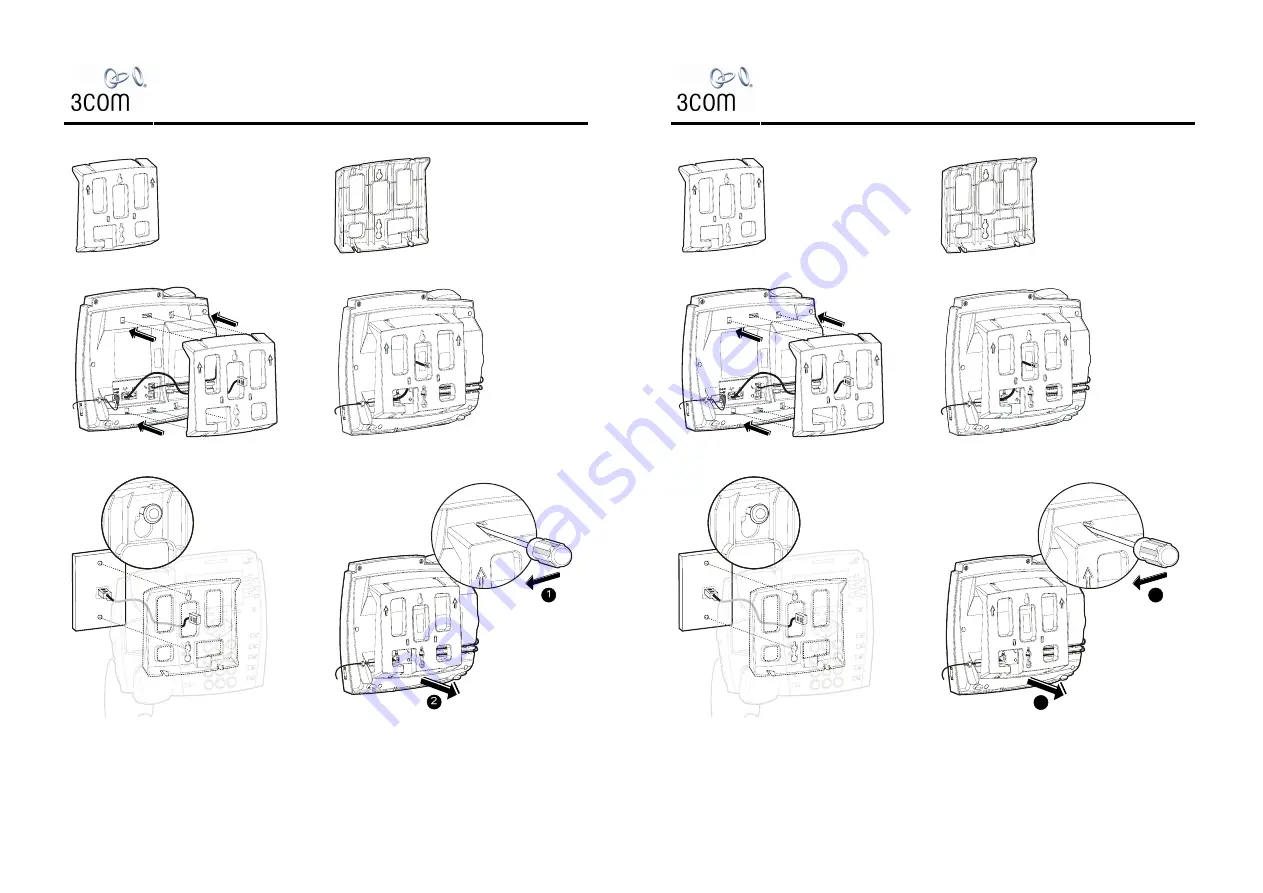
Wall mount bracket for
3Com IP Phone. (Wall
Side view)
Wall mount bracket, to be
attached to rear of 3Com
IP phone (Phone side
view).
Installing the Wall Mount
Connect the cables first (route the network cable through
the Wall Mount), and then attach the Wall Mount to the
rear panel of the IP Phone.
After installation, the Wall Mount should be attached to
rear panel of the IP Phone, by securing the four tabs on
the Wall Mount to the correct positions on the IP Phone.
After installing the Wall Mount and connecting cables, you
can attach the IP Phone to an indoor Wall Mounting plate
as shown.
To remove the Wall Mount, insert a flat-blade screwdriver
into each of the four tab slots connected to the IP phone,
and carefully pry the screwdriver towards the tab. The
Wall Mount can be removed after all four tabs have been
released.
3COM
®
350x
系列
IP
话机壁挂
安装指导
壁挂件简介
壁挂件与室内墙面接触面
壁挂件与话机后面板接触
面,
4
个顶角各有一个锁扣,
用来将壁挂件安装到
350x
系列话机后面板上
安装壁挂件
先连接好话机的各条线缆,网线需要从壁挂件中间穿过,
然后将壁挂件安装到话机后面板上
安装完成后,壁挂件应该紧密的与话机后面板相连,
4
个锁
扣已经锁死
1
2
壁挂件安装完成并连接各条线缆后,可以将话机固定到用
户室内统一标准的接口面板上
拆卸壁挂组件时,先将一字螺丝刀依次插入壁挂组件
4
个导
槽内,并轻轻向锁扣一侧翘动,使壁挂件的锁扣与话机后
面板松脱,
4
个锁扣完全松脱后,即可将壁挂件向外拉出


