background image

3Com IntelliJack Switch NJ225/NJ225FX

User Guide

http://www.3com.com/
http://esupport.3com.com

Published April  2004
User Guide version 2.1

Summary of Contents for IntelliJack NJ225FX

Page 1: ...3Com IntelliJack Switch NJ225 NJ225FX User Guide http www 3com com http esupport 3com com Published April 2004 User Guide version 2 1 ...

Page 2: ...entation and the software described herein are provided to you subject to the following All technical data and computer software are commercial in nature and developed solely at private expense Software is delivered as Commercial Computer Software as defined in DFARS 252 227 7014 June 1995 or as a commercial item as defined in FAR 2 101 a and as such is provided with only such rights as are provid...

Page 3: ...nstalling the Web Configuration Manager on a Windows 2000 machine 27 USING THE LOCAL CONFIGURATION MANAGER Initializing the IntelliJack 31 Setting Location Information Setting the Group Name Setting the IP Address Setting Advanced Options 33 Changing the Password Configuring for SNMP USING THE CENTRAL CONFIGURATION MANAGER Discovering IntelliJacks on Your Network 35 Viewing Device Properties 39 Ge...

Page 4: ...d 802 1X SNMP Configuration Tab 58 Advanced Configuration Tab 59 Event Alerts Port Based Configuration Flow Control AutoMDI X Data Rate Control Restoring to Base Configurations 61 Finding Computers Connected to IntelliJacks 64 Upgrading the NJ225 Firmware 65 Viewing Log Files 68 Viewing and Canceling Scheduled Firmware Upgrades 69 TROUBLESHOOTING THE NJ225 Troubleshooting Matrix 71 TECHNICAL SUPPO...

Page 5: ...y via an optional local power supply You can manage the NJ225 using the included Central Configuration Manager or Web Configuration Manager You can also use a supported SNMP management console as you would with any managed device on your network but greater management and control is available through the Configuration Manager software Management features include Device discovery Port status state ...

Page 6: ...ion white cable green LED For more information see Checking the LEDs on page 13 4 Power LED Indicates NJ225 power status green For more information see Checking the LEDs on page 13 5 Pass through port Provides a link to your LAN that passes through the NJ225 IntelliJack The data or voice traffic is separate from and unaffected by the NJ225 switch 6 Power forwarding LED Lights when the IntelliJack ...

Page 7: ... mounting locations compatible with the IntelliJack Thread forming screws for mounting into plastic n M3 x 30mm 2x n M3 x 40mm 2x Machine screws for mounting into metal n M3 5 x 30mm 2x n M3 5 x 40mm 2x Obtaining Optional Components for the NJ225 The switch works with the following optional components all of which are available from 3Com Order online at www 3com com or by calling 1 877 949 3266 9 ...

Page 8: ...Process by an IEEE 802 3af compliant PSE 3CNJVOIP NBX 3Com Part Number 3CNJMP EXT Description IntelliJack NJ225 10mm extension ring 10mm thick extension ring that attaches to the back of an NJ225 IntelliJack extension ring that ships with every unit effectively extending the depth of the wall space This allows flush mounting of an IntelliJack in a shallow DIN or BSI cutout 3Com Part Number 3CNJMP ...

Page 9: ...unting plate that enables the installation of an NJ225 IntelliJack in a floor box 3Com Part Number 3CNJMPD UK Description IntelliJack NJ225 UK style double gang mounting plate Mounting plate that enables an IntelliJack NJ225 to be installed in a BSI compliant double gang UK style wallbox such as found in the UK and other countries ...

Page 10: ...use the depth of some wall and cubicle openings differ observe the following requirements and recommendations before installing the IntelliJack The NJ225 has been designed for installation into wall or cubicle openings that conform to BSI standard BS 4664 Installation into openings not conforming to this standard may be accomplished using a suitable mounting adapter plate 3Com Part Number 3CNJMP F...

Page 11: ...r the network via a 3Com multi port midspan power supply 3CNJPSE24 Over the network via a single port Ethernet power supply Locally via a 3Com local power supply NOTE The NJ225 is designed to be mounted using the provided mounting plate or many after market faceplates However some after market faceplates stand out from the wall and do not provide a secure mounting surface for the IntelliJack In su...

Page 12: ...et or Fast Ethernet infrastructure with standard Category 5 or better cabling and powers up to 24 IntelliJack devices For complete installation instructions see the Ethernet multi port midspan power supply documentation located at www 3Com com Connect the network data voice power cable to the IntelliJack white cable as shown in the following illustration NOTE For a list of power supplies that supp...

Page 13: ...ply connect the power supply to the network hub or switch and to the IntelliJack white cable as shown in the following illustration The black cable should be connected to a data port on the wire closet switch NOTE The black cable can also be connected to an Ethernet multi port midspan power supply and will power an IEEE 802 3af device connected to the pass through port on the IntelliJack but it wi...

Page 14: ... power supply to the IntelliJack follow these steps as shown in the previous diagram 1 Route the power cable through the strain relief on the top of the IntelliJack 2 Plug the power cable into the IntelliJack 3 Check to ensure that the cable is secure in the strain relief 4 Route the cable behind the trim ring from top to bottom 5 Secure the local power supply and cable to the wall 6 Plug the loca...

Page 15: ...nector n The white cable connects the LAN to the four personal area network PAN ports located on the bottom of the IntelliJack n The black cable connects the LAN to the single pass through port located on the front of the IntelliJack 3 Choose one pair of the provided screws that best fits your outlet box 4 Tighten the screws while holding the IntelliJack in place NOTE The IntelliJack is designed t...

Page 16: ...nect devices 1 RJ 45 Personal Area Network PAN Ports any of the four switched ports on the bottom of the IntelliJack All ports feature 10 100 Mbps auto negotiation which configures the NJ225 IntelliJack for 10 Mbps or 100 Mbps connections automatically 2 Pass through port a single pass through port is provided that allows an additional device to be connected to a separate network segment through t...

Page 17: ... connect power to the IntelliJack there is a delay of approximately 5 seconds The power LED light blinks once or twice before remaining solid on n Off the IntelliJack is not receiving power Power forwarding n On the IntelliJack is connected to and is forwarding power to an IEEE 802 3af compliant device n Off the IntelliJack is not connected to or is not forwarding power to an IEEE 802 3af complian...

Page 18: ...rk It ships with and can be managed by the same software that the NJ225 uses The main differences are that the LAN port cannot be configured there is no additional pass through port and the NJ225FX cannot be powered via Power over Ethernet PoE The following diagram shows the front rear and bottom views of the NJ225FX Figure 1 NJ225FX ST Figure 2 NJ225FX SC ...

Page 19: ... Please note that the following installation steps are different for this switch Setting up the power supply Mounting the IntelliJack Setting Up the Power Supply Power to the IntelliJack 225FX is provided through one of the following two methods 1 Directly via AC power The 225FX has an internal power supply that can accept 100 240V AC power if you have access to AC power near the unit A green powe...

Page 20: ...Mounting the NJ225FX Before connecting the IntelliJack to the network verify that the existing network cabling is connected to an active fiber port The IntelliJack includes mounting brackets designed to fit into a number of different raceway and floor box designs as follows CAUTION Make sure that the proper wires associated with L and N are appropriately plugged into the corresponding slots on the...

Page 21: ...trim ring 3 Prepare the AC or DC power supply If using AC screw the power wires into the green connector If using DC plug the cord into a power outlet Connect AC or DC power to unit 4 Connect fiber cables to the fiber transceiver on the unit 5 Mount the unit and trim ring into the raceway 6 Tighten supplied screws to the raceway while holding the IntelliJack unit in place ...

Page 22: ...18 CHAPTER 1 INSTALLING THE INTELLIJACK Instructions for Tehalit BRSN70170 1 may work with other designs 1 Snap plastic mounting box into raceway 2 Repeat steps 2 through 6 as above Floor Boxes ...

Page 23: ... be adjusted to the lowest setting to provide this clearance LED Description LAN n On the IntelliJack is connected to the network and a link has been established n Off there is no connection to the network Power n On the IntelliJack is receiving power local or via the network When you first connect power to the IntelliJack there is a delay of approximately 5 seconds The power LED light blinks once...

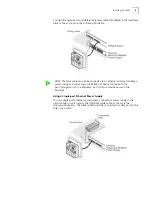
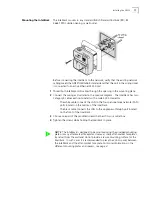
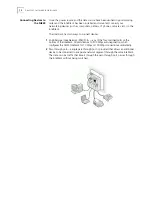
Page 24: ...20 CHAPTER 1 INSTALLING THE INTELLIJACK ...

Page 25: ...llowing steps to install the Configuration Manager software 1 Insert the Configuration Manager software CD into your Windows 2000 Windows XP Pro or Windows NT computer NOTE The instructions in this section apply to both the NJ225 and NJ225FX unless otherwise noted In this section the terms IntelliJack and NJ225 refer to either the NJ225 or the NJ225FX NOTE You will use the Local Configuration Mana...

Page 26: ...G THE CONFIGURATION MANAGERS 2 If your computer is configured to Auto Play CDs the installation will start automatically If not double click the setup exe icon on the CD and you will see this window 3 Click Next to continue ...

Page 27: ... Carefully read the license agreement If you agree click Yes I accept and Next to continue 5 The installation will present Readme Information This is also found in the Readme txt file on the installation CD Please read the information and click Next to continue ...

Page 28: ...he computer you re installing these applications on Select the option you prefer and click Next NOTE If you have a previous version of the Central Configuration Manager installed in another directory you will lose access to any database or log files that are stored there You should copy them to the same directory where you plan to store the configuration software prior to completing the installati...

Page 29: ...uration Managers 25 7 The program files will be installed in the directory C Program Files 3Com IntelliJack If you want to change the location of the installation click Change Otherwise click Next to accept the default location and continue ...

Page 30: ...d click Next The Typical installation will install both the Local Configuration Manager and the Central Configuration Manager on your system The Custom installation option lets you install just one of the programs if you wish 9 Review the settings you selected and click the Install button ...

Page 31: ...covered and managed through a standard web browser The Web Configuration Manager lets you access and control IntelliJacks from any Web enabled computer on your network In order to enable the Web Configuration Manager you will need the following A servlet compliant web server or stand alone servlet engine Internet Explorer 6 0 or later Netscape 7 0 or later web browser NJ225 Installation CD The fol...

Page 32: ...to the Start menu and select Settings Control Panel System Advanced Environment Variables Under System Variables section on the Advanced tab click New In the dialog box that appears enter JAVA_HOME in the variable home field and the directory path to the JDK in the variable value field Click OK 4 Copy the CB DLL file from the NJ225 Installation CD into the Windows system directory C WINNT SYSTEM32...

Page 33: ...our server is configured you can use the Web Configuration Manager from any Web enabled machine To do so 8 Open up your Internet Explorer or Netscape browser and point it to the following URL http Your_Server_IP_Address 8080 3ComIntelliJack main index jsp ...

Page 34: ...30 CHAPTER 2 INSTALLING THE CONFIGURATION MANAGERS ...

Page 35: ...software to any one of the four personal area network PAN ports on the front of the NJ225 2 Click on the desktop shortcut icon labeled IJ Local Config Mgr to start the program When it launches you will see a window like this 3 The MAC address Serial Number and Firmware Version of the currently connected NJ225 will appear at the top of the window If you connect to another NJ225 you must click the Q...

Page 36: ...fy an address If you elect to specify your own address you should enter the IP Address Subnet Mask and Default Gateway information in the appropriate fields 8 If you wish check the box next to Lock IP Address Selecting this option will ensure that the IntelliJack will always use a particular address 9 Click the Configure button and the Local Configuration Manager will ask you to enter the password...

Page 37: ...ombination of letters and numbers between 8 and 32 characters 3 To configure the NJ225 for management with an SNMP console select the SNMP Configuration box Enter the GET Community string and SET Community string in the appropriate fields Each field lets you enter any combination of letters and numbers up to 32 characters 4 Click the Configure button and the Local Configuration Manager will ask yo...

Page 38: ...34 CHAPTER 3 USING THE LOCAL CONFIGURATION MANAGER ...

Page 39: ...r machine Information such as traps and alerts are sent to the CCM on a periodic basis If you shut off the machine or close the configuration manager you will not be able to receive this information Discovering IntelliJacks on Your Network In order to manage the IntelliJacks on your network the Central Configuration Manager needs to include them in its database The easiest way to add new IntelliJa...

Page 40: ...double clicking on the IJ Cent Config Mgr desktop icon When it launches you will see a window similar to this one 2 Select Discovery from the Devices menu or click the Discover button on the toolbar The following window will appear NOTE The default subnets are the ones your machine is connected to ...

Page 41: ...discovers If unchecked the discovery process will add newly discovered devices to the current database 5 Click OK to start the discovery process The device discovery tool will return the following information from the IntelliJacks on your network IP address MAC address Subnet address Group name Location information Firmware version You can sort this information in ascending or descending order NOT...

Page 42: ...t of IP subnets to choose from Selecting Network will show all of the discovered devices in the database If you select a particular subnet only the devices in that subnet will be displayed When Firmware Ver is selected you will see a list of the different firmware versions loaded on the devices This view is particularly useful if you want to select only the devices with an old firmware version so ...

Page 43: ... see Changing Device Configuration on page 49 To get more detailed information about a device you should check its properties The process for configuring one or more IntelliJacks is the same You choose the changes or configurations you wish to make by selecting them from the various tabs in Device Properties for changes to a single IntelliJack or Configure for single or multiple IntelliJacks When ...

Page 44: ...c IP address or gets its address from a DHCP server You can also view and edit the IntelliJack s Group Name and Location 4 Click Apply to save any changes you make to the fields in this window Port Information 5 In the middle of this window you ll see information about each of the four PAN ports on the front of the IntelliJack You can check to see if the port is Enabled or Disabled if there is a n...

Page 45: ...o find out more information or configure that particular port Click OK to save your changes or Cancel to discard them Product Information 6 Under the Product Information box you can see the current firmware version of the IntelliJack the Product Name and the Serial Number ...

Page 46: ...f the fields with drop down lists Priority Schedule Policy LAN Port Egress Mode LAN Port Ingress Mode LAN Port Speed Duplex Max Frame Size Counter Mode and Power Forwarding NOTE The LAN Port Speed Duplex field will be grayed out for the NJ225FX because you are unable to configure the speed and duplex of a fiber connection NOTE For help determining the best configuration options for your system see...

Page 47: ...or each entry The IntelliJack lets you manage its ATU table You may want to know which MAC addresses have been plugged into a particular IntelliJack You may want to associate a MAC address with selected ports so the unselected ports will not receive frames from this MAC address You may want to set a certain priority level to the frames associated with the MAC address Finally you may want to lock d...

Page 48: ... or add to it You can edit existing VLAN settings tagging schemes and port associations by clicking the Edit button The VLAN table is a record of the VLAN settings which have been configured for a particular IntelliJack You may want to know which ports have been assigned a VLAN ID VID whether packets are tagged or untagged and whether the ports are associated with one another All of these configur...

Page 49: ... each of the four PAN ports on the IntelliJack RMON counters are extensions to the Simple Network Management Protocol SNMP that provide comprehensive network monitoring capabilities see appendix C page 77 for detailed information 12 To load the counter information from the IntelliJack click the Read button This window lets you monitor the traffic through your network by displaying statistics for m...

Page 50: ...gs tab to see the following window 14 You can view and edit the SNMP Community String settings and Trap settings for this particular NJ225 NOTE The device log records information regarding watch dog timer errors or other abnormalities If for example the IntelliJack has unexpectedly rebooted the event will be recorded in the device log 3Com Customer Support can use information in the device log to ...

Page 51: ...Settings Tab 16 Click on the Advanced Settings tab to see the following window 17 You can view the Event Alert Level and 802 1X Settings configured for this particular NJ225 802 1X is a security protocol for LANs that relies on the Extensible Authentication Protocol EAP to pass messages to RADIUS authentication servers NOTE For help configuring SNMP and 802 1X settings for your system see the Chan...

Page 52: ...e box will be grayed out on the CCMs of all other machines 18 Click Apply to save any changes you make and a configuration summary dialog box will appear Verify the information and click OK 19 Click Exit to close the Device Property window Alert Level Notifying Event Level 0 Disable all alert messages None Level 1 Allow critical alerts Device Power Failure Reboot Abnormal Reboot IP Address Change ...

Page 53: ... and select Configuration from the pop up menu NOTE It is possible to configure multiple IntelliJacks at the same time NOTE To make configuration changes to a IntelliJack from the Central Configuration Manager the NJ225 must be part of the device database See the section on Discovering NJ225 Devices on Your Network for information about including new devices in the database You must also be able t...

Page 54: ...ecking the box next to the characteristic you want to modify Then select a value from the drop list Forwarding Enable is the default setting for the Port State The other option is Blocking Disable Forwarding Enable allows traffic to pass through the individual ports By setting the Port State to Blocking Disable you can block any traffic from passing You may want to set the Port State to Blocking D...

Page 55: ...plugged into Port 1 of the NJ225 The default setting of the NJ225 is auto detect We recommend that you keep this setting as part of your configuration to ensure that power will only be forwarded to devices capable of receiving it The IEEE802 3af standard requires a powered device to present a signature to the power sourcing equipment The power sourcing equipment will check this signature and will ...

Page 56: ...st Both the Use IEEE 802 1p Traffic Class Field and Use IP TOS DiffServ fields look up schemes examine Ethernet packets to determine their prioritization The former looks at one portion of the packet effectively making it a Layer 2 tool The latter looks at a different part of the packet effectively making it a Layer 3 tool The Look up Scheme is part of the prioritization of Ethernet packets Priori...

Page 57: ... ports 16 To change the VLAN mode setting click the box and select an option from the drop list You can choose to Disable the VLAN In this mode ingress frames are forwarded through default switching rules You can also choose Enable unrestricted VLAN In this mode the port is associated with the current VLAN ID you have set Frames ingressed into this port without a VLAN tag or with the same VLAN ID ...

Page 58: ... different VLANs 19 You can also change the Incoming from LAN tag scheme By default all frames are received unmodified By receiving frames unmodified you will not risk losing communication between upstream switches and the devices connected to the IntelliJack due to misaligned VIDs If an upstream switch is sending a tagged packet but the device connected to one of the IntelliJack ports does not ne...

Page 59: ...e changes by clicking the box and selecting an option from the drop list The default setting for Port Authorize Mode is Disable 802 1X 802 1X is a standard for port based network access control Typical 802 1X implementations in an Ethernet switch usually include the authenticator as well as NOTE You should change the password to ensure that no one else can re configure your system Make sure you re...

Page 60: ...ne is connected to the IntelliJack the phone s MAC address will be locked into the ATU automatically Therefore packets sent from the phone can pass through by default without further authentication If 802 1X control is not required an IP phone can connect to a port with 802 1X disabled and voice traffic will pass through without authentication 24 When 802 1X security is applied authentication is r...

Page 61: ...t advanced 802 1X security settings click the Advanced Settings button in the Security Configuration window Primary and secondary accounting servers are similar to the settings for RADIUS servers The supplicant settings let you configure the IntelliJack as a supplicant to an 802 1X enabled upstream switch To enable this option select the box next to Supplicant When you do the other fields on the s...

Page 62: ...s the ability to send traps notifications to a trap destination such as an SNMP server when one or more conditions have been met Traps are network packets that contain data relating to a component of the system sending the trap When the condition for the trap has been met the SNMP agent forms an SNMP packet and sends it to the administration application A Cold Start Trap signals the administration...

Page 63: ...3 Set the Trap Community String in the final field of this window Advanced Configuration 34 Select the Advanced Configuration tab for this window Event Alert Levels 35 At the top of this window is a setting to specify the Event Alert Level The NJ225 can alert you when specific events occur While this lets you monitor and respond to network events more quickly it also creates an additional workload...

Page 64: ... and the device it s plugged into are straight through cables not cross over cables If you use cross over cables to connect devices to your network you would need to set this option to Manual MDIX Configuration so that network traffic can pass between the device and the PAN port of the IntelliJack 39 You may want change the Data Rate Control options for either ingress or egress traffic The default...

Page 65: ...ag is added the maximum size increases to 1522 bytes As a result this is the default setting If your network uses larger frames you can select the 1536 byte option Restoring to Base Configurations 42 At the bottom of this window is an option to restore some of the configuration settings to their default values If you check this box the following settings will be restored Priority Option 0 2 4 6 Mu...

Page 66: ...wer Forward Auto detection Local Configuration Enable SNMP SET Enable SNMP Traps Disabled Event Alert Level 2 ATU Table Blank VTU Table Blank All RADIUS settings Blank 802 1X Supplicant Status Disabled 802 1X Supplicant User Name and Password Blank Port Setting Default Value State Forwarding Link Auto negotiation Flow Control Off MDI X Force MDI Multicast Limit 3 Priority Lookup Tag IPV4 Port Prio...

Page 67: ...ou may want to provide network access between the hours of 7 00 a m and 10 00 p m You can use the schedule function to automatically turn off the ports at 10 00 p m You can even use this feature to automatically repeat the operation on a regular basis From the file menu you can use the features Backup and Restore The Backup operation lets you save a snapshot of the configuration of one or more Int...

Page 68: ...on field of the NJ225 can be very useful If you know the IP address or MAC address of the computer or networked device you can use the Central Configuration Manager to find the right IntelliJack 1 Select Find Location from the Tools menu You will see a window like this 2 Enter the IP address or the MAC address of the network device you wish to find 3 Click the Find button When the search is comple...

Page 69: ...ng one of the grouping options available to you in the drop down list at the top left corner of the main window 2 Select Upgrade from the devices menu A window like this will appear 3 Select Yes to continue the upgrade operation A window like this will appear 4 Select a valid firmware image by typing the path to the file or by using the Browse button This file is the one that you have downloaded a...

Page 70: ...mediately or select a specific time and date to send the file You may for example want to perform an upgrade during off hours such as a weekend 6 Click Next and a window like this will appear 7 Review the list of IntelliJacks you want to upgrade If you want to modify this list click Cancel and restart the firmware upgrade procedure ...

Page 71: ...Upgrading the NJ225 Firmware 67 8 Type your password in the Password field then click Finish The Upgrade Progress dialog box will appear ...

Page 72: ...the Central Configurator Log subdirectory under the directory where you installed the IntelliJack configuration software You can the log by selecting Log History from the View menu A window like this will appear To view the details of a particular log select it and click Detail If an upgrade or configuration operation fails for some reason a message will appear in the log file Consult the troubles...

Page 73: ... IntelliJacks in your network To view and make changes to the firmware upgrades you have scheduled follow these steps 1 Select Manage Schedule from the Tools menu A window like this will appear 2 To view the details of a scheduled upgrade select it from the list and click Show Devices To cancel a scheduled upgrade select it from the list and click Delete ...

Page 74: ...70 CHAPTER 4 USING THE CENTRAL CONFIGURATION MANAGER ...

Page 75: ...ctions for terminating the cable Be sure to test the connector and verify it is working Has a valid connection to the network Adheres to proper length and cabling specifications for your network The IntelliJack is configured for manual MDI Be sure to use a straight through cable If you want to use a cross connect cable you must change settings in the Configuration Manager software Troubleshooting ...

Page 76: ...vice does not exceed 7 watts The IntelliJack can only forward up to 7 watts Power LED is blinking continuously Unit has detected a problem Traffic can pass through but management will not work Contact 3Com Technical Support Authentication Failure Wrong password has been entered Confirm correct password and re type Timeout Device did not respond within a specified period of time Refresh the screen ...

Page 77: ... available to manage your installation with minimal disruption to your network Expert assessment and implementation services are offered to fill resource gaps and ensure the success of your networking projects More information on 3Com Extended Warranty and Professional Services is available at http www 3com com Where To Go For Help Contact your authorized 3Com reseller or 3Com for additional produ...

Page 78: ...To obtain telephone support as part of your warranty and other service benefits you must first register your product at http eSupport 3com com When you contact 3Com for assistance please have the following information ready Product model name part number and serial number A list of system hardware and software including rev level Diagnostic error messages Details about recent configuration changes...

Page 79: ...ion using the following e mail apr_technical_support 3com com Or request a repair authorization number RMA by fax using this number 65 543 6348 From anywhere in these regions call You can also obtain support in this region using the following URL 44 0 1442 435529 http emea 3com com support email html From the following countries you may use the numbers shown Austria Belgium Denmark Finland France ...

Page 80: ...0 988 2112 0 810 444 3COM 1 800 998 2112 1 800 998 2112 1 800 998 2112 52 5 201 0010 1 800 998 2112 1 800 998 2112 0800 13 3COM 1 800 998 2112 AT T 800 998 2112 AT T 800 998 2112 AT T 800 998 2112 1 800 998 2112 AT T 800 998 2112 AT T 800 998 2112 Guatemala Haiti Honduras Jamaica Martinique Mexico Nicaragua Panama Paraguay Peru Puerto Rico Salvador Trinidad and Tobago Uruguay Venezuela Virgin Isla...

Page 81: ... 802 3u industry standard for a 100 Mbps baseband CSMA CD local area network Performance Auto negotiation Communication speed 10 Mbps or 100 Mbps and duplex mode full or half can be determined through auto negotiation with the attached devices The IntelliJack attempts to negotiate the fastest connection possible 100 Mbps full duplex The communication speed and duplex mode can also be controlled us...

Page 82: ...ment Operating temperature 32 to 104 F 0 to 40 C Storage temperature 22 to 194 F 30 to 90 C Operating humidity 10 90 noncondensing Storage humidity 10 90 noncondensing Operating Altitude 8 000 ft max Storage Altitude 20 000 ft max Standards Conformance IEEE802 3 10BASE T 100BASE TX and auto negotiation Power Over Ethernet Capacitive Power Discovery Process and IEEE 802 3af Power forwarding IEEE802...

Page 83: ...he count includes the FCS but not the preamble InBadOctets Total data octets received in frames with an invalid FCS fragments and jabbers are included The count includes the FCS but not the preamble Undersize Total frames received with a length of less than 64 octets but a valid FCS Fragments Total frames received with a length of less than 64 octets and an invalid FCS In64Octets Total frames rece...

Page 84: ...in OutBroadcasts or OutPause OutFCSErr Total frames transmitted with a valid length and an invalid FCS OutGoodOctets Total data octets transmitted The count includes the FCS but not the preamble Out64Octets Total frames transmitted with a length of exactly 64 octets including those with errors Out127Octets Total frames transmitted with a length of between 65 and 127 octets inclusive including thos...

Page 85: ...Total number of successfully transmitted frames that experienced exactly one collision Deferred Total number of successfully transmitted frames that are delayed because the medium is busy during the first attempt ...

Page 86: ...Product Specifications 82 ...

Page 87: ...rranty or representation that its software products will meet Customer s requirements or work in combination with any hardware or software products provided by third parties that the operation of the software products will be uninterrupted or error free or that all defects in the software products will be corrected For any third party products listed in the 3Com software product documentation or s...

Page 88: ... standard of the Voluntary Control Council for Interference by Information Technology Equipment VCCI If this equipment is used in a domestic environment radio disturbance may occur in which case the user may be required to take corrective actions Manual version 2 1 April 2004 ...

Reviews: