Manually Configuring IP Information
35
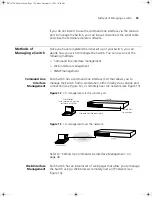
If you have not logged onto the Switch before, you will be prompted to
enter a new password. 3Com recommends that you change your
password from its default blank setting.
2
At the login and password prompts, enter
admin
as your user name and
enter your password at the password prompt (or just press Return if you
have not yet set a password). If you have logged on correctly, the
top-level menu of the command line interface is displayed as shown in
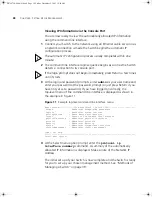
the example in Figure 9.
Figure 9
Example top-level command line interface menu
3
At the Select menu option prompt you can either:
■
enter the
protocol ip basicConfig
command. At the
Enter
configuration method
prompt enter
manual
. The screen
prompts you to enter IP information.
or
■
enter the
gettingStarted
command. At the
Enter
configuration method
prompt enter
manual
. The screen
prompts you to enter IP information.
4
Enter the IP address, subnet mask, and gateway IP address for the Switch.
The screen displays a summary of the information entered.
If using the
gettingStarted
command you will then be prompted to
enter system information, change passwords, and then given the option
to carry out advanced configuration.
The initial set up of your Switch is now complete and the Switch is ready
for you to set up your chosen management method. See “Methods of
Managing a Switch” on page 39.
Menu options: -----------3Com SuperStack 3 Switch 3226-----------------------
bridge - Administer bridge-wide parameters
feature - Administer system features
gettingStarted - Basic device configuration
logout - Logout of the Command Line Interface
physicalInterface - Administer physical interfaces
protocol - Administer protocols
security - Administer security
system - Administer system-level functions
trafficManagement - Administer traffic management
Type ? for help.
------------------------------------- (1)------------------------------------
Select menu option:
DUA1750-0AAA01.book Page 35 Friday, December 5, 2003 10:24 AM
Summary of Contents for SUPERSTACK 3 3226
Page 6: ...DUA1750 0AAA01 book Page 6 Friday December 5 2003 10 24 AM...
Page 28: ...28 CHAPTER 2 INSTALLING THE SWITCH DUA1750 0AAA01 book Page 28 Friday December 5 2003 10 24 AM...
Page 50: ...50 CHAPTER 4 PROBLEM SOLVING DUA1750 0AAA01 book Page 50 Friday December 5 2003 10 24 AM...
Page 58: ...58 APPENDIX A SAFETY INFORMATION DUA1750 0AAA01 book Page 58 Friday December 5 2003 10 24 AM...
Page 70: ...DUA1750 0AAA01 book Page 70 Friday December 5 2003 10 24 AM...


