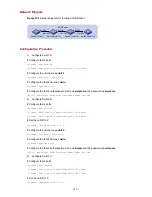
Network Diagram
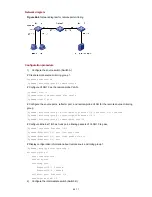
Figure 47-4
Network diagram for forming an XRN fabric
XRN Fabric
GE1/0/25
GE1/0/26
GE1/0/25
GE1/0/26
GE1/0/25
GE1/0/26
Switch A(Unit 1)
Switch B(Unit 2)
Switch C(Unit 3)
Switch D(Unit 4)
Configuration Procedure
1) Configure Switch A.
# Configure fabric ports.
<Sysname> system-view
[Sysname] fabric-port GigabitEthernet1/0/25 enable
# Configure the unit name as
Unit 1
.
[Sysname] set unit 1 name Unit1
# Configure the fabric name as
hello
.
[Sysname] sysname hello
# Configure the fabric authentication mode as
simple
and the password as
welcome
.
[hello] xrn-fabric authentication-mode simple welcome
2) Configure Switch B.
# Configure fabric ports.
<Sysname> system-view
[Sysname] fabric-port GigabitEthernet1/0/25 enable
[Sysname] fabric-port GigabitEthernet1/0/26 enable
# Set the unit ID to 2.
[Sysname] change unit-id 1 to 2
# Configure the unit name as
Unit 2
.
[Sysname] set unit 1 name unit2
# Configure the fabric name as
hello
.
[Sysname] sysname hello
# Configure the fabric authentication mode as
simple
and the password as
welcome
.
[hello] xrn-fabric authentication-mode simple welcome
3) Configure Switch C.
# Configure fabric ports.
<Sysname> system-view
[Sysname] fabric-port GigabitEthernet1/0/25 enable
[Sysname] fabric-port GigabitEthernet1/0/26 enable
# Set the unit ID to 3.
[Sysname] change unit-id 1 to 3
47-11

