background image

110

3D Systems, Inc

.

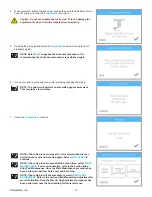
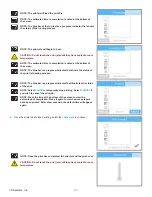
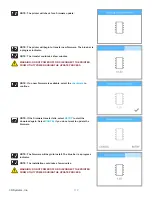
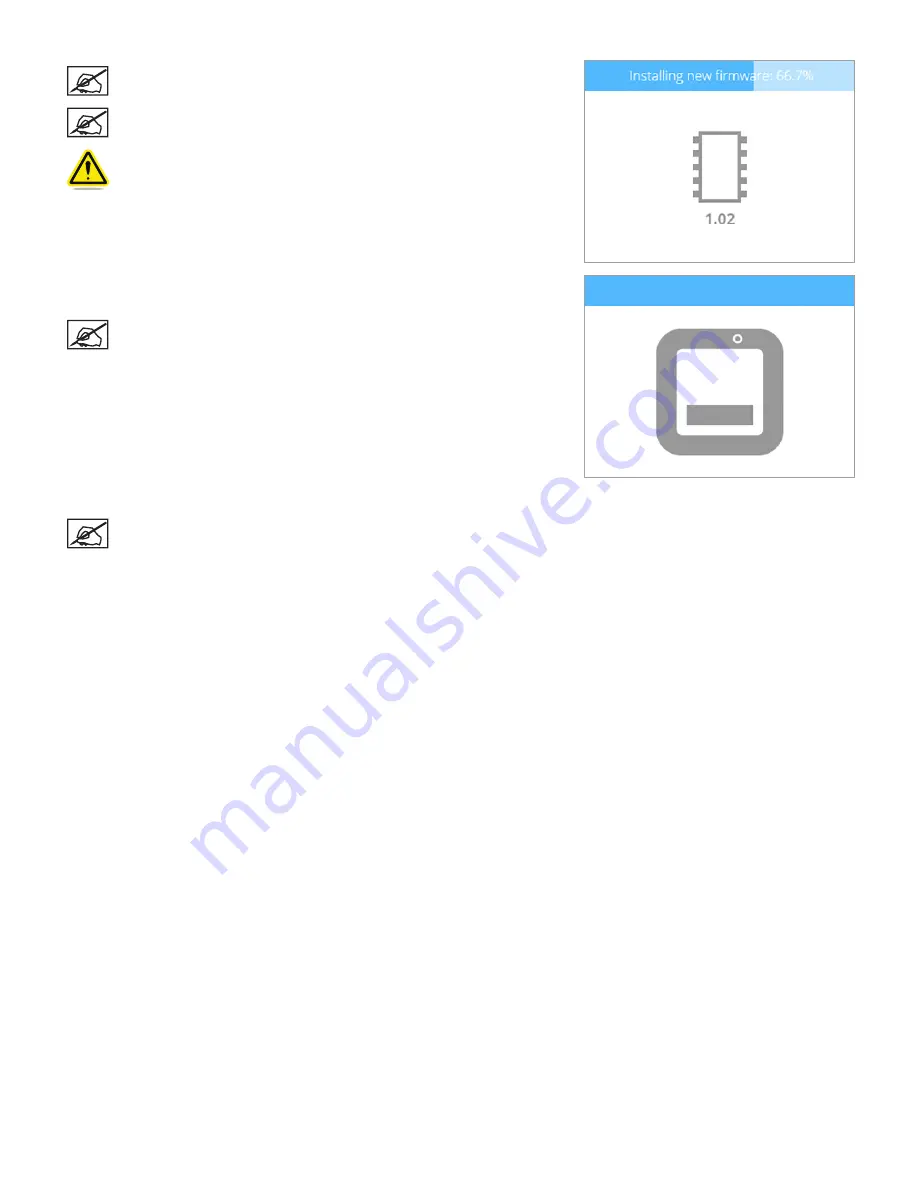
NOTE: The firmware will begin to install. The blue bar is a progress 

indicator .

NOTE: The installation could take a few minutes .

WARNING: DO NOT POWER OFF OR DISCONNECT THE PRINTER 

FROM UTILITY POWER DURING THE UPDATE PROCESS .

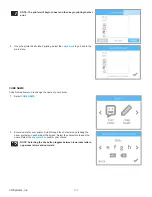
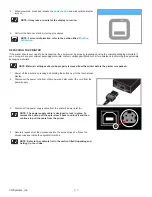
4 .  When prompted, press and release the 

power button

 and wait until the display 

turns on . 

NOTE: It may take a minute for the display to turn on .

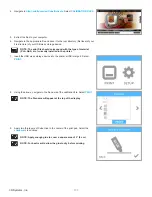
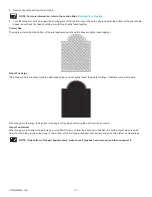
5 .  Perform the Auto Level and Auto Gap procedures .

NOTE: For more information, refer to the section titled 

Print Pad 

Calibration

 .

Summary of Contents for CUBE

Page 1: ...Cube Personal 3D Printer User Guide Original Instructions 3rd Generation ...

Page 2: ...S AND REQUIREMENTS 6 Weight 6 Software 6 OpenGL Version 6 Windows Requirements 6 MAC OS X Requirements 6 Android 6 iOS 6 Wireless Options 6 USB Mass Storage Device 6 Electrical Requirements 6 Material Storage 6 Dimensions 7 Operating Environment 7 6 UNPACKING AND SETTING UP YOUR CUBE 8 Contents 8 Unpacking and Installing your Cube 8 Initial Setup of the Cube 12 Menu Overview 23 Touchscreen Display...

Page 3: ...iew 40 Account Settings 41 Design Feed Tab 42 Shop Tab 43 My Shelf Tab 46 Print Tab 48 Print Settings 49 Printer 54 Connecting Cubify To Your Printer 56 Sidewalks 69 Supports 69 Printing A Model Via Wireless Connection 70 Printing From A Desktop Application 70 Printing From A Mobile Application 73 Saving A Model to A Mass Storage Device 77 Desktop Application 77 10 OPERATION PROCEDURES 79 Applying...

Page 4: ...ntenance 94 Clean The Print Pad 94 Printer Calibration 95 Test Print 103 Cube Name 104 Recovering the Cartridge 105 Updating the Cube Firmware 108 Updating Firmware Using Wi Fi 108 Updating Firmware Using USB 111 Repacking the Printer 113 Contacting Support 115 12 CUBIFY SUSTAINABILITY PROGRAM 116 ...

Page 5: ...ever there is no guarantee that interference will not occur in a particular installation If this equipment does cause harmful interference to radio or television reception which can be determined by turning the equipment off and on the user is encouraged to try to correct the interference by one or more of the following measures Reorient or relocate the receiving antenna Increase the separation be...

Page 6: ... to and operate concurrently with all rights and remedies conveyed by such consumers protection laws and regulations including but not limited to these additional rights THIS WARRANTY IS THE ONLY WARRANTY PROVIDED FOR THE CUBE 3D PRINTER TO THE MAXIMUM EXTENT PERMITTED BY LAW 3D SYSTEMS EXPRESSLY DISCLAIMS ALL OTHER WARRANTIES FOR THE CUBE 3D PRINTER AND EACH OF ITS COMPONENTS WHETHER THOSE WARRAN...

Page 7: ...appropriate use Ensure small 3D prints are not accessible to young children These 3D prints are potential choking hazards for young children DO NOT change a material cartridge during printing doing so may damage the Cube HOT SURFACE HAZARD DO NOT TOUCH THE PRINT JETS DURING SETUP AND OPERATION THE PRINT JETS BECOME VERY HOT Caution DO NOT disconnect the CUBE from utility power while the print jets...

Page 8: ...ridge 25 free 3D print creations USB inlet port and Wi Fi connectivity CUBE 3D PRINTER PROPERTIES Technology Plastic Jet Printing PJP Print Jets Up to two 2 jets Maximum Creation Size 6 x 6 x 6 152 40 mm x 152 40 mm x 152 40 mm Material Tough recyclable plastic Layer Thickness 070 mm 70 microns 200 mm 200 microns Supports Fully automated easy to peel off Cartridge 1 cartridge prints 13 to 14 mid s...

Page 9: ...nt Jets B Print Jet Tubes C Material Cartridges D Print Pad E Print Platform F Touchscreen Display G On Off Button H USB Inlet Port Mass Storage Device I Power Inlet J Purge Bins K USB B Port for future use H I D E B B F G L H C C J A K I ...

Page 10: ...red for Ad Hoc Wi Fi print job submission MAC OS X REQUIREMENTS OS X 10 8 and 10 9 Minimum screen resolution 1400 x 900 ANDROID 4 0 ICS tablets supported IOS 6 0 iPhone4 and newer Minimum screen resolution iPhone4 WIRELESS OPTIONS 802 11b g with WPS Infrastructure Ad Hoc mode USB MASS STORAGE DEVICE USB mass storage device supplied with the printer to transfer print files to the printer using the ...

Page 11: ...ems Inc DIMENSIONS 13 3 H x 13 3 W x 11 D 33 5 x 33 8 x 28 cm OPERATING ENVIRONMENT Room Temperature 16 29 C 60 85 F Non Condensing Relative Humidity 30 60 13 3 33 5 cm 13 3 33 5 cm Front View Side View 11 28 cm ...

Page 12: ...ction titled Print Pad Maintenance NOTE The actual appearance of the contents may differ from the illustrations UNPACKING AND INSTALLING YOUR CUBE NOTE Keep all packing materials for future transport Transporting a printer that is not packaged properly may damage the printer and void the manufacturer s warranty 1 Pull the clips A and remove them from the top of the printer box A Power Supply Power...

Page 13: ... where you intend to use it NOTE When installing the printer there must be a minimum of 8 203 mm of space on top and on either side of the printer NOTE There must be a minimum of 4 102 mm space in front of and behind the printer 7 Remove the top insert 8 203 mm 8 203 mm 8 203 mm Hand Clearance Around the Printer Build Plate Travel Area 4 102 mm 4 102 mm Back Front Front View Top View ...

Page 14: ...ge device the power supply and cord and the bottle of Cube Glue NOTE Keep all packing materials for future repacking NOTE Depending on your configuration you may receive 1 or 2 cartridges with your printer 7 Connect the power supply cable to the power inlet port A on the printer NOTE Ensure the connection is secure The cable should lock in place To remove the cable pull back on the outer cable end...

Page 15: ...11 3D Systems Inc 4 Connect the power cord to utility power and to the power supply NOTE Ensure the connection is secure 5 Power on the printer by pressing the button next to the touchscreen display ...

Page 16: ...ercase letters and numerals NOTE The printer will search for area wireless networks 3 Connect the printer to a wireless network Use the up or down arrows to scroll to your network choice Select the desired network name Select SKIP to bypass this step NOTE You can connect to a wireless network at any time Navigate to the Network screen select WIFI and follow the prompts on the touchscreen display N...

Page 17: ... enter the password Once entered select the checkmark to continue NOTE The display will indicate when the network connection has been made NOTE If the wrong password was entered you will be asked to enter the password again after a few seconds NOTE If the printer can not connect to a network you will be asked to select another network after a few seconds ...

Page 18: ...Cubify and log in to your account NOTE You must be logged in to www cubify com to activate your printer If you have not activated an account select SIGN UP and enter the appropriate information 6 Go to www cubify com activate NOTE The serial number for your printer will appear on the printer s touchscreen display Take note of the serial number You will need it to activate your printer 7 Select the...

Page 19: ...he activation code You will need to enter it into the printer s touchscreen display to activate the printer 5 Enter the 4 digit activation code into the printer and select the checkmark to continue 6 Select the checkmark to complete the registration and warranty activation process NOTE It is very important to calibrate your printer ...

Page 20: ...int jet from the cartridge that will be mounted on the left side of the printer into the left print jet opening on top of the printer 6 Rotate the print jet clockwise until the dots A align Select the checkmark to continue NOTE As you rotate the print jet ensure the print jet tube is tucked under the top of the printer cover 7 Mount the cartridge on the left side of the printer and select the chec...

Page 21: ...ill begin to heat Wait until the printer has finished heating and then follow the user prompts in the touchscreen menu 5 Insert the print jet from the cartridge that will be mounted on the right side of the printer into the right print jet opening on top of the printer 6 Rotate the print jet clockwise until the dots align Select the checkmark to continue NOTE As you rotate the print jet ensure the...

Page 22: ... melted material into the refuse bin 5 The right cartridge has been installed Select the checkmark to continue 6 Select PRINT 7 It is recommended that Auto Level is performed prior to the first print Ensure the print pad is clean and installed properly and then select the checkmark to continue to Auto Level NOTE Auto Level should be performed when the printer is positioned away from bright lights ...

Page 23: ...ructions on the touchscreen display Use the included 1 5 mm Allen wrench to loosen the lock screws securing the adjustment knobs to the bracket before turning the knobs Select the checkmark to continue NOTE The lock screw 1 is located just below the adjustment knob 2 The lock screw for adjustment knob B can be accessed from the front of the printer The lock screw for adjustment knob A can be acces...

Page 24: ...ll the print pad and select the checkmark to perform Auto Gap NOTE To install the print pad place it on top of the adjustment knobs When the print pad is centered properly magnets will secure the print pad to the adjustment knobs NOTE The printer will perform an automated gap measurement 6 Select the checkmark to continue NOTE The value presented on the touchscreen display is the absolute print pa...

Page 25: ...process of printing the welcome message test print Select SKIP to bypass this test print You can print this test print at any time Navigate to the System 1 screen and select TEST PRINT Follow the prompts in the touchscreen display NOTE If the color built into the test print does not match a color of one of the installed print cartridges the printer will assign an installed cartridge color to the t...

Page 26: ...22 3D Systems Inc 4 Select the checkmark to go to the main menu NOTE You may also press and release the button next to the touchscreen display to return to the main menu ...

Page 27: ...ct to a Bluetooth device install cartridges and view the printer status Navigation Navigation between screens is performed by pressing the right or left arrows Materials CARTRIDGE STATUS CARTRIDGE STATUS allows you to view the type and color of the material that is installed It also displays the estimated amount of material left in the cartridge CHANGE CARTRIDGE Selecting CHANGE CARTRIDGE allows y...

Page 28: ...king print jets Network WIFI The Network screen provides a utility to connect the printer to a wireless network Wireless connections include Wi Fi Ad Hoc System 1 TEST PRINT TEST PRINT is a feature that allows you to perform a test print which is saved in the printer This Test Print is the same Welcome Message test print that is printed when first setting up and activating your printer CUBE NAME C...

Page 29: ...m 3 FIRMWARE Selecting FIRMWARE allows you to update the printer firmware either with a file downloaded to a USB mass storage device or by wireless connection INFO By selecting INFO the printer will display the printer status ...

Page 30: ...wing procedure Installing the cartridge without following the prompts from the printer menu can damage the printer and print jets and void the manufacturer s warranty 1 To install a cartridge select SETUP 2 Select CHANGE CARTRIDGE 3 Select the left cartridge NOTE This procedure demonstrates replacing the left material cartridge Follow the same concept to replace the right material cartridge if app...

Page 31: ...der the top of the printer cover 6 Mount the cartridge on the left side of the printer Select the checkmark to continue NOTE It may become necessary to rotate the cartridge to seat it properly NOTE The print jet will begin to heat Once the print jet has reached the operating temperature the printer will prime melted material into the refuse bin 7 The left cartridge has been installed Select the ch...

Page 32: ...ure the print pad is clean before printing NOTE For best results perform the Auto Level and Auto Gap procedures before your first print NOTE After every 10 prints the printer will prompt you to perform the Auto Level and Auto Gap procedures 1 After powering on your printer press the touchscreen to begin 2 Select PRINT NOTE If the file is saved on a USB mass storage device insert the device into th...

Page 33: ... A Material Cartridge for instructions about replacing a cartridge NOTE If there is not enough material to complete the print but you want to use up the remaining material select the checkmark to continue printing NOTE If the file was built with color s that are not installed the printer will assign a color from one of the installed cartridges that match the material type Select the checkmark to c...

Page 34: ...gress indicator that shows the status of the print jet heating process NOTE The blue bar is a progress indicator that illustrates the status of the print NOTE Select PAUSE to temporarily stop printing Select CANCEL if you wish to cancel the print job NOTE Press the time at the bottom of the screen to view the percentage of completion Press it again to view how many layers have been printed After a...

Page 35: ...ets will begin to cool CAUTION Do not touch the print jets until they have cooled to room temperature 4 Refer to the section titled Finishing Your Creation for information about removing your creation from the print pad cleaning the print pad and cleaning the part ...

Page 36: ... remove a part so the print pad is not damaged or gouged 4 Rinse your creation under hot water to ensure all of the glue has been removed 5 Rinse the print pad under water to clean off any remaining glue 6 Dry the print pad completely before reinstalling it into the printer CAUTION Failure to completely dry the print pad before reinstalling it into the printer can damage sensitive electrical compo...

Page 37: ...tters cut away the support structure from your creation Once the supports have been cut away use fine grade sandpaper not included to finish smoothing the part When using Infinity Rinse Away support material run warm water over the part until the part can be removed from the print pad Submerge the part in warm water until the supports begin to soften Pull the supports away from the part using plie...

Page 38: ...tion is available from the Google Play Store CUBIFY SOFTWARE INSTALLATION Installing Cubify Software for Windows NOTE Windows computers can only communicate with printers that are connected to the same wireless network 1 Go to www cubify com and log in with your username and password 2 Go to www cubify com en cube activate Select WINDOWS 3 Navigate to the Downloads folder Double click the Cube ins...

Page 39: ...x and then select Next to continue NOTE By selecting the checkbox you agree to the license terms and conditions 6 Enter a User Name and Organization in the provided fields Select Next to continue 7 Select Next to install the application in the listed location or select Change and browse to a different location 8 Select Install to continue ...

Page 40: ...ware For Apple OS X NOTE Apple OS X computers can only communicate with printers that are connected to the same wireless network 1 Go to www cubify com and log in with your username and password 2 Go to www cubify com en cube activate Select MAC 3 Double click the Cube software dmg installer file ...

Page 41: ...software NOTE Safari users will not have to unzip the dmg file it unzips as it downloads NOTE Cubify can be opened by navigating to the Applications page and double clicking the Cubify icon Installing Cubify for Android NOTE Android devices can only communicate with printers that are connected to the same wireless network 1 Open the Play Store from your Android browser 2 Select the Search icon ...

Page 42: ...38 3D Systems Inc 4 Enter Cubify in the search box 5 Select the Cubify application and install it ...

Page 43: ...ng Cubify for iOS NOTE iOS devices can only communicate with printers that are connected to the same wireless network 1 Locate the Cubify application from the App Store and select it 2 Download the application to your iOS device ...

Page 44: ...he 3D printing lifestyle The following overview illustrates the desktop applications and some features may not be available on mobile platforms A Tool Ribbon Tools used to access the print files from www cubify com B My Shelf Your purchases or downloads can be stored on the Shelf You can also store custom configurations of your creations C Design Feed The location to select free or for purchase pr...

Page 45: ...mation about your orders C Order Cartridges Order cartridges from Cubify com through the Cubify application D Privacy Policy Read the Privacy Policy E Terms of Service Read the Terms of Service F App Settings Select your unit of measure to either inches or millimeters G Help Application documentation H About View the software version number A B C D E F H G ...

Page 46: ...an save it to the Shelf For some creations you may select the option to have Cubify print it for you For more information please visit www cubify com NOTE Some models can be purchased To purchase a creation select the option to add to the cart When ready you can finish the transaction and download the model to your Shelf A Filter Narrow the choices to your preferences B Selection Select an item to...

Page 47: ...ategories Select a category from the Shop menu to view the available sub categories This allows for quicker access to your favorite design types and products A Category Dropdown Select a category from a dropdown list B Featured List Select a category from a list A B ...

Page 48: ...44 3D Systems Inc Select the category dropdown list to narrow your search Categories are divided into product types and collections After selecting a category you can select a collection or a type ...

Page 49: ... selecting a creation you can find more information about the item purchase it print it free files only or add it to your shelf Some models have multiple views Select the navigation arrows A to see other views Not an available feature for mobile applications A ...

Page 50: ...es include STL files Print files are cube3 files optimized and ready to print B ADD You can add items to your shelf C SYNC You can refresh your items in MY SHELF with your latest purchases or additions D EKOCYCLE Icon The EKOCYCLE icon indicates a print ready EKOCYCLE Cube file E Item Selection You can select an item to print F Cube File The Cube icon indicates an optimized cube3 printable file G ...

Page 51: ...n to view information about the selected item B EXPORT Export the item to your device storage C DESELECT Deselect a selected item D DELETE Delete a selected item from My Shelf E Print Now Select Print Now to prepare the selected item for printing F Selected The checkmark indicates that the item has been selected A B C D E F ...

Page 52: ...model M VIEW Change the view of the model N PRINTER Locate and connect to your printer on your wireless network O Printer Name The name of the printer connected to your network The printer is considered offline if it is not connected to a wireless network P Help Find help for navigating the print tab in the application Q Cartridges Change the cartridge colors and material type of a non networked p...

Page 53: ...s not require fine details Premium A strong print that requires fine details Custom Allows you to set the layer thickness density and fill pattern You may also enable or disable supports and rafts Layers 0 070 mm High quality prints 0 200 mm Shorter print time Density Hollow Short print times and low material use Strong Stronger prints Almost Solid High material use and almost solid prints Fill Pa...

Page 54: ...Custom to view the current print settings You can personalize the settings by selecting a category and then selecting the arrows to expand your options Layers 0 070 mm 0 200 mm Density Hollow Strong Almost Solid Fill Pattern Honeycomb Diamonds Lines ...

Page 55: ...51 3D Systems Inc Print Settings Draft Select Draft for prints that do not require strength or fine detail Layers 0 200 mm Density Hollow Fill Pattern Lines ...

Page 56: ...52 3D Systems Inc Print Settings Standard Select Standard for strong prints that do not require fine detail Layers 0 200 mm Density Strong Fill Pattern Diamonds ...

Page 57: ...53 3D Systems Inc Print Settings Premium Select Premium for prints that require strength and fine detail Layers 0 070 mm Density Strong Fill Pattern Diamonds ...

Page 58: ...Cube Select Offline Cube if you intend to use a printer that is not connected to your network C Offline EKOCYCLE Cube Select Offline EKOCYCLE Cube if you intend to use an EKOCYCLE Cube printer that is not connected to your network D Find Cubes on Network Refresh the list of printers on your network E Add Cube Manually Manually add a printer to your network by entering an IP address A B C D E F ...

Page 59: ...55 3D Systems Inc Information Select Information A to view the printer status A ...

Page 60: ...irelessly or to view the printer properties 1 Select PRINTER A 2 Select the printer on your network B If you would rather print from a non network printer select Offline Cube C NOTE If your printer is not listed select Refresh D and then select your printer from the list You can also manually connect to the printer by entering its IP address and selecting ADD E B C D E A ...

Page 61: ...t the ADD button Selecting From My Shelf will take you to the MY SHELF tab Selecting From File will allow you to browse to the file on your computer where you can drag and drop the file directly to the print pad Not an available feature for mobile applications ...

Page 62: ...ms Inc Remove To remove the model from the print pad select the Remove button Select Yes to confirm your decision You can find the model again by selecting My Shelf Not an available feature for mobile applications ...

Page 63: ... you want to color For models with multiple parts select and drag a color to the part of the model you want to color For mobile applications press and hold the color wheel and then drag it to the part you want to color For models with multiple parts press hold and drag the color wheel to the part of the model you want to color ...

Page 64: ...en select the Move tool Freely move the model by selecting it and then dragging it across the print pad You can also select an arrow on the Free Move section of the Move toolbar Precision movements can be made by entering a value in the Exact Move field selecting the X axis or Y axis and selecting Move When finished close the Move toolbar and select the Move button to deselect it Not an available ...

Page 65: ... X axis Y axis or Z axis and then select either the right or left arrow You can also rotate the model by selecting an axis and entering a value in the Exact Rotate field Select Rotate to rotate the model to the specified amount When finished close the Rotate tool and select the Rotate button to deselect it Not an available feature for mobile applications ...

Page 66: ...ncrease the size or the down arrow to decrease the size You can also enter a percentage value in the Exact Scale field and select Scale Entering 50 will reduce the model to half of the current size Entering 200 will double the size of the model The value 100 will have no effect When finished close the Scale tool and select the Scale button to deselect it Not an available feature for mobile applica...

Page 67: ...63 3D Systems Inc Center Model Tool Select the model and then select the CENTER button to center the model on the print pad Not an available feature for mobile applications ...

Page 68: ...ool enables you to revert any changes back to default If the model has been moved rotated scaled or centered select the model and then select RESET to revert it back to its original state Select Yes to confirm your decision to reset the model ...

Page 69: ...65 3D Systems Inc Zoom In Zoom in on a model by selecting it and then selecting IN ZOOM IN does not affect the size of the model but brings it closer for better viewing ...

Page 70: ...66 3D Systems Inc Zoom Out Zoom out on a model by selecting it and then selecting OUT ZOOM OUT does not affect the size of the model but pushes the print pad away for another perspective ...

Page 71: ...67 3D Systems Inc Center Model Tool Select the model and then select the Center button to center the model on the print pad Not an available feature for mobile applications ...

Page 72: ...68 3D Systems Inc Change Views Select Change Views and then select the camera viewing angle ...

Page 73: ...ency of warping especially when printing flat parts with ABS material They should not be used for parts that have fine details Supports Supports are used when printing creations that need a supporting structure to print properly These parts may have overhangs cavities or other openings that will not print correctly without a supporting structure A ...

Page 74: ... device The Cubify application includes useful tools to place a creation in the optimum position for printing The model can be moved or rotated using a mouse Zoom In Out Rotate the mouse wheel in either direction Move the Stage Press and hold the mouse wheel and drag the mouse Rotate the Stage Right click and drag the mouse to rotate the stage 1 Select an item from My Shelf and select Print Now 2 ...

Page 75: ... of Cube Glue to the print pad and select OK 5 Select PRINT on the printer s touchscreen display 6 Select the checkmark to continue NOTE For best results allow the glue to dry before printing NOTE To ensure proper adhesion the glue area should be larger than the base of your printed creation ...

Page 76: ...e print jets will heat to operating temperature NOTE The printer will begin to print 4 When the printer has finished printing select the checkmark to continue NOTE Follow the steps in the section titled Finishing Your Creation ...

Page 77: ...To print a file ensure the mobile device and the printer are connected on the same wireless network NOTE Transferring a print file over a wireless network may take more time than transferring a print file from a USB mass storage device The model view can be changed by using the following gestures Zoom Out Zoom In Rotate the Print Pad Move Model ...

Page 78: ...74 3D Systems Inc 1 Select an item from My Shelf 2 Select Print Now ...

Page 79: ...d and drag a color wheel to the model to change the color 5 Select Print NOTE The printer will generate a cube3 file and then transfer it to the printer over the wireless network 6 Select PRINT on the printer s touchscreen display ...

Page 80: ...e printing NOTE To ensure proper adhesion the glue area should be larger than the base of your printed creation NOTE The print jets will heat to operating temperature NOTE The printer will begin to print 5 When the printer has finished printing select the checkmark to go to the main menu NOTE Follow the steps in the section titled Finishing Your Creation ...

Page 81: ...Pan Zoom Rotate the mouse wheel in either direction Move the Stage Press and hold the mouse wheel and drag the mouse Rotate the Stage Right click and drag the mouse to rotate the stage 1 Select an item from My Shelf and select Print Now 2 Select a color wheel to set a color for your model 3 Select a color and then select Set to continue NOTE For a list of available colors and material types please...

Page 82: ... original 3D file will remain there as well NOTE Cubify will generate a print file 5 Once the file has been generated browse to the USB mass storage device and select Save 6 Select OK 7 Refer to the section titled Printing Your Creation for information about printing from a USB mass storage device ...

Page 83: ...e down with the cap on to allow the glue to settle into the applicator before applying For best results apply two thin layers of glue to the print pad using slow circular motions when prompted by the touchscreen display Apply the glue in an overlapping pattern The coverage dimensions should be larger than the footprint of the creation you are printing Layer 1 Apply a thin layer of glue to the prin...

Page 84: ...ing the cartridge without using the printer menu can damage the printer and print jets and void the manufacturer s warranty 1 Select SETUP 2 Select CHANGE CARTRIDGE 3 Select the material cartridge to change NOTE This procedure illustrates changing the right cartridge The same concept applies to the left side NOTE The print jet will begin to heat ...

Page 85: ...jet counter clockwise and remove the print jet from the printer Select the checkmark to continue 6 Insert the cartridge print jet from the replacement cartridge into the print jet opening on top of the printer 7 Rotate the cable clockwise until the dots A align Select the checkmark to continue NOTE As the print jet is rotating ensure the print jet tube is tucked under the top of the printer cover ...

Page 86: ...e the printer will prime melted material into the refuse bin Select the checkmark to complete the procedure SETTING UP A WIRELESS CONNECTION Wireless connections can be made with a Wi Fi network or an ad hoc network Setting Up A Wi Fi Connection 1 Select SETUP 2 Navigate to the Network screen and select WIFI ...

Page 87: ...twork is confirmed by a checkmark to the left of the network name If the network is secured a lock icon will appear to the right of the network name NOTE If your network requires a password use the navigation arrows to browse to the characters that make up your password and select them Select the checkmark to continue NOTE The printer will attempt to connect to the network ...

Page 88: ...twork An ad hoc network is a temporary yet direct connection between a computer or device and the printer It does not connect through a router or base station and the data transfer rates are slower than the transfer rate of a standard wireless network The computer or device you wish to connect ad hoc to the printer must have an ad hoc adapter installed An ad hoc network is deleted when the user ha...

Page 89: ... Select the checkmark to exit the utility 8 In Windows select Start Control Panel 9 Type network in the search box 10 Select Network and Sharing Center 11 Select Set up a new connection or network 12 Select Set up a wireless ad hoc computer to computer network 13 Select Next 14 Follow the steps in the wizard ...

Page 90: ...ion to having scrapers to clean the print jet nozzles the jet wiper assemblies are also purge bins collecting print material that has been primed from the print jets As the purge bin assemblies fill they will need to be emptied regularly Using the handle pull the purge bin assembly inward at the top and then upward to free the bottom tab from the slot NOTE Note the tab at the bottom of the purge b...

Page 91: ...reached the end of its useful life the printer will prompt you to replace it Select the checkmark to continue NOTE When the right jet wiper has reached the end of its useful life the printer will prompt you to replace it Select the checkmark to continue NOTE If you have replaced the jet wiper select the checkmark to reset the printer count Press SKIP to be reminded later Procedure 1 Remove the pur...

Page 92: ...Install the new jet wiper onto the purge bin and reinstall the purge bin assembly into the printer NOTE Ensure the jet wiper is fully seated before reinstalling the purge bin assembly 6 Select the checkmark to confirm the replacement of the jet wiper A ...

Page 93: ...el should always be performed before the Auto Gap procedure NOTE Auto Level should be performed when the printer is positioned away from bright lights or direct sunlight Auto Level 1 Navigate to the Print Plate Calibration screen and select AUTO LEVEL 2 Clean the print pad thoroughly removing all glue and debris Select the checkmark to continue NOTE The surface of the print pad must be completely ...

Page 94: ...Allen wrench that is included with the printer NOTE The lock screw 1 is located just below the adjustment knob 2 The lock screw for adjustment knob B can be accessed from the front of the printer The lock screw for adjustment knob A can be accessed from behind the printer 6 Follow the instructions on the touchscreen display Once the adjustments have been made select the checkmark to continue 7 Whe...

Page 95: ...ntinue NOTE If Auto Gap is not successful it is recommended that you perform Auto Level and Auto Gap again Select AUTO LEVEL to continue NOTE If Auto Gap is not successful the second time select PLATE MAINTENANCE For more information refer to the section titled Print Pad Maintenance Once the Plate Maintenance procedure has been performed perform Auto Level and Auto Gap NOTE If Auto Gap is still no...

Page 96: ...rge If the lines are more prominent see the illustration below and not tightly fused the gap is too large Auto Level and Auto Gap should be performed When the gap is too large the first layer may begin to fray when removing the print from the print pad Gap Is Too Narrow When the gap is too narrow the part may be very difficult to remove from the print pad In addition the bottom layers may break of...

Page 97: ...ace the gap gauge on top of the print pad under the left print jet Select the checkmark to continue NOTE Ensure the left cartridge is installed before performing this procedure NOTE The Gap Gauge is a thin polyester strip approximately 8 5 216 mm long and 1 5 38 mm wide 3 Gently slide the gap gauge back and forth between the print pad and the left print jet Using the arrows raise or lower the prin...

Page 98: ...to Level and Auto Gap procedures Clean The Print Pad 1 Remove the print pad from the printer 2 Wash all glue and print material from the print pad with warm tap water If necessary scrub the print pad with a soft brush 3 Dry the print pad thoroughly 4 If residual material is still adhered to the print pad gently use the scraper to remove it 5 If portions of the print pad appear shiny buff the surfa...

Page 99: ...ATE 2 Select Auto Cal NOTE The printer will maneuver the print pad to center it and then position it under the print jet nozzles 3 Lower the value on your display by 1 00 using the down arrow NOTE The value displayed may be different from the illustration Referring to this illustration your target value would be close to 4 76 If the value displayed is 6 23 your target value would be close to 5 23 ...

Page 100: ... gauge from the print pad 5 Press the white space to the right of CAL 2 NOTE This illustration shows the target area where you need to press NOTE The printer will begin the calibration 6 Record the value for CAL 1 NOTE This value will need to be used again in this procedure NOTE The printer will display a value for CAL 2 7 Select the checkmark to save the values 8 Navigate to the Printer Calibrati...

Page 101: ...on next to the touchscreen display and do not save the value NOTE If the recorded CAL 1 value is greater than 0 05 of the value displayed select the checkmark to save this value 5 Navigate to the Print Plate Calibration screen and select AUTO LEVEL 6 Clean the print pad thoroughly removing all glue and debris Select the checkmark to continue NOTE The surface of the print pad must be completely cle...

Page 102: ...ad is magnetically attached to the adjustment knobs 6 When prompted loosen the lock screw that is indicated on the touchscreen display Select the checkmark to continue NOTE Use a 1 5 mm Allen wrench that is included with the printer NOTE The lock screw 1 is located just below the adjustment knob 2 The lock screw for adjustment knob B can be accessed from the front of the printer The lock screw for...

Page 103: ...e Z gap NOTE The printer will perform an automated gap measurement This may take a few minutes 7 Select the checkmark to continue NOTE If Auto Gap is not successful it is recommended that you perform Auto Level and Auto Gap again Select AUTO LEVEL to continue NOTE If Auto Gap is not successful the second time select PLATE MAINTENANCE For more information refer to the section titled Print Pad Maint...

Page 104: ... the type of material PLA ABS etc currently installed in the printer 7 Insert the USB mass storage device into the printer s USB inlet port Select PRINT 8 Using the arrows navigate to the file name of the calibration file Select PRINT NOTE The file name will appear at the top of the display 9 Apply two thin layers of Cube Glue to the center of the print pad Select the checkmark to continue NOTE Ap...

Page 105: ...s indicator that shows the status of the print jet heating process NOTE The blue bar is a progress indicator that illustrates the status of the print NOTE Select PAUSE to temporarily stop printing Select CANCEL if you wish to cancel the print job NOTE Press the time at the bottom of the screen to view the percentage of completion Press it again to view how many layers have been printed After a few...

Page 106: ...fused together Gap Is Too Large If the lines are more prominent see the illustration below and not tightly fused the gap is too large Calibrate your printer again When the gap is too large the first layer may begin to fray when removing the print from the print pad Gap Is Too Narrow When the gap is too narrow the part may be very difficult to remove from the print pad In addition the bottom layers...

Page 107: ...rint pad is correct 1 Select TEST PRINT 2 Select PRINT NOTE If the color built into the test print does not match a color of one of the installed cartridges the printer will assign an installed cartridge color to the test print 3 Apply two thin layers of Cube Glue to the print pad Select the checkmark to continue NOTE Apply enough glue to cover a square area of 5 15 cm NOTE For best results allow ...

Page 108: ...u CUBE NAME Cube Name allows you to change the name of your printer 1 Select CUBE NAME 2 Enter a name for your printer Scroll through the characters by pressing the arrow symbols on each side of the screen Select the characters to spell the name Select the checkmark to confirm your choice NOTE Selecting the abc button toggles between lowercase letters uppercase letters and numerals ...

Page 109: ...ust be properly installed in the printer before performing this procedure NOTE If you do not have the door on your cartridge and need to recover it please contact Cubify Support 1 Carefully open the cartridge door and remove it from the cartridge 2 Select SETUP 3 Navigate to the Print Jet Calibration screen and select PURGE JETS ...

Page 110: ...material just above the sleeve and push the material upward NOTE Once the print jet begins to purge the upward pressure will allow the feeder to engage the print material Caution Exercise caution when handling the print material to ensure it does not break 7 Continue to push the print material upward until the print jet begins purging NOTE Once the print jet reached the operating temperature it wi...

Page 111: ...D Systems Inc 4 Insert the top of the cartridge door into the cartridge and then secure it in the closed position NOTE As the print material is fed into the print jet the sleeve will move back into position ...

Page 112: ...ion or by using a USB mass storage device NOTE Whenever a firmware update is performed you must perform the Auto Level and Auto Gap procedures Updating Firmware Using Wi Fi 1 Select SETUP 2 Navigate to the System 3 screen and select FIRMWARE 3 Select WIFI NOTE The printer will attempt to connect to the server ...

Page 113: ... printer will begin downloading new firmware The blue bar is a progress indicator NOTE The download could take a few minutes WARNING DO NOT POWER OFF OR DISCONNECT THE PRINTER FROM UTILITY POWER DURING THE UPDATE PROCESS NOTE If no new firmware is available select the checkmark to continue NOTE If the firmware download fails select RETRY to start the download again Select CANCEL if you do not want...

Page 114: ...DO NOT POWER OFF OR DISCONNECT THE PRINTER FROM UTILITY POWER DURING THE UPDATE PROCESS 4 When prompted press and release the power button and wait until the display turns on NOTE It may take a minute for the display to turn on 5 Perform the Auto Level and Auto Gap procedures NOTE For more information refer to the section titled Print Pad Calibration ...

Page 115: ... the firmware log in to your www cubify com account and download the latest firmware for your USB mass storage device 1 Select SETUP 2 Navigate to the System 3 screen and select FIRMWARE 3 Select USB KEY 4 Insert the USB mass storage device into the printer and select the checkmark to continue ...

Page 116: ...TILITY POWER DURING THE UPDATE PROCESS NOTE If no new firmware is available select the checkmark to continue NOTE If the firmware transfer fails select RETRY to start the download again Select CANCEL if you do not want to update the firmware NOTE The firmware will begin to install The blue bar is a progress indicator NOTE The installation could take a few minutes WARNING DO NOT POWER OFF OR DISCON...

Page 117: ...riate packaging materials NOTE Material cartridges should be properly removed from the printer before the printer is repacked 1 Power off the printer by pressing and holding the button next to the touchscreen display 2 Disconnect the power cord from utility power and disconnect the cord from the power supply 3 Disconnect the power supply cable from the printer s power inlet A NOTE The power supply...

Page 118: ...6 Place the lower insert on top of the print pad and fold the sides outward 7 Move the print jet mount to the center of the printer and place the top insert over the mount NOTE The top insert is designed to keep the sides of the lower insert pressed outward 8 Place the printer in the protective bag and then place it in the lower foam support in the box A B ...

Page 119: ...pport on top of the printer 5 Close the box and install the clips in the cutouts on top of the box 6 Place the printer box into the outer box and seal the outer box CONTACTING SUPPORT Support for the Cube is available at cubifysupport cubify com ...

Page 120: ...dge for recycling Plastics Recycling Send your used PLA and ABS printed parts to either our USA or Ger many location We will properly and responsibly compost recycle and reuse your returned plastic parts as a renewable source to manufacture new cartridges reducing both raw materials consumption and the waste stream 3D Systems is committed to continuously improve the sustainability of its 3D printi...

Page 121: ...3D Systems Inc 333 Three D Systems Circle Rock Hill SC 29730 USA www Cubify com www 3dsystems com 2015 3D Systems Inc All rights reserved PN 390184 00 Rev F ...

Reviews: