background image

3dscentral.3dsystems.com


13

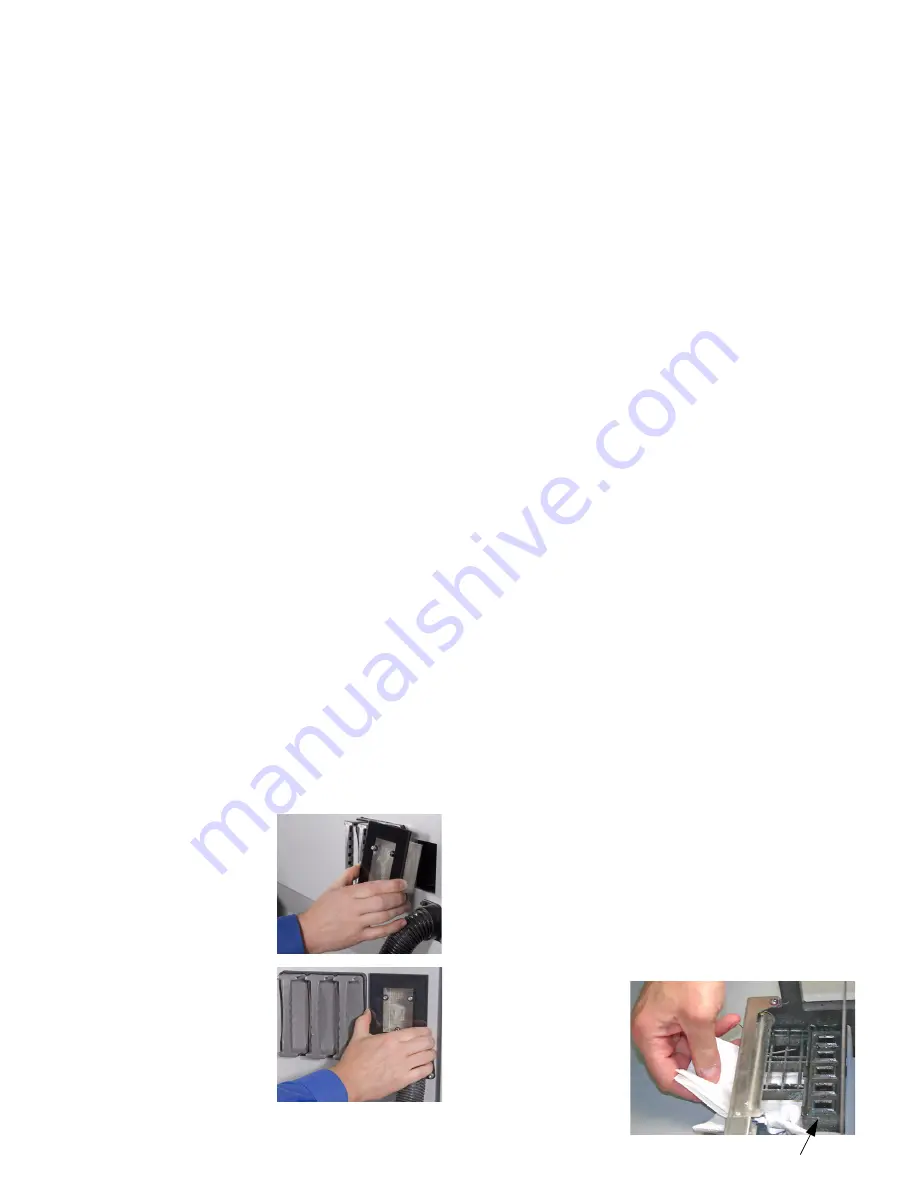
6.2   Empty The Debris Separator

The purpose of the Debris Separator is to keep any large parti-
cles from going back into the Feeder during vacuuming.
1.

Pull the Debris Separator out 
of its holder on the printer.

2.

Empty the contents into a 
trash receptacle.

3.

Use the soft brush found in the 
Accessory Kit to brush caked 
on powder from the screen.

4.

Return the empty Debris Sepa-
rator to its holder. Be sure to 
push the Separator flat against 
the panel for a secure fit.

6.3   Clean the Parking Caps

The Parking Caps keep the print heads from drying out between 
print jobs. Cleaning the Parking Caps after every build results in 
longer lasting print heads and precise accuracy during printing. 
The Parking Caps are located on the right end of the Fast Axis. 
Before you begin:

Get several dry paper towels.

Get the squirt bottle included in your Accessories Kit.

Fill the squirt bottle with distilled water.

Wear disposable gloves.

1.

Pull the Fast Axis toward you and slide the Printhead Car-
riage to the left to expose the Parking Caps.

2.

Lay paper towels 
on the Build Bed 
under and around 
the Parking Caps. 
Be sure to cover 
the Front Over-
flow with paper 
towels to keep 
water out.

Parking Caps

(5 total)

Summary of Contents for ZPRINTER 650

Page 1: ...ZPRINTER 650 QUICK START GUIDE Part Number 09578 Rev C ...

Page 2: ...t Binder Cartridges Debris Separator Heater Vent Vacuum Hose Fast Axis Build Bed Service Station hidden Arm Holes Air Wand Control Nut Post Processing Tray shown raised Control Panel Printing Storage Post Processing Storage Accessory Tray Arm Air Wand ...

Page 3: ...nction Turn the Control Knob left right to highlight menu items When selecting the Raise Lower Platform commands hold the Control Knob down to raise lower the platform Printing Storage Cleaning Solution Cartridge Waste Tray Post Processing Storage Tool Basket Parts Trays Accessory Tray QSG 4 control panel ...

Page 4: ...al 3dsystems com to learn more about 3D printing materials Best Practices and post processing techniques 1 About 3D Printing 1 1 Before You Begin Ensure the ZPrinter 650 is properly installed and running and that no errors are displayed on the ZPrinter 650 control panel Ensure the ZPrint Software is installed and running and the printer is connected to the same network as the com puter that is run...

Page 5: ...s below to print your part Section Title Page 2 Check The Printer 6 3 Setup Your Build And Print 7 4 Automatic Powder Removal 10 5 Fine Powder Removal 11 6 Routine Cleaning After Every Build 12 7 Post Processing With Z Bond 18 8 Additional Printer Operations 22 ...

Page 6: ...u need to clean these areas follow the steps in Section 6 1 Vacuum Up Excess Powder 3 Check that the Debris Separator Parking Caps the Rails and Carriage and the Service Station are clean If any of these need cleaning follow the procedures in these sections Section 6 2 Empty The Debris Separator Section 6 3 Clean the Parking Caps Section 6 4 Clean The Rails and Carriage Section 6 5 Clean The Servi...

Page 7: ...d Layer Thickness setting 0 004 Check the Bleed Compensation option if it isn t checked already If you want to print all in one color check the Print in Monochrome option Click OK 3 ZPrint orients the part in the Build Bed for the fastest print time If you need to transform the part prior to printing you have a couple of options otherwise proceed with Step 4 In the Top or Side views of ZPrint sele...

Page 8: ...inter to turn on the heater in the build chamber prior to printing This warms the powder and binder and is used for certain combinations of powder and binder Visit the Materials section of our Web site at 3dscentral 3dsystems com to learn more about which binders and powders would benefit from preheating Delay Start Time allows you to start the print job at a later time This is useful if you wish ...

Page 9: ... and align the print heads Fill the Build Bed with powder and then spread one layer to make the Build Bed surface smooth 8 The Printing dialog opens and reports the status of the print job for the duration of the build This dialog details Estimated print finish time Estimated remaining print time Actual print start time Actual print elapsed time The layer that is currently printing and the percent...

Page 10: ...lly excavate the excess powder away from the part using the vacuum Or run an Automatic Powder Removal cycle that you can control at the printer by selecting BUILD CHAMBER EMPTY BUILD CHAMBER on the LCD display 1 Open the cover of the Post Processing Unit If the solid metal tray has been placed on the bottom of the Unit lift the tray and latch it into place in the top of the Unit 2 Open the printer...

Page 11: ...delicate parts start with light air pressure 3 Using the Air Wand remove all remaining powder on the part The vacuum will evac uate the powder through the floor of the Post Processing Unit and recycle it Important When fin ished use the Air Wand to clean the Post Processing Unit of any remaining powder including the backside of the top cover 4 Push the Control Knob once to turn the air compressor ...

Page 12: ...Emptying the Debris Separator Cleaning the Parking Caps Cleaning the Rails and Printhead Carriage Cleaning the Service Station 6 1 Vacuum Up Excess Powder Vacuum the Build Bed the Fast Axis and the Deck 1 Press the Control Knob once then select VACUUM on the LCD menu 2 Open the printer top cover and remove the vacuum hose from its stand 3 Vacuum all powder from the Build Bed but not the Feeder sid...

Page 13: ... The Parking Caps keep the print heads from drying out between print jobs Cleaning the Parking Caps after every build results in longer lasting print heads and precise accuracy during printing The Parking Caps are located on the right end of the Fast Axis Before you begin Get several dry paper towels Get the squirt bottle included in your Accessories Kit Fill the squirt bottle with distilled water...

Page 14: ...or Deck 6 Remove the paper towels from the front overflow and dry it thoroughly 7 Be sure the Parking Caps are completely dry before starting your next build Note If the Caps are very dirty or if washing them as above is not sufficient then remove the Caps from the printer and wash them under running water Dry them thoroughly before reinstall ing them in the Fast Axis Service Station Carriage Pape...

Page 15: ...illed water to remove any powder Move the Carriage back and forth as needed to clean the entire length of both rails 3 Using a clean dry paper towel thoroughly dry both rails 4 Using a fresh paper towel wipe the Carriage to remove any powder 5 Wipe or vacuum the Build Bed and Deck as needed to remove any powder dislodged from the Rails and Carriage Important Never vacuum up water it will clog the ...

Page 16: ...inter runs optimally for your next print job Before you begin Get several dry paper towels and a cotton swab Get the squirt bottle filled with distilled water Wear disposable gloves Get the Pick and Syringe from the Accessories Kit Powder Binder ink Powder Clean Squeegee Clean Spit Plate Clean Housing Clean Deck and Bed ...

Page 17: ...r out of any corners 5 Remove the spit plate from the Service Station and clean it with a paper towel Replace the spit plate using the edge tabs for correct alignment 6 Install a needle onto the small syringe Gently push the tip of the needle through each of the six Wash Holes to clear them 7 Wipe off any water or wash fluid on the Wash Holes Thoroughly wipe the Service Station clean 8 Wipe up any...

Page 18: ... the part is completely dry before applying Z Bond Wear a lab coat or smock safety glasses and a pair of high quality gloves supplied with the Z Bond Dipping Kit or 2 pairs of lightweight disposable gloves supplied with the Starter Kit Place a piece of wax paper over the metal Post Process ing Tray to keep it clean Use a dipping container large enough to fully submerge your part Have paper towels ...

Page 19: ... 1 Pull down the Accessory Tray Arm 2 Slide the Accessory Tray onto the Arm 3 Place the part on the Accessory Tray 4 Unlatch the metal tray from inside the top of the Post Pro cessing Unit 5 Lower the metal tray to the bottom of the Post Pro cessing Unit and press down to snap it in place 6 Turn on the carbon air filter to capture any fumes from the infiltration On the LCD Menu select POST PROCESS...

Page 20: ...If you see bubbles rising wait until the bubbles stop and then remove the part 3 Keep the part moving in your hands so it does not stick to your gloves Note The part will get very warm and may emit visible vapor These are normal by products of the curing process 4 Quickly and thoroughly wipe any excess liquid off the part with paper towels and place the part on the wax paper Do not let excess liqu...

Page 21: ...t with the most delicate areas first Wet as much of the part as you can easily reach 3 Reposition the part and repeat this process until the entire part is infiltrated 4 Quickly and thoroughly wipe any excess liquid off the part with paper towels and place the part on the wax paper Do not let excess liquid pool on the part as this may cause its texture to change Move the part frequently for the fi...

Page 22: ...efore unsealing the powder canister turn it upside down and shake to loosen the powder inside 2 Check the expiration date 3 Open both top covers on the ZPrinter 650 and place the powder canister in the Post Processing Unit 4 Remove the gray sealing cap from the top of the canister 5 Insert the vacuum hose into the hose fitting located on top of the canister 6 Select VACUUM on the LCD menu The vacu...

Page 23: ...f its housing on the printer 2 Get a new binder cartridge Check the cartridge label for the expiration date and for the correct color and orientation Match the cartridge color to the color label on the printer 3 Insert the cartridge into its housing with the color marking on top Ensure the cartridge is pushed all the way in You should feel it gently snap into place Important If a cartridge does no...

Page 24: ...expiration date and for the correct orientation 4 Insert the car tridge into its hous ing Ensure the cartridge is pushed all the way in You should feel it gently snap into place Important If a cartridge does not snap into place do not force it Check the orientation and that it is the correct type and try again 8 4 Replace the Waste Tray If the Waste Tray is Full ZPrint displays EMPTY WASTE TRAY in...

Page 25: ...oward you and move it out over the build bed 2 Wet a paper towel with distilled water and wipe off the alignment sensor window on the under side of the Carriage The alignment window is located on the front left corner of the Carriage under the bundle of print head tubes Note Don t wipe the bottoms of the printheads 3 Dry with a clean paper towel 4 Select PRINT HEADS then CHANGE PRINT HEADS on the ...

Page 26: ...firmly on the top of the print head at the same side as the pogo pins to securely fit a printhead into its slot 11 Close the carriage cover by pressing down until you hear it click shut Be sure both latches are engaged 12 Close the printer top cover Select CONTINUE then EXIT on the LCD The fast axis reparks and the printer goes Online The printer purges the new printheads and runs an auto align me...

Page 27: ...le to use with your printer on the Materials section of our Web site at 3dscentral 3dsystems com To order consumables materials visit 3DS Shop on our Web site at 3dsshop 3dsystems com If you are an international cus tomer you can order consumables materials directly from your local service provider or reseller Do you have questions comments observations Logon to the Resources section of our Web si...

Page 28: ...ark Adler Microsoft Windows is a trademark of Microsoft Corporation 3D Systems acknowledges the trademarks of other organizations for their respective products or services mentioned in this docu mentation Proprietary Information Information contained in this document is the confidential prop erty of 3D Systems Recipient shall not disclose such Information to any third party and shall not use it fo...

Page 29: ...OR IMPLIED AND DIS CLAIMS ALL WARRANTIES INCLUDING BUT NOT LIMITED TO IMPLIED WARRANTIES OF MERCHANTABILITY AND FITNESS FOR A PARTICULAR PURPOSE AND ANY OTHER OBLIGATIONS OR LIABILITIES WHETHER IN CONTRACT WARRANTY NEGLIGENCE OR OTHERWISE THE COMPANY IS NOT LIABLE FOR ANY DIRECT INDIRECT SPECIAL PUNITIVE CONSEQUENTIAL OR INCIDENTAL DAMAGES INCLUDING WITHOUT LIMITATION DAMAGES FOR LOSS OF BUSINESS ...

Page 30: ...ution User should use care to avoid possible damage to equipment Hot Surface User should use care when working near or on the labelled item High Voltage User should use appropriate electrical safety pre cautions ...

Page 31: ...porate Headquarters 333 Three D Systems Circle Rock Hill SC 29730 Tel 1 803 326 3900 Technical Support Europe Middle East Africa Phone 44 20 8144 3907 E mail support emea 3dsystems com Skype z corp service emea Technical Support North and South America Phone 1 781 852 5050 Fax 1 781 852 5055 E mail support us 3dsystems com Technical Support Asia Pacific Phone 852 8191 2453 Fax 852 2948 2244 E mail...

Page 32: ...Part and Model Samples 3D Systems Corporation 2012 All Rights Reserved ...

Reviews: