3DGence INDUSTRY F340 | 75
version 1.0/07.2017
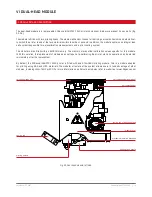
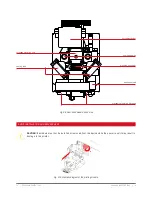
2.1. Installing the module
1. The printer must be turned off and cooled down to continue.
2. Open the printer upper and front door, thus providing a good access to the carriage.
3. Position the carriage by hand in the middle of the printer working space.
4. Position the D-Sub plug and port side by side and gently insert the plug into the socket. Keep the hold on the module
(fig. 37, step 1).
5. Reach to the back side of the carriage with your second hand. By rotating the knob, tighten the module to the carriage.
Positioning pins will automatically position the module in proper orientation. The module has to be tightened relatively
securely (fig. 37, step 2).
2.2. Module exchange
1. Turn the printer on.
2. In MENU go to PREPARE submenu. Pressing the MODULE CHANGE option starts the printing module exchange assistant.
3. The printer will assess, if materials are installed. If not, it will go right away to step no. 5.
4. If materials are identified, the printer will start their removal according to the filament removal procedure, successively
for T0 and then for T1. Follow the on-screen instructions. Your selection to remove materials should be confirmed by
pressing the CONTINUE key.
5. The machine will start cooling down its heating devices. It will not be possible to continue the procedure until the
maximum safe temperature is obtained.
6. The next step is to remove PTFE tubing that lead material to the printing module. To do this press the orange ring at
the tubing inlet from the top. While pressing, pull the tubing up.
It is a good idea to mark the tubing, because they must not
be switched!
Press the CONTINUE key once the tubing is removed.
7. Turn the printer off. By following the guidelines described in subsection INSTALLING THE MODULE, install a new module.
Make sure that the module is tightened correctly.
8. After installing a new module, connect PTFE tubing the same way as they were connected previously.
Summary of Contents for INDUSTRY F340
Page 1: ...USER MANUAL 3DGence INDUSTRY F340 ...
Page 2: ...2 3DGence INDUSTRY F340 ...
Page 39: ...3DGence INDUSTRY F340 39 version 1 0 07 2017 ...
Page 43: ...3DGence INDUSTRY F340 43 version 1 0 07 2017 ...
Page 86: ...86 3DGence INDUSTRY F340 ...
Page 87: ......

