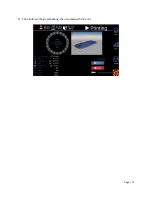
background image


Page | 1  

Rev. 1.04 – 4/16/2021 


X400 QUICK START REFERENCE GUIDE 


READ THIS DOCUMENT BEFORE USING YOUR 3D PRINTER 


Summary of Contents for X400

Page 1: ...Page 1 Rev 1 04 4 16 2021 X400 QUICK START REFERENCE GUIDE READ THIS DOCUMENT BEFORE USING YOUR 3D PRINTER ...

Page 2: ...S INTRODUCTION AND HOW TO GET HELP 3 WHAT S INCLUDED IN YOUR KIT 3 UNPACKING THE PRINTER CONTENTS 4 MOVING THE PRINTER 6 SETTING UP THE PRINTER 6 LOADING MATERIAL 7 STARTING YOUR FIRST 3D PRINT 14 TROUBLESHOOTING 16 ...

Page 3: ... to it s max potential and it will give you the best results 3D Labs support is here to help you flatten the learning curve 3D Labs support can be reached by phone at 904 201 9593 by email at support 3dlabs io or via support ticket at https www 3dlabs io support should you have any questions WHAT S INCLUDED IN YOUR KIT 1 3D LABS X400 3D PRINTER 2 QUICK START REFERENCE GUIDE 3 TOOL BAG CONTAINING a...

Page 4: ...ad screwdriver before doing anything else Failure to do so could damage the printer These are installed to prevent movement of the gantry during shipping 2 Plug in the printer using the supplied power cord Usually located on top of the print bed zip tied to the back panel 3 Turn on the printer ...

Page 5: ... ALL button This will cause the system to home and raise the bed so the contents underneath can be removed 6 Remove the filament foam and toolbag from the printer MAKE SURE TO KEEP ALL OF THE PACKAGING FOR 30 DAYS IN CASE THE MACHINE NEEDS TO BE SENT BACK FOR REPAIR ...

Page 6: ... Work surface must be a minimum of 23 x 25 The X400 is a heavy machine so the work surface should be strong enough to accommodate 150lbs at least 2 people are required to lift the X400 Do not attempt to move it by yourself Any bumps or shocks could throw off the leveling of the bed gantry or other parts in the machine so lift and set it down carefully SETTING UP THE PRINTER 1 Remove the plastic pr...

Page 7: ...If you don t have an ethernet plug and require wifi you can purchase a wifi adapter from 3D Labs to connect it to your wireless network Wifi is not supplied by default due to ITAR and security requirements of most businesses LOADING MATERIAL 1 Unscrew the ptfe tube coupling on top of the extruder head you intend to use ...

Page 8: ... Do not loosen it so much that the nut comes off of the screw 3 Open the rear door of the printer and feed the material through the tube until about 2 of filament comes out of the other end inside the printer 4 Carefully hang the spool onto the mount and close the door ...

Page 9: ...a 45 degree angle with flush cutters and insert it into the hole on top of the extruder head where you removed the coupling 6 Press down firmly on the filament and insert it about 1 you may have to press it in a couple of times into the hole ...

Page 10: ...ght It does not have to be super tight Typically an 1 8 inch 3mm gap is a good place Tug on the filament lightly and you should feel some resistance This is normal it means that the extruder is gripping the filament which is what we want 8 Press the Material button on the touch screen interface ...

Page 11: ...uder to load filament into In our case we ll be loading ABS or ASA that came with the printer so choose Extruder 1 Note this button may be called Material on some models 10 Set the temperature to 225C to use the ABS or ASA that you received with the printer ...

Page 12: ...Page 12 11 Click the Insert filament button and wait for the nozzle to heat up 12 Once heated the START button will light up Press it and the filament will begin loading ...

Page 13: ...out press the Extrude button twice b If you still don t see any coming out try tightening the tension adjuster a little bit tighter and it should begin feeding 14 Click the FINISHED button Now firmly screw down the coupling on top of the extruder to secure it into place Failure to do so could result in uneven extrusion during the print ...

Page 14: ...ced for ABS ASA material so do not attempt to print them with your own PLA material Only use the material that came with the printer 1 Use the purple glue stick to apply a cross hatch pattern to the center of the print bed Try to evenly cover an area of about 6 x 6 2 1 2 layers of glue is all that is needed Do not apply more 3 Click the Files button 4 Select the First Print file and click Print ...

Page 15: ...Page 15 5 The printer will begin preheating then proceed with the print ...

Page 16: ...ean that the distance between the nozzle and bed is either too far away or too close You can adjust the distance of the nozzle from the bed in real time to get a perfect first layer 2 Click Controls on the print screen 3 Click Babystep and use the up and down arrows to adjust the nozzle gap START WITH THE SMALLEST INCREMENTS AT FIRST THERE MAY ALSO BE A DELAY IN THE ADJUSTMENT SO BE PATIENT ...

Reviews: