3
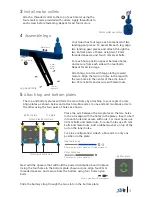
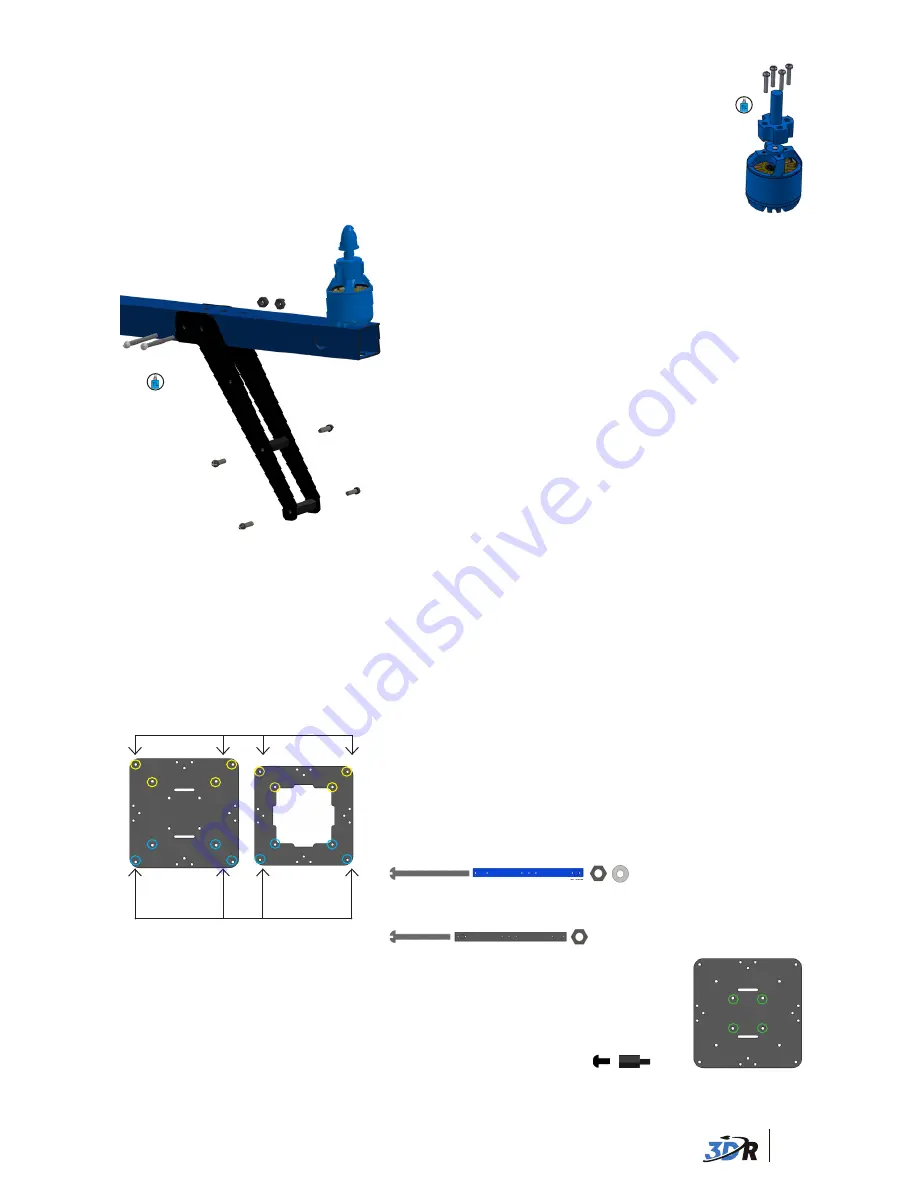
Attach a threaded collet to the top of each motor using the
four small screws provided with collets. Apply threadlock to
each screw before fastening. Repeat for all four motors.
5
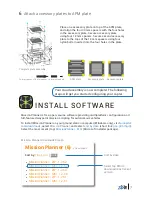
Attach top and bottom plates
Place the arm between the two plates so the two holes
in the arm align with the holes in the plates. Insert a bolt
into each hole and secure with nuts. For inner holes use
30 mm bolts and metal nuts; for outer holes use 25 mm
bolts and metal nuts. Add a rubber washer on top of the
nut on the inner holes.
For plus configuration: Attach a blue arm to only one
position on the plate.
Top plate
Bottom plate
Next add the spacers that will hold the power distribution board in place.
Using the four holes in the bottom plate shown across, align four 8 mm
threaded spacers, and secure from the bottom using four 5 mm nylon
bolts.
Slide the battery strap through the two slots in the bottom plate.
The top and bottom plates will form the main frame by attaching to your copter’s arms.
Align plates as shown below, and attach two blue arms to one end and two black arms to
the other using the four pairs of holes as shown.
Install motor collets
3
Motor collet assembly
25 mm bolt + arm + metal nut
Outer holes use:
4
Assemble legs
Leg assembly
Your Quad has four legs, each comprised of two
landing gear pieces. To assemble each leg, align
two landing gear pieces and attach through the
two bottom pairs of holes using two 18 mm
threaded spacers and four 5 mm steel bolts.
For each hole, position spacer between holes,
and secure from each side with steel bolts.
Repeat for all four legs.
Attach legs to arms with leg pointing toward
motors. Align the two top holes in the leg with
the two holes in the center of the arm. Insert
two 25 mm bolts and secure with metal nuts.
25 mm bolts
18 mm
spacers
Metal nuts
5 mm
steel
bolts
Attach black arms here
Attach blue arms here
Inner holes use:
30 mm bolt + arm + metal nut + rubber washer
Bottom plate
5 mm nylon bolt + 8 mm spacer


