3DUpFitters Taz6 Enclosure Kit, Installation Manual
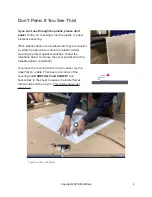
The 3DUpFitters Taz6 Enclosure Kit comes with an easy-to-follow Installation Manual that guarantees a hassle-free setup process. This comprehensive manual is available for free download on our website, giving you step-by-step instructions to effortlessly assemble and enjoy your new enclosure.
Share
Download


Reviews:
No comments
Related manuals for Taz6 Enclosure Kit

imagePROGRAF W8400
Brand: Canon Pages: 24

imagePROGRAF TZ-30000
Brand: Canon Pages: 66

imagePROGRAF W7200
Brand: Canon Pages: 126

imagePROGRAFi iPF840 series
Brand: Canon Pages: 149

IPF850
Brand: Canon Pages: 166

iP4000 - PIXMA Photo Printer
Brand: Canon Pages: 2

P 400
Brand: Olympus Pages: 3

BW Remote Operators Software Kit-A1
Brand: Canon Pages: 20

imageRUNNER 2420
Brand: Canon Pages: 30

IPF850
Brand: Canon Pages: 51

imageCLASS LBP325dn
Brand: Canon Pages: 252

7197
Brand: NCR Pages: 5

TR8600 Series
Brand: Canon Pages: 20

PIXMA TS9100 Series
Brand: Canon Pages: 100

PIXMA TS8120
Brand: Canon Pages: 100

N 1000
Brand: Canon Pages: 105

Pixma G1010 Series
Brand: Canon Pages: 16

PRO-4000S
Brand: Canon Pages: 14


