background image

©2021 by 3Gen Inc.  |   04 May 2021  |  NL1-1701B 

(English)

Instructions

Intended Use
This device is intended for medical purposes to illuminate body sur-
faces. It is used for non-invasive visual examination of intact skin.

This battery-operated product is designed for external examination 
only within professional healthcare facilities by medical profession-
als.
Check the correct operation of the device before use! Do not use 
the device if there are visible signs of damage.
CAUTION: Do not look directly into the LED light. Patients must 
close their eyes during examinations.
In case of a serious incident with the use of this device, notify 3Gen 
immediately and, if required by local regulations, your national 
health authority.

CAUTION: Do not use the device in fire or explosive risk area (e.g. 

oxygen-rich environment).
WARNING: This product can expose you to chemicals including 
methylene chloride and hexavalent chromium, which are known to 
the State of California to cause cancer or reproductive toxicity. For 
more information go to www.P65Warnings.ca.gov.
Electromagnetic Compatibility
This device complies with the EMC Emissions and Immunity level 
requirements of the standard IEC 60601-1-2:2014. The emission 
characteristics of this equipment make it suitable for use in profes-
sional healthcare environment as well as residential environment 

(CISPR 11 Class B). This equipment offers adequate protection to 

radio communication service. In the rare event of interference to the 
radio communication service, the user might need to take mitigation 
measures, such as relocating or re-orienting equipment. 
WARNING: Use of this equipment adjacent to or stacked with other 
equipment should be avoided because it could result in improper 
operation. If such use is necessary, this equipment and the other 
equipment should be observed to verify that they are operating 
normally.
WARNING: Use of accessories other than those provided by the 
manufacturer of this equipment could result in increased electro-
magnetic emissions or decreased electromagnetic immunity of this 
equipment and result in improper operation.
WARNING: Portable RF transmitters should be used no closer than 
30 cm (12 inches) to any part of the device. Otherwise, degradation 
of the performance of this equipment could result.

Nailio® turns DermLite® Foto X (sold separately) into a nail exam-
ination device and provides enhanced visualization using red LED 
light.

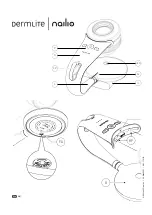
Place the Nailio Base (B) on a table or another level work area. 
Attach Foto X to Nailio, making sure Nailio’s two alignment pins 
(AP) match up with their mating alignment holes on Foto X. Slip the 
supplied IceCap® Cover (IC) over the Base (B), ensuring its printed 
guideline (GL) is parallel with Nailio’s arm (A).

For best results, apply an immersion fluid such as ultrasound gel on 
your patient’s nail. Place your patient’s finger or toe over the LED’s 

circular window (LED). Turn on Foto X (refer to Foto X instructions 
for use), then press the power button (P) to activate Nailio’s red 
LED. Look through the Foto X lens and gently push down to make 
contact with the nail. Focus Foto X, if needed. Push the + or - but-
tons to choose between Nailio’s 5 brightness levels. Adjust Foto X 
brightness as desired. 
Tilt Nailio from side to side and/or rotate your patient’s nail for ex-
amination at various angles, ensuring the digit covers the red LED 
at all times. To allow for visual examination of the distal nail, Nailio 

may even be swiveled 90º. Swivel friction can be modified with a 

2.5mm hex key (not included) via Friction Adjustment (FA). Press 

the power button to turn off the red LED. In order to save power, 
the device will turn off automatically after 3 minutes.

This device is equipped with a four-level Charge Indicator (CI). 
When the unit is turned on and fully charged, all four LEDs light 
up. When less than 75% of battery life remains, three LEDs are 
illuminated. If more than half the battery is drained, two LEDs are 
on, while a single LED indicates that less than 25% of battery 
capacity remains. To charge your device, connect the supplied 
USB-C to USB cable to the Charging Port (CP) and any IEC 
60950-1 compliant (5V) USB port. The Charge Indicator (CI) pulses 
to indicate charging, with the number of pulsing LEDs correspond-
ing with charge level. When charging is complete, all four indicator 
LEDs illuminate. After years of use, you may wish to re-place the 
battery, which is only available directly from 3Gen or an authorized 
3Gen dealer. 

Battery and Charging 
CAUTION: This device uses a special 3.7V 1400mAh  lithium ion 
battery, which can only be purchased from 3Gen or from an autho-
rized 3Gen dealer. Do not under any circumstances use another 
battery other than the one designed for this unit.
To change the battery, contact 3Gen or your local 3Gen dealer.

Troubleshooting
Please check www.dermlite.com for the most current trouble-
shooting information. If your device requires servicing, visit www.
dermlite.com/service or contact your local 3Gen dealer.

Care and Maintenance

CAUTION: No modification of this equipment is allowed.

Your device is designed for trouble-free operation. Repairs shall be 

made only by qualified service personnel.

Cleaning
The exterior of your device, except the optical parts, may be wiped 
clean with isopropyl alcohol (70% vol.) prior to use on a patient. 
The lens should be treated as high-quality photographic equipment 
and should be cleaned with standard lens cleaning equipment and 
protected from harmful chemicals. Do not use abrasive material on 
any part of the equipment or immerse the device in liquid. Do not 
autoclave.

Warranty: 2 years for parts and labor. The battery is warranted for 
1 year. 

Disposal
This device contains electronics and a lithium-ion battery that must 
be separated for disposal and may not be disposed of with general 
household waste. Please observe local disposal regulations.

The Nailio set includes:
Nailio examination device (1 polarized red LED), USB to USB-C 
charging cable, 5 IceCap covers.

Technical Description
Visit www.dermlite.com/technical or contact your local 3Gen dealer.

ENGLISH

Summary of Contents for DERMLITE nailio

Page 1: ...ilge 11 Hrvatski 12 Italiano 13 Latvietis 14 Lietuvis 15 Magyar 16 Nederlands 17 Polskie 18 Português 19 Română 20 Slovenščina 21 Slovenský 22 Suomi 23 Svenska 24 Türk 25 Ελληνικά 26 български 27 русский 28 Український 29 한국어 30 日本語 31 简体中文 32 NL1 2021 by 3Gen Inc 04 May 2021 NL1 1701B ...

Page 2: ...B AP USBC FA CI A P IC LED GL CP 2021 by 3Gen Inc 04 May 2021 NL1 1701B NL1 ...

Page 3: ...ons for use then press the power button P to activate Nailio s red LED Look through the Foto X lens and gently push down to make contact with the nail Focus Foto X if needed Push the or but tons to choose between Nailio s 5 brightness levels Adjust Foto X brightness as desired Tilt Nailio from side to side and or rotate your patient s nail for ex amination at various angles ensuring the digit cove...

Page 4: ...irali Nailio crveni LED Pogledajte kroz foto objektiv i lagano gurnite prema dolje da dođete u kontakt s noktom Pritisnite tipke plus ili minus da biste izabrali između 5 razina svjetline Podesite svjetlost Foto X po želji Nagnite Nailio sa strane na stranu i ili zakrenite nokat pacijenta za pregled pod različitim uglovima osiguravajući da se crveni LED prekida u sva kom trenutku Da bi se omogućio...

Page 5: ...čítka napá jení P aktivujte červenou LED Nailio Prohlédněte si objektiv Foto X a jemně zatlačte dolů abyste se dostali do kontaktu s nehtem Stisknutím tlačítek plus nebo mínus vyberte mezi 5 úrovněmi jasu Upravte jas Foto X podle potřeby Nakloňte Nailio ze strany na stranu a nebo otočte nehtem pacienta pro vyšetření pod různými úhly čímž zajistíte že červená LED bude vždy zakrytá Aby bylo možné vi...

Page 6: ... gennem Foto X objektivet og skub forsigtigt ned for at komme i kontakt med neglen Tryk på plus eller minus knapperne for at vælge mellem 5 lysstyrkeniveau er Juster Foto X lysstyrken efter ønske Vip Nailio fra side til side og eller drej din patients negle til undersøgelse i forskellige vinkler så du sørger for at den røde LED til enhver tid er dækket For at muliggøre en visuel undersøgelse af de...

Page 7: ... aktivieren Schauen Sie durch das Foto X Objektiv und drücken Sie es vorsichtig nach unten um Kontakt mit dem Nagel herzustellen Drücken Sie die Plus oder Minus Taste um zwischen 5 Helligkeitsstufen zu wählen Passen Sie die Helligkeit von Foto X wie gewünscht an Kippen Sie Nailio von einer Seite zur anderen und oder drehen Sie den Nagel Ihres Patienten zur Untersuchung in verschiedenen Winkeln um ...

Page 8: ...Foto X sisse vaadake Foto X kasutusjuhendit seejärel vajutage Nailio punase LED i aktiveerimiseks toitenuppu P Vaadake läbi Foto X objektiivi ja lükake küüntega kokkupuutumiseks õrnalt alla 5 heleduse taseme vahel valimiseks vajutage pluss või miinusnuppe Reguleerige Foto X heledust vastavalt soovile Kallutage Nailio küljelt küljele ja või pöörake patsiendi küünte uurimiseks erinevate nurkade alt ...

Page 9: ...n la uña Presione los botones más o menos para ele gir entre 5 niveles de brillo Ajuste el brillo de Foto X como desee Incline a Nailio de lado a lado y o gire la uña de su paciente para examinarla en varios ángulos asegurándose de que el LED rojo esté cubierto en todo momento Para permitir el examen visual de la uña distal Nailio puede incluso girarse 90º La fricción giratoria se puede modificar ...

Page 10: ...Nailio Regardez à travers la lentille Foto X et poussez doucement vers le bas pour entrer en contact avec l ongle Appuyez sur les boutons plus ou moins pour choisir entre 5 niveaux de luminosité Réglez la luminosité de Foto X comme vous le souhaitez Inclinez Nailio d un côté à l autre et ou faites pivoter l ongle de votre patient pour un examen sous différents angles en veillant à ce que la LED ro...

Page 11: ...mhachta P chun LED dearg Nailio a ghníomhachtú Féach tríd an lionsa Foto X agus brúigh síos go réidh chun teagmháil a dhéanamh leis an ingne Brúigh na cnaipí móide nó lúide le roghnú idir 5 leibhéal gile Coigeartaigh gile Foto X mar a theastaíonn Tilt Nailio ó thaobh go taobh agus nó rothlaigh ingne d othair le scrúdú ag uillinneacha éagsúla ag cinntiú go bhfuil an LED dearg clúdaithe i gcónaí Le ...

Page 12: ...tivirali Nailio crveni LED Pogledajte kroz foto objek tiv i lagano gurnite prema dolje kako biste ostvarili kontakt s nok tom Pritisnite tipke plus ili minus da biste izabrali između 5 razina svjetline Podesite svjetlost Foto X po želji Nagnite Nailio s jedne na drugu stranu i ili zakrenite nokat svog pacijenta za pregled pod različitim kutovima osiguravajući da se crveni LED prekida u svakom tren...

Page 13: ...averso l obiettivo Foto X e spingi delicatamente verso il basso per entrare in contatto con l unghia Premere i pulsanti più o meno per scegliere tra 5 livelli di luminosità Regola la luminosità di Foto X come desideri Inclinare Nailio da un lato all altro e o ruotare l unghia del paziente per l esame da varie angolazi oni assicurando che il LED rosso sia sempre coperto Per consentire l esame visiv...

Page 14: ...Nailio sarkano gaismas diodi Skatieties caur Foto X objektīvu un viegli nospiediet uz leju lai izveidotu kontaktu ar nagu Nospiediet plus vai mīnusa pogas lai izvēlētos starp 5 spilgtuma līmeņiem Pielāgojiet Foto X spilgtumu pēc vēlēšanās Nolieciet Nailio no vienas puses uz otru un vai pagrieziet pacienta nagu pārbaudei dažādos leņķos nodrošinot ka sarkanā gaismas diode vienmēr ir pārklāta Lai var...

Page 15: ...ir švelniai paspauskite žemyn kad galėtumėte susisiekti su nagais Norėdami pasirinkti 5 ryškumo lygius paspauskite pliuso ar minuso mygtukus Jei norite sureguli uokite Foto X ryškumą Pakreipkite Nailio iš vienos pusės į kitą ir arba pasukite paciento nagą apžiūrai įvairiais kampais užtikrin dami kad raudona lemputė visada būtų uždengta Kad būtų galima apžiūrėti distalinį nagą Nailio gali būti net ...

Page 16: ...a Nailio piros LED jének aktiválásához Nézze át a Foto X lencsét és óvatosan nyomja le hogy kapcsolatba kerüljön a körmével A plusz vagy a mínusz gombokkal válassza ki az 5 fényerőszintet A kívánt módon állítsa be a Foto X fényerősségét Döntse a Nailio t oldalról oldalra és vagy forgassa el a beteg körmét különböző szögekből történő vizsgálat céljából ügyelve arra hogy a piros LED folyamatosan le ...

Page 17: ...n Kijk door de Foto X lens en duw voorzichtig naar beneden om contact te maken met de nagel Druk op de plus of minknoppen om te kiezen tussen 5 helderheidsniveaus Pas de helderheid van Foto X naar wens aan Kan tel Nailio van links naar rechts en of draai de nagel van uw patiënt voor onderzoek onder verschillende hoeken zodat de rode LED altijd bedekt is Om visueel onderzoek van de distale nagel mo...

Page 18: ...dę LED Nailio Spójrz przez obiektyw Foto X i delikatnie dociśnij aby zetknąć się z paznokciem Naciśnij przycisk plus lub minus aby wybrać jeden z 5 poziomów jasności Dostosuj jasność Foto X zgodnie z potrzebami Przechyl Nailio z boku na bok i lub obróć paznokieć pacjenta w celu zbadania pod różnymi kątami upewniając się że czerwona dioda LED jest cały czas zasłonięta Aby umożliwić wiz ualne badani...

Page 19: ... e ou gire a unha do seu paciente para exame em vários ângulos garantindo que o LED vermelho esteja sempre coberto Para permitir o exame visual da unha distal Nailio pode até ser girado 90º A fricção giratória pode ser modificada com uma chave sextavada de 2 5 mm não incluída via Ajuste de fricção FA Pressione o botão liga desliga para desligar o LED vermelho Para economizar energia o dispositivo ...

Page 20: ...saţi butonul de pornire P pentru a activa ledul roşu al lui Nailio Priviţi prin lentila Foto X şi împingeţi uşor în jos pentru a intra în contact cu unghia Apăsaţi butoanele plus sau minus pentru a alege între 5 niveluri de luminozitate Reglaţi luminozitatea Foto X după cum doriţi Înclinaţi Nailio dintr o parte în alta şi sau rotiţi unghia pacientului pentru examinare în diferite unghiuri asigurân...

Page 21: ...jektiv in nežno potisnite navzdol da pridete v stik z nohtom Pritisnite gumb plus ali minus da izbe rete med 5 stopnjami svetlosti Prilagodite svetlost Foto X po želji Nailio nagnite od strani do strani in ali zavrtite noht pacienta za pregled pod različnimi koti in tako zagotovite da bo rdeča LED ves čas pokrita Za vizualni pregled distalnega nohta lahko Nailio celo zasukamo za 90 Vrtljivo trenje...

Page 22: ...ilio Pozerajte sa cez šošovku Foto X a jemne zatlačte nadol aby ste sa dostali do kontaktu s nechtom Stláčaním tlačidiel plus alebo mínus zvoľte medzi 5 úrovňami jasu Jas Foto X upravte podľa potreby Nakloňte Nailio zo strany na stranu a alebo otáčajte klincom pacienta aby ste ho mohli vyšetriť pod rô znymi uhlami čím zaistíte že červená LED dióda bude zakaždým zakrytá Aby sa umožnilo vizuálne vyš...

Page 23: ...P Katso Foto X linssin läpi ja työnnä kevyesti alaspäin saadaksesi yhteyden kynsiin Painamalla plus tai miinuspainikkeita voit valita viidestä kirkkaustasosta Säädä Foto X n kirkkaus halu amallasi tavalla Kallista Nailio laitetta sivulta toiselle ja tai käännä potilaan kynsiä tutkittavaksi eri kulmista varmistaen että punainen LED valo on aina peitetty Nailion kynsien visuaalisen tutkimuksen mahdo...

Page 24: ...enom Foto X linsen och tryck försiktigt nedåt för att få kontakt med spiken Tryck på plus eller minus knapparna för att välja mellan 5 ljusstyrkenivåer Justera Foto X ljusstyrka efter önskemål Luta Nailio från sida till sida och eller rotera din patients spik för undersökning i olika vinklar så att den röda lysdioden täcks hela tiden För att möjliggöra visuell un dersökning av den distala nageln k...

Page 25: ...rleştirin Foto X i açın Foto X kullanım talimatlarına bakın ardından Nailio nun kırmızı LED ini etkinleştirmek için güç düğmesine P basın Foto X merceğine bakın ve çiviyle temas etmek için hafifçe aşağı doğru itin 5 parlak lık seviyesi arasında seçim yapmak için artı veya eksi düğmelerine basın Foto X parlaklığını istediğiniz gibi ayarlayın Kırmızı LED in her zaman kaplanmasını sağlayarak Nailio y...

Page 26: ...λήκτρα συν ή μείον για να επιλέξετε μεταξύ 5 επιπέδων φωτεινότητας Ρυθμίστε τη φωτεινότητα Foto X όπως επιθυμείτε Τραβήξτε το Nailio από τη μια πλευρά στην άλλη και ή περιστρέψτε το νύχι του ασθενούς σας για εξέταση σε διάφορες γωνίες εξασφαλίζοντας ότι το κόκκινο LED είναι καλυμμένο ανά πάσα στιγμή Για να είναι δυνατή η οπτική εξέταση του απομακρυσμένου νυχιού το Nailio μπορεί να περιστρέφεται ακ...

Page 27: ...ирате червения светодиод на Nailio Погледнете през обектива Foto X и леко натиснете надолу за да осъществите контакт с нокътя Натиснете бутоните плюс или минус за да изберете между 5 нива на яркост Регулирайте яркостта на Foto X по желание Наклонете Nailio отстрани и или завъртете нокътя на пациента си за изследване под различни ъгли като гарантирате че червеният светодиод е покрит по всяко време ...

Page 28: ... Включите Foto X см Инструкцию по использованию Foto X затем нажмите кнопку питания P чтобы активировать красный светодиод Nailio Посмотрите в объектив Foto X и осторожно нажмите вниз чтобы соприкоснуться с ногтем Нажмите кнопки плюс или минус чтобы выбрать один из 5 уровней яркости Отрегулируйте яркость Foto X по желанию Наклоните Nailio из стороны в сторону и или вращайте ноготь пациента для обс...

Page 29: ...тивувати червоний світлодіод Nailio Подивіться крізь лінзу Foto X і обережно натисніть вниз щоб зіткнутися з нігтем Фокус Foto X якщо потрібно Натискайте кнопки або щоб вибрати між 5 рівнями яскравості Nailio Налаштуйте яскравість Foto X за бажанням Нахиліть Nailio з боку в бік та або поверніть ніготь пацієнта для дослідження під різними кутами забезпечуючи щоб цифра постійно покривала червоний св...

Page 30: ...면 Foto X 지침 참조 전원 버튼 P 을 눌러 Nailio의 빨간색 LED를 활 성화하십시오 Foto X 렌즈를 통해 부드럽게 아래로 눌러 손 톱에 닿도록합니다 플러스 또는 마이너스 버튼을 눌러 5 개 의 밝기 레벨 중에서 선택합니다 원하는대로 사진 X 밝기를 조정하십시오 Nailio를 좌우로 기울이거나 환자의 손톱을 여러 각도로 회전 시켜 빨간색 LED가 항상 덮여 있는지 확인하십시오 원위 손 톱의 육안 검사를 위해 Nailio를 90º 회전시킬 수도 있습니다 회전 마찰은 마찰 조정 FA 을 통해 2 5mm 육각 키 미포함 로 수정할 수 있습니다 전원 버튼을 눌러 빨간색 LED를 끕 니다 전원을 절약하기 위해 장치는 3 분 후에 자동으로 꺼집 니다 이 장치에는 4 단계 충전 표시기 CI 가 장착되어 있...

Page 31: ...します Foto Xレ ンズに目を通し 軽く押し下げて爪に接触させます プラスまた はマイナスボタンを押して 5つの輝度レベルから選択します 必 要に応じてFoto Xの明るさを調整します Nailioを左右に傾けたり さまざまな角度で検査のために患者の爪 を回転させたりして 赤いLEDが常に覆われるようにします 遠 位の爪の目視検査を可能にするために Nailioは90ºでも回転でき ます 旋回摩擦は 摩擦調整 FA を介して2 5mm六角キー 別 売 で変更できます 電源ボタンを押して 赤色のLEDをオフに します 電力を節約するために デバイスは3分後に自動的にオフ になります このデバイスには 4レベルの充電インジケータ CI が装備され ています ユニットの電源を入れて完全に充電すると 4つのLED がすべて点灯します バッテリーの寿命が75 未満になると 3 つのLEDが点灯し...

Page 32: ...凝胶之类的浸泡液 将患者的手指或脚趾放在LED的圆 形窗口 LED 上 打开Foto X 请参阅Foto X使用说 明 然后按电源按钮 P 激活Nailio的红色LED 翻 阅Foto X镜头 然后轻轻向下按使其与指甲接触 按加号 或减号按钮在5个亮度等级之间进行选择 根据需要调整 Foto X的亮度 将Nailio左右倾斜和 或旋转患者的指甲以进行不同角度的 检查 以确保始终覆盖红色LED 为了对远端指甲进行视 觉检查 甚至可以将Nailio旋转90º 可以使用2 5mm六 角扳手 不包含 通过摩擦力调整 FA 修改旋转摩擦 力 按下电源按钮以关闭红色LED 为了节省电量 设备 将在3分钟后自动关闭 该设备配备了四级充电指示器 CI 当本机打开并充 满电时 所有四个LED点亮 当剩余电池寿命不足75 时 三个LED会亮起 如果电池电量消耗了一半以上 则两个LED会亮起 而单个LED则表示...

Page 33: ... 번호 カタログ番号 目录编号 Serial Number Serijski broj Sériové číslo Serienummer Seriennummer Seerianumber Número de serie Numéro de série Uimhir Sraithuimhir Serijski broj Numero di serie Sērijas numurs Serijos numeris Sorozatszám Serienummer Numer seryjny Número de série Număr de serie Serijska številka Sériové číslo Sarjanumero Serienummer Seri numarası Σειριακός αριθμός Сериен номер Серийный номер Серійн...

Page 34: ...ни битови отпадъци Не выбрасывать в качестве несортированных бытовых отходов Не викидайте як несортовані побутові відходи 분류되지 않은 도시 폐기물로 처리하지 마십시오 分別されていない一般廃棄物として処分しないでください 请勿作为未分类的城市垃圾处理 Product complies with European Medical Device Regulation 2017 745 Proizvod je u skladu s Europskom uredbom o medicinskim proizvodima 2017 745 Produkt vyhovuje evropským předpisům o zdravotnických prostředcích 2...

Page 35: ...rte Limitation de l humidité pour le stockage et le transport Teorainn taise le haghaidh stórála agus iompair Ograničenje vlage za skladištenje i transport Limitazione dell umidità per lo stoccaggio e il trasporto Mitruma ierobežojums uzglabāšanai un pārvadāšanai Laikymo ir gabenimo drėgmės apribojimas Páratartalom korlátozása tárolás és szállítás esetén Vochtigheidsbeperking voor opslag en transp...

Page 36: ...as JAV draudžia šį prietaisą pardavinėti licencijuotam sveikatos priežiūros specialistui arba jo užsakymu Vigyázat Az USA szövetségi törvénye korlátozza ezt a készüléket engedéllyel rendelkező egészségügyi szakember által vagy megrendelésére Let op de federale wet VS beperkt dit apparaat tot verkoop door of in opdracht van een erkende zorgverlener Przestroga prawo federalne USA ogranicza sprzedaż ...

Reviews: