background image

12

13

3

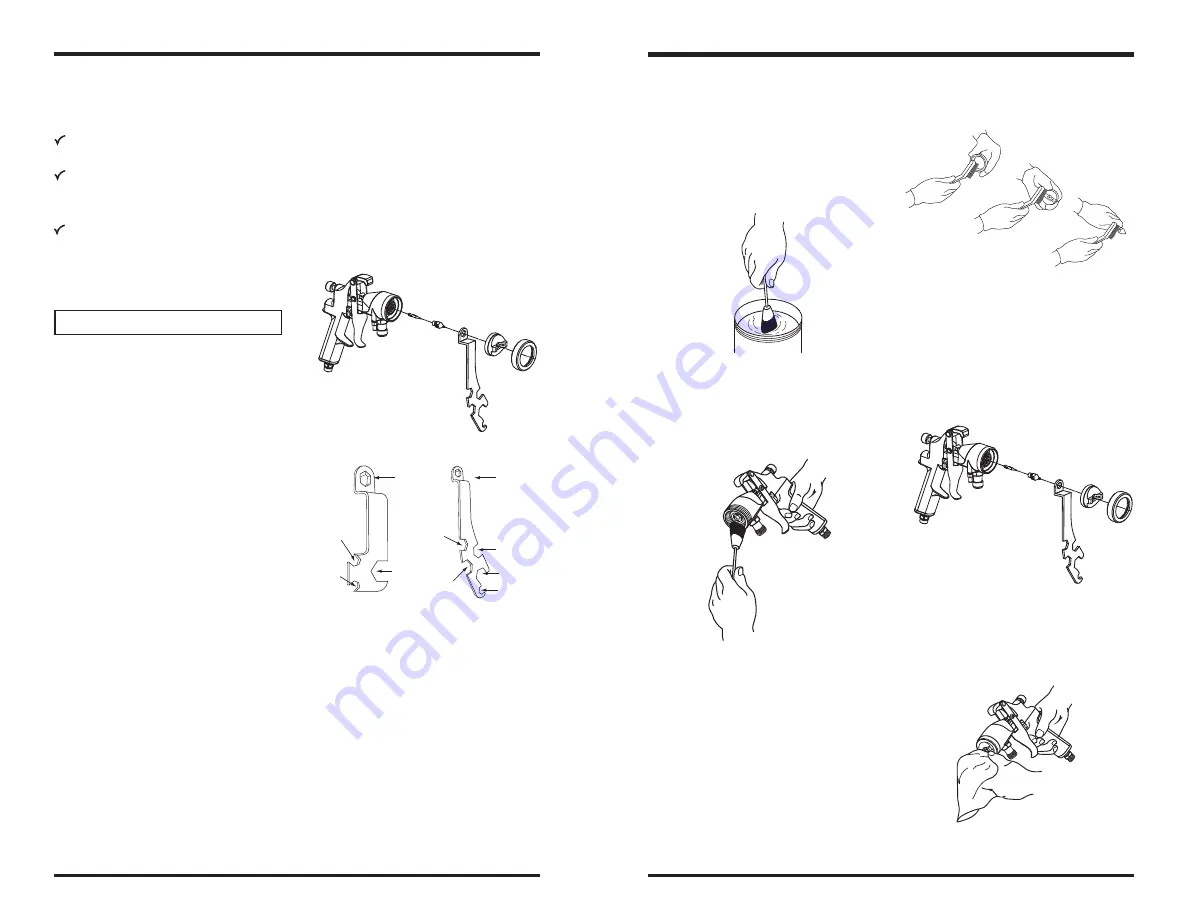
11.  Thread fl uid needle tip on fi nger 

tight. Pull trigger back and hold 
while you install the fl uid nozzle with 
the gun wrench. Tighten the nozzle 
securely to obtain a good seal.

12.  Install the retaining ring and air cap.

Spray Gun Care and Cleaning cont.

10.  Scrub the retaining ring, air cap and 

fl uid nozzle with a soft-bristle brush. 
To clean out air cap holes, use a 
small brush. Clean the air cap and 
fl uid nozzle after each use. Do not 
soak the retaining ring in solvent for 
prolonged periods of time.

13.  Dampen a soft cloth with solvent 

and wring-out the excess. Point 
the spray gun down and wipe off 
the outside of the spray gun.

9.  With the spray gun pointed down, 

clean the front of the spray gun, 
using a soft-bristle brush and 
solvent.

8.  Dip the end of a soft-bristle brush 

into a compatible solvent. Do not 
continuously soak the brush’s bristles 
with solvent, and do not use a wire 
brush.

Fluid 
Nozzle

Fluid 
Nozzle

Valve Cap

Cup Hex
Fitting

Cup Hex
Fitting

Packing Nut

Seal

Housing

Fan Air

Fitting

Packing

Nut

Pressure

Stem

ATTENTION

Solvent left in the spray gun air 
passages could result in a poor quality 
paint fi nish. Do not use any cleaning 
method which may allow solvent into the 
spray gun air passages. Do not expose 
air regulators and gauges to solvent as 
damage may occur.

Cleaning Process 

1.  Relieve the pressure from the spray 

gun and cup before servicing.

2.  Refer to your cup or fl uid source 

manual for removal and cleaning.

3.  To retain unused material or 

temporarily store mixed material, 
see your Local, State, Federal and 
OSHA guidelines, along with material 
manufacturer’s recommendations for 
storage. 

4.  Flush the spray gun. To fl ush spray 

gun, run water or compatible and 
compliant solvent into the spray gun 
fl uid passage while triggering the 
spray gun.

Spray Gun Care and Cleaning cont.

5.  Remove the retaining ring and air cap.

6.  Pull trigger back and hold while 

removing the fl uid nozzle from the 
spray gun with the gun wrench. 


Note: 

This prevents damage to the 

needle tip and fl uid nozzle.

  Clean the fl uid and air line fi lters daily.

  Check for any fl uid leakage from the 

spray gun and fl uid hoses.

  Flush the spray gun before changing 

colors and when done operating the 
spray gun.

Wrench for composite 
handle spray gun

Wrench for metal
handle spray gun

7.  Release the trigger and unscrew the 

fl uid needle tip with fi ngers.

Summary of Contents for 10

Page 1: ...HVLP Alto Volumen Baja Presi n y LVLP Bajo Volumen Baja Presi n Manual del Usuario Read Warnings and Instructions Lea las Instrucciones y Advertencias This Manual Covers Spray Gun Models 10 11 12S 12...

Page 2: ...de Seguridad 31 Contenidos Desempaque 36 Instalaci n y Uso General del Pistola aplicadora en spray 37 Cuidado y Limpieza del Pistola aplicadora en spray 40 Identificaci n de Piezas de Pistola aplicado...

Page 3: ...ilable approved fire extinguisher or other approved fire fighting equipment in the spray area Always locate air compressor or turbine unit as far away from spray area as the air supply hoses allow Nev...

Page 4: ...th lifting and handling Always follow proper lifting and handling practices when moving system components To reduce the risks associated with tripping falling and tipping Route air hoses and any exten...

Page 5: ...body construction 10 cfm air consumption 6 1 reduction ratio 1 4 air inlet connection 60 psi maximum inlet air pressure for use with compressed air systems only Maximum inlet pressure will yield appr...

Page 6: ...benefits of the series 12S Spray Gun with a composite body construction 10 cfm air consumption 6 1 reduction ratio 1 4 air inlet connection 60 psi maximum inlet air pressure and the ability to spray o...

Page 7: ...es can distort the spray pattern Do not point the spray gun up while cleaning it Lubricate Lubricate Lubricate HVLP Lubricate Fig 2 Fan Adjustment Knob Adjusting the Fan Pattern Size The fan size is r...

Page 8: ...gun air passages could result in a poor quality paint finish Do not use any cleaning method which may allow solvent into the spray gun air passages Do not expose air regulators and gauges to solvent...

Page 9: ...4 23 Stainless Steel Needle Shaft 91 078 24 Threaded Sleeve 25 Spring LG 27 5 26 Needle Adjustment Screw 91 068 27 Pressure Relief Stem LFG 465 28 Pressure Relief Stem Cap 91 109 10 Pack of 10 29 Flan...

Page 10: ...Stainless Steel Needle Shaft 91 078 24 Threaded Sleeve 91 041 25 Spring LG 27 5 26 Needle Adjustment Screw 91 068 27 Pressure Relief Stem LFG 465 28 Pressure Relief Stem Cap 91 109 10 Pack of 10 29 P...

Page 11: ...8 27 Pressure Relief Stem LFG 465 28 Pressure Relief Stem Cap 91 109 10 Pack of 10 29 Valve Cap 30 Valve Cap Washer 31 Piston Return Spring 32 Valve Seal 33 O Ring 34 Valve Body 35 Valve Body Seal 36...

Page 12: ...ure Relief Stem LFG 465 25 Pressure Relief Stem Cap 91 109 10 Pack of 10 26 Valve Cap 27 Valve Cap Washer 28 Piston Return Spring 29 Valve Seal 30 O Ring 31 Valve Body 32 Valve Body Seal 33 Valve Rod...

Page 13: ...Seat 14 Valve Spring 15 O Ring 16 Valve Cap 97 034 17 E Clip 18 O Ring 19 Fan Air Fitting 97 043 20 Fan Valve Stem 97 041 21 O Ring 22 Fan Air Adjustment Knob 97 040 23 Screw 24 Air Inlet Tube 25 Han...

Page 14: ...Seat 14 Valve Spring 15 O Ring 16 Valve Cap 97 034 17 E Clip 18 O Ring 19 Fan Air Fitting 97 043 20 Fan Valve Stem 97 041 21 O Ring 22 Fan Air Adjustment Knob 97 040 23 Screw 24 Air Inlet Tube 25 Hand...

Page 15: ...143 061DT 072 1 8 mm Replacement Tips 91 107 072 4 Pack of 4 Standard Tip Nozzle Set 91 143 072DT 084 2 0 mm Replacement Tips 91 107 084 4 Pack of 4 Standard Tip Nozzle Set 91 143 084DT 110 3 0 mm Re...

Page 16: ...information available at the time of publication 3M reserves the right to make changes at any time without notice PRINTED IN U S A 3M 2009 All rights reserved 3M Accuspray and PPS are trademarks of 3...

Page 17: ...tase a la Hoja de Datos de Seguridad de los Materiales y a la etiqueta del envase de cada material con el que va a pulverizar antes de utilizar el equipo de 3M Uso previsto Cada Pistola aplicadora en...

Page 18: ...otro equipo aprobado para apagar incendios en el rea de pulverizaci n Siempre ubique la unidad de la turbina o compresor de aire tan alejada del rea de pulverizaci n como lo permitan las mangueras de...

Page 19: ...ntro hacia fuera para lograr aplicaciones eficaces y efectivas de pinturas adhesivos revestimientos y acabados Estos Pistolas aplicadora en spray cubren grandes patrones de pulverizaci n con muy bajo...

Page 20: ...Pistola aplicadora en spray sin purgaci n con una construcci n de armaz n compuesta consumo de aire de 10 cfm escala de reducci n de 6 1 admisi n de aire de 1 4 Presi n m xima de admisi n de 60 psi p...

Page 21: ...punto de partida gire suavemente la perilla hacia la derecha hasta que sienta que no hay m s ajustes Luego gire la perilla hacia la izquierda en una rotaci n completa El ajuste de distribuci n le perm...

Page 22: ...a en spray Purgue el Pistola aplicadora en spray antes de cambiar los colores y al finalizar la operaci n con el Pistola aplicadora en spray ATENCI N El solvente que permanece en los pasajes de aire d...

Page 23: ...ire utilice un cepillo peque o Limpie la tapa del aire y la boquilla de l quidos despu s de cada uso No empape el anillo de retenci n en el solvente durante per odos prolongados de tiempo 11 Ajuste la...

Page 24: ...91 068 27 V stago de Alivio de Presi n LFG 465 28 Tapa del V stago de Alivio de Presi n 91 109 10 Pack de 10 29 Buje con Bridas 30 V lvula de Disco 31 Sello de la V lvula de Disco 32 Resorte Telesc p...

Page 25: ...guja Delrin 91 107 XXX 23 Eje de la Aguja de Acero Inoxidable 91 078 24 Manguito Roscado 91 041 25 Resorte LG 27 5 26 Tornillo de Ajuste de la Aguja 91 068 27 V stago de Alivio de Presi n LFG 465 28 T...

Page 26: ...o de Alivio de Presi n LFG 465 28 Tapa del V stago de Alivio de Presi n 91 109 10 Pack de 10 29 Tapa de la V lvula 30 Arandela de la Tapa de la V lvula 31 Resorte de Retorno del Pist n 32 Sello de la...

Page 27: ...ivio de Presi n LFG 465 25 Tapa del V stago de Alivio de Presi n 91 109 10 Pack de 10 26 Tapa de la V lvula 27 Arandela de la Tapa de la V lvula 28 Resorte de Retorno del Pist n 29 Sello de la V lvula...

Page 28: ...43 21 V stago de V lvula de Distribuci n 97 041 22 Junta T rica 23 Perilla de Ajuste del Aire de Distribuci n 97 040 24 Tornillo 25 Tubo de Admisi n del Aire 26 Tapa de la Manija 27 Adaptador de Admis...

Page 29: ...201 14 Asiento de la V lvula 15 Resorte de la V lvula 16 Junta T rica 17 Tapa de la V lvula 97 034 18 Sujetador E 19 Junta T rica 20 Adaptador del Aire de Distribuci n 21 V stago de V lvula de Distrib...

Page 30: ...sto 0 021 0 5 mm Aguja de Material Compuesto Completo 91 006 021 D Boquilla de Material Compuesto 91 148 021 0 028 0 7 mm Aguja de Material Compuesto Completo 91 006 028 D Boquilla de Material Compues...

Page 31: ...ga el Pistola aplicadora en spray perpendicular a la superficie de trabajo Sin Flujo de Pintura Boquilla de l quidos atascada Limpie la boquilla de l quidos P rdida de presi n del aire Chequee la mang...

Page 32: ...bra el cual deber ser aprobado con anterioridad por el comprador Salvo lo escrito anteriormente 3M NO OTORGA NINGUNA OTRA GARANT A NI CONDICI N EXPRESA O IMPL CITA INCLUYENDO EN FORMA NO TAXATIVA LA G...

Page 33: ...62 Nota...

Page 34: ...nnia File Name 34870372058 indd Structure SS 18218 Date 8 26 09 Printed Colors Front Printed Colors Back Match Colors This artwork has been created as requested by 3M 3M is responsi ble for the artwor...

Reviews: