background image

6

  How to assemble a cartidge

1.Confirm that the center rod has been screwed into the head surely without looseness. Assemble a new cartridge to the 

center rod. 

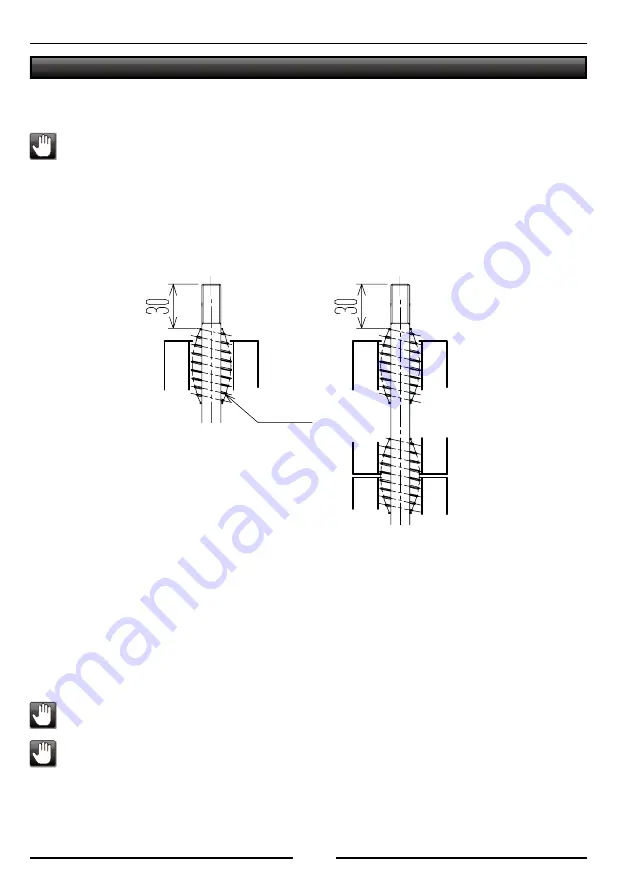
When you assemble the guide, you should make adjustments that the guide end comes approx. 30mm below the 

center rod end. 

Insert the protruding poring in the center of the cover into a cartridge and check if the cartridge tilts or gets loose. 

When you assemble a 10" of 3M

TM

 Micro-Wind

TM


D Series filter cartridge to 1BS2-T/1BS2-TW, put a spacer 

between them. A spacer is not required for other filter cartridges.  In case of 10" 3M

TM

 Micro-Wind

TM


D Series filter 

cartridge make adjustments that the guide end comes approx. 30mm below the center rod end and the guide 

comes between the cartridges. In case of 20"of 3M

TM

 Micro-Wind

TM


D Series filter cartridge, make similar 

adjustments for 10" to position the guide between the cartridges. (See the figures below.)

2. Assemble the shell gaskets and nut gaskets to the gasket grooves of the head and the cover. Inspect the gaskets before 

assembling and if it has deterioration or damages, replace them by new ones. In addition, check if the filter housing body 

has anything abnormal. 

3. Assemble the shell (this applied only to 1BS-T type). 

4. Hold the cover firmly and insert it from the bottom of the head.  

5. Screw the cap nut and tighten it. 

6. Assemble the drain plug and tighten it.

Make sure that the shell is fitted in the head groove and the cover groove. (For 1BS-TW type, the shell is welled to 

the cover.) When you fasten the cap nut, fix the projection on the cover bottom with the wrench. The appropriate 

torque for fastening the cap nut is 27 to 32N-m.

The drain plug and vent plug are covered with sealing tape. If the tape is peeled off, cover them with new tape.


Operation


Operation


Operation

1BS2-T/1BS2-TW 

1BS1-T/1BS1-TW 

Guide

Summary of Contents for 1BS-T Series

Page 1: ...y at Hand for Quick Reference When Required CONTENTS Introduction 1 For Your Safety 1 2 Attention to galling or seizure of treaded portions 2 Specifications 3 Part names 4 Installation and piping 5 Flushing and cleaning 5 How to assemble a cartridge 6 7 Filtration process 8 How to remove a cartridge 8 Maintenance 9 Consumables 10 Product warranty 10 ...

Page 2: ... in advance to see if it is appropriate to the filter housing of 1BS T 1BS TW To prevent electrostatic accumulation of electricity Use a ground wire When you use the filter housing for high temperature fluid its surface will become hot Pay enough attention when you handle the housing When you replace a cartridge with another release the pressure in the filter housing Especially when you use high t...

Page 3: ...pplied for the threaded portions of this device Please use the lubricant optimal to your working conditions When you remove the cap nut take the most care not to let the threaded portion contaminated by foreign matters When you install it fasten it with the specified torque at maximum In case you have not removed the cartridge for a long time the threaded portions may be solidified In that case ch...

Page 4: ...asket PTFE Major dimensions Shell s outer diameter 89 1mm Height 1BS1 T TW 341mm 1BS2 T TW 589mm Weight 1BS1 T TW 2 8kg max 1BS2 T TW 4 1kg max Capacity 1BS1 T TW 1 4L max 1BS2 T TW 2 8L max Port size Inlet Outlet nozzle 1BS1 T TW 15A 20A 25A Rc 1BS2 T TW 20A 25A Rc Drain nozzle 8A Rc Vent nozzle 8A Rc ...

Page 5: ...4 Part Names Vent plug Vent Cap nut Inlet Head Cartridge Center rod Drain plug Drain Guide Shell Shell gasket Cover Outlet Nut gasket Shell gasket ...

Page 6: ...you install the filter housing To prevent electrostatic accumulation of electricity Use a ground wire Do not connect the wrong pipes to the inlet and the outlet If you do so you cannot filter the fluid properly Do not forcibly pull or bend the nozzle at the inlet or the outlet of the filter housing in order to adapt it to the piping at site If you do so you will damage the housing Flushing and Cle...

Page 7: ...e make similar adjustments for 10 to position the guide between the cartridges See the figures below 2 Assemble the shell gaskets and nut gaskets to the gasket grooves of the head and the cover Inspect the gaskets before assembling and if it has deterioration or damages replace them by new ones In addition check if the filter housing body has anything abnormal 3 Assemble the shell this applied onl...

Page 8: ...eterioration or damages of gaskets may cause the fluid used to blow out If the cap nut is not fastened appropriately the fluid used may blow out In addition it may cause the center rod and cap nut had the threaded portion to suffer from galling CAUTION Cap nut Vent Nut Vent plug Inlet Outlet Head Cartridge Center Drain Drain Shell Guide Shell Shell Cover Use the wrench for ...

Page 9: ... you find no leakage open fully the inlet and the outlet for filtration If you pressurize the filter housing up to the working pressure all at once the fluid may blow out form the point where the fluid is leaking Loosen the vent plug slowly not to let the fluid blow out How to remove a cartridge 1 Close the inlet and the outlet to stop running of the fluid in the filter housing 2 Loosen the vent p...

Page 10: ...oss differential pressure so that you can learn exactly when to replace the cartridge In order to avoid long stoppage of filtration it is recommended that you should keep a new cartridge and gaskets and nuts at hand 2 For replacement parts place an order to 3M or our agents by clarifying the model serial number part name part number material and quantity Cap nut Vent Nut Vent plug Inlet Outlet Hea...

Page 11: ...ufacturers to our product are caused by natural disasters including without limitation a fire or an earthquake are caused by shipment transportation or dropping of the product after purchase or are caused by reasons that are not attributable to us 5 Except where prohibited by law this product warranty is made in lieu of all rights warranties and conditions statutory or otherwise Thus we will not g...

Reviews: