3M
™
Mining Cable Splice Kit 3104
Instructions
Kit Contents:
1 Scotch
®
Heavy Duty Mining Tape 31, 2" x 8.5'
1 3M
™
Temflex
™
Vinyl Electrical Tape 1700P, 1½" x 44'
2 Scotch
®
Electrical Shielding Tape 24, 2" x 10'
1 3M
™
Cable Cleaning Preparation Kit CC-2-Dry
2 Scotch
®
Linerless Rubber Splicing Tape 130C, 1½" x 30'
1 Instruction Sheet
Note: Scotch
®
Linerless Rubber Splicing Tape 130C is applied highly-stretched with
tacky side DOWN.
Technical Information:
For use on 3-conductor mine and portable cables, type SHD-GC
#6 AWG–1/0 kcmil (14-50 mm
2
)
2 kV
Cables up to 500 kcmil (250 mm
2
) will require the use of additional tapes.
Mine Safety and Health Administration Acceptance:
P-07-KA080005/00-MSHA
DANGER
Before attempting any cable repairs, make sure that the proper cable is disconnected,
locked out and suitably tagged.
CAUTION
Working around energized systems may cause serious injury or death. Installation
should be performed by personnel familiar with good safety practice in handling
electrical equipment. De-energize and ground all electrical systems before installing
product.
August 2009
78-8127-6849-3-C
Scotch
®
Linerless Rubber Splicing Tape 130C
Scotch
®
Heavy Duty Mining Tape 31
3M
™
Temflex
™
Vinyl Electrical Tape 1700P
3M
™
Temflex
™
Electrical Vinyl Tape 1700P
Scotch
®
Linerless Rubber Splicing Tape 130C
3M
™
Temflex
™
Vinyl Electrical Tape 1700P
Scotch
®
Electrical Shielding Tape 24
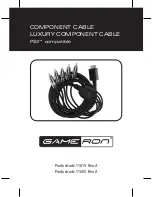
1.0 Prepare Cable
1.1
Position cable ends so that conductor color rotation matches.
1.2
Circle-cut cable jacket approximately 12" (305 mm) from each end. Be sure not
to damage cable conductors.
1.3
Measure approximately 14" (355 mm) from cable end and fully taper cable
jacket down to circle cut.
Circle cut cable jacket
12"
(305 mm)
14"
(355 mm)
Scuff & Clean
4"
(100 mm)
1.4
Remove approximately 12" (305 mm) of cable jacket.
1.5
Scuff and clean 4" (100 mm) of cable jacket beyond top of taper.
1.6
Remove cable fillers.
1.7
Fold back grounds and ground check conductors and temporarily tape to cable
jacket with vinyl tape.
Fold back grounds &
ground check conductors
1.8
Select one conductor and cut conductor approximately 9" (230 mm). Match this
conductor with same color conductor on opposite end.
1.9
Take next conductor in rotation and cut approximately 6" (150 mm) from end.
6"
(150 mm)
9"
(230 mm)
12"
(305 mm)
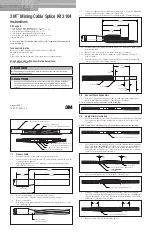
1.10
From the end of each conductor cutback remove 3½" (90 mm) of braid or tape
metallic shielding.
1.11
Remove cable color-coding to ¼" (6 mm) from edge of shielding.
1.12
Remove insulation from ends of conductors for one-half connector length
plus ¼" (6 mm).
1.13
Pencil insulation for ¾" (20 mm), sand smooth and even with electrical grade
abrasive cloth from cable cleaning materials.
3½"
(90 mm)
½ connector length
+ ¼" (6 mm)
Color-coding
Metallic shield
¾"
(20 mm)
¼"
(6 mm)
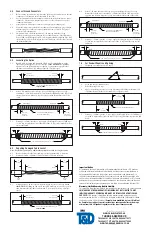
2.0 Connect Phase Conductors
2.1
Join power conductors with proper connectors and appropriate crimping tool.
Make certain conductors butt up to center indents of connector.
Note: Ground wires and ground check will be joined later.
3.0 Apply Primary Insulation
3.1
Apply one half-lapped layer of 3M
™
Temflex
™
Electrical Vinyl Tape 1700P from
edge of taper to edge of taper, making sure to completely cover edges of the
connector
NOTE: Scotch
®
Glass Cloth Tape 27, while not included, may be used at this time.
3M
™
Temflex
™
Electrical Vinyl Tape 1700P
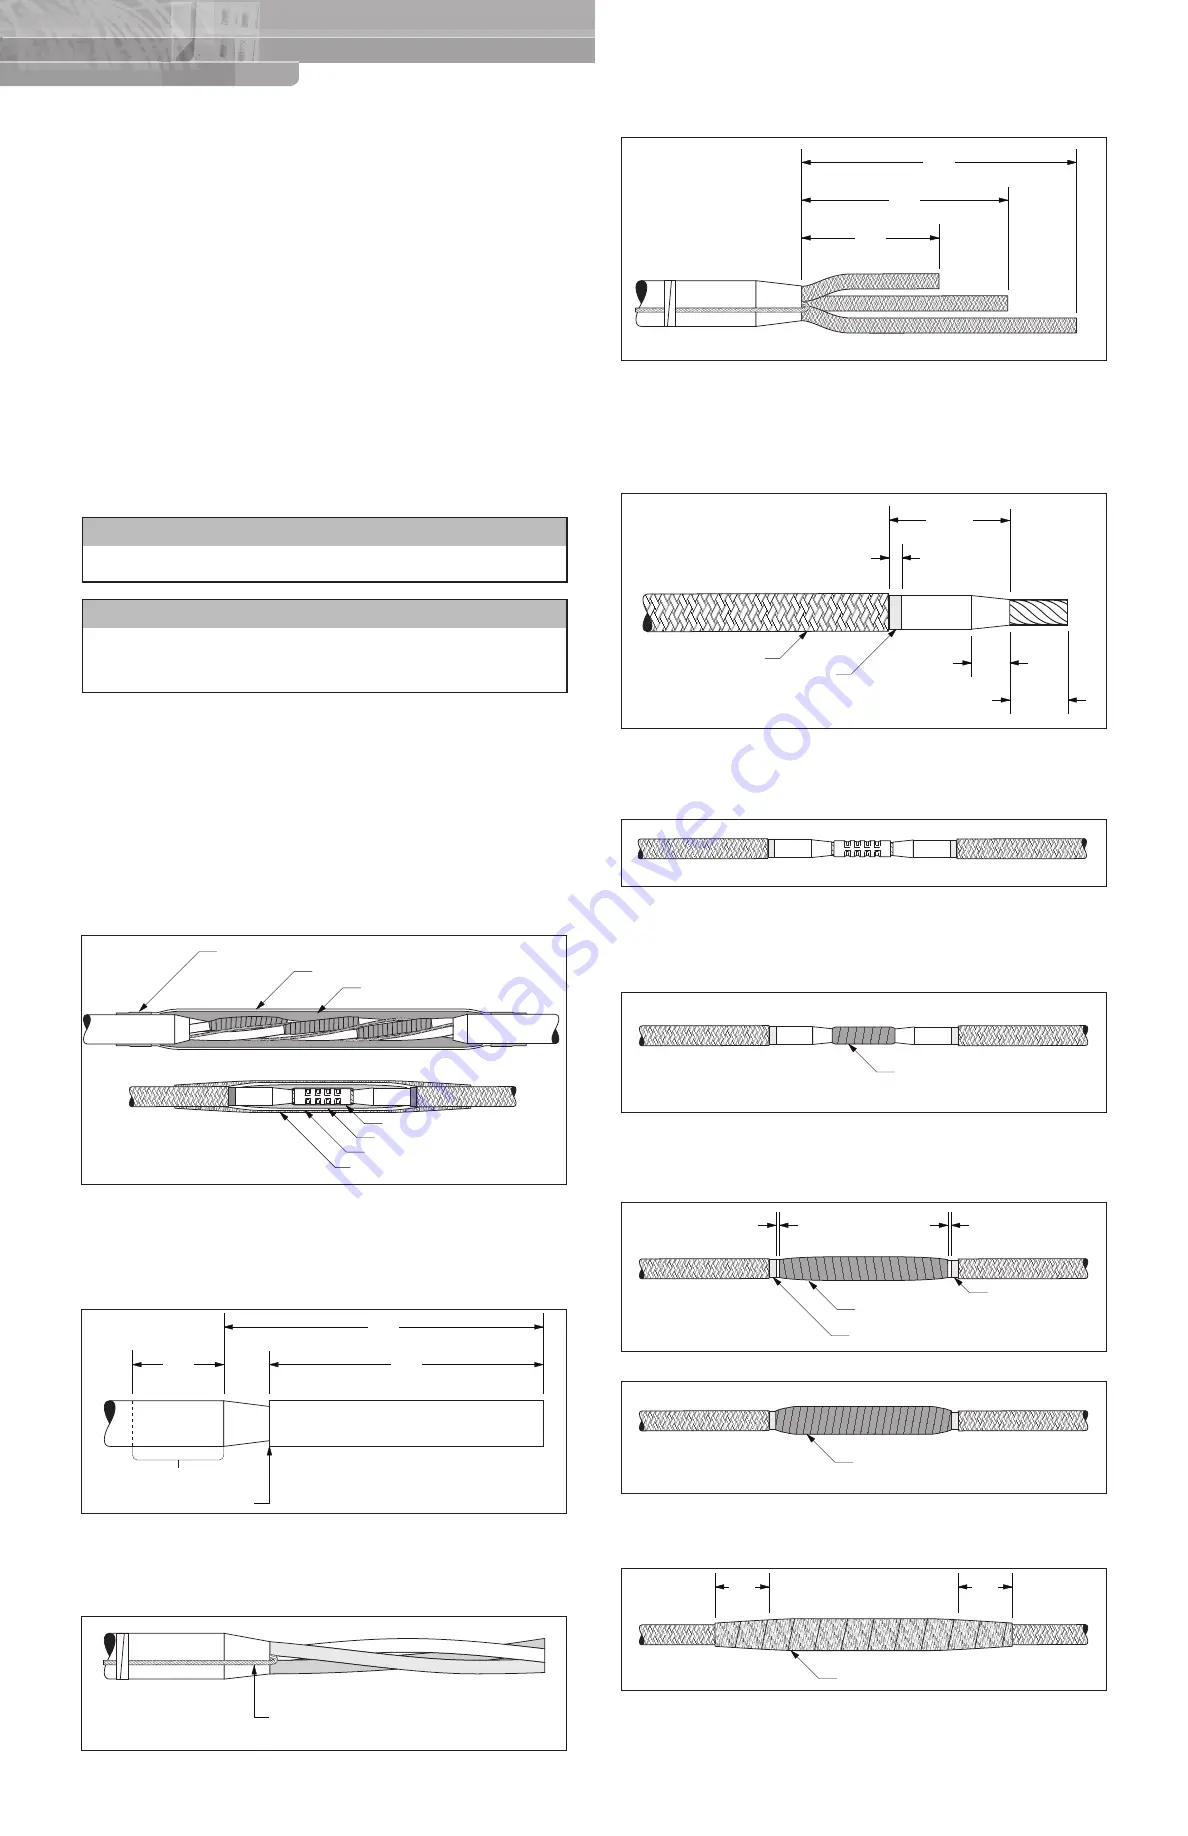
3.2
Apply highly-stretched half-lapped layers of Scotch
®
Linerless Rubber Splicing
Tape 130C (
tacky side DOWN
) over 1700P tape and up onto tapers. Build up
half-lapped layers of tape gradually going out on existing insulation to 1/8" (3
mm) from edge of original color coding. Tape should be wrapped to a thickness
equal to or greater than original insulation.
Scotch
®
Linerless Rubber Splicing Tape 130C
Tacky Side DOWN
Color coding
Color coding
1/8"
3 mm
1/8"
3 mm
3.3
Apply one half-lapped layer of 1700P tape over the 130C tape.
3M
™
Temflex
™
Electrical Vinyl Tape 1700P
3.4
Starting 2" (50 mm) up on exposed metallic shielding, wrap one half-lapped
layer of Scotch
®
Electrical Shielding Tape 24 over the vinyl tape continuing onto
opposite shielding for 2" (50 mm). Wrap back down the shielding, secure with a
half hitch or square knot, and trim ends.
Scotch
®
Electrical Shielding Tape 24
2"
(50 mm)
2"
(50 mm)
3.5
Repeat sections 2.0 & 3.0 for remaining phases.