27
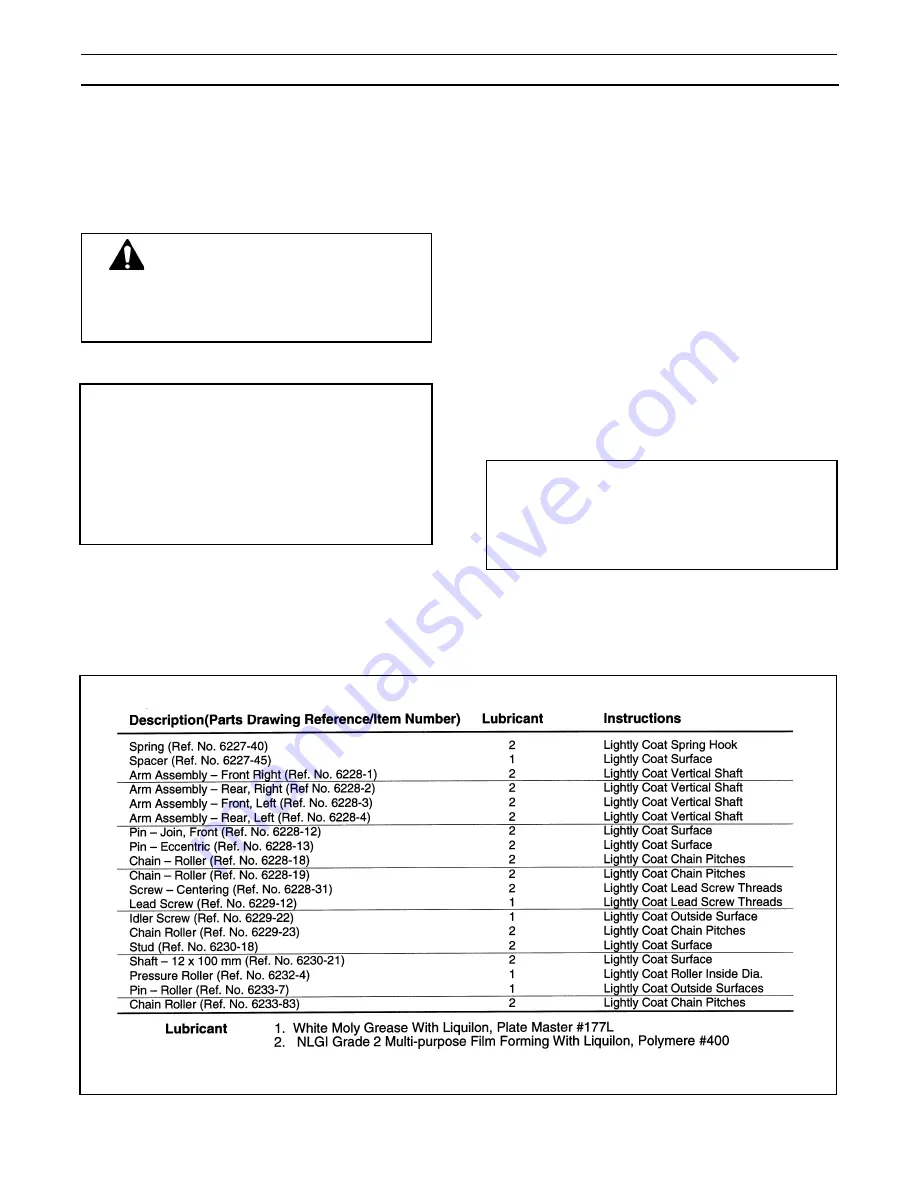
Figure 4-1 Lubrication Chart
Maintenance
The case sealer has been designed for long, trouble
free service. The machine will perform best when it
receives routine maintenance and cleaning.
Machine components that fail or wear excessively
should be promptly repaired or replaced to prevent
damage to other portions of the machine or to the
product.
WARNING Turn air and electrical
supplies off and disconnect before
beginning maintenance. Failure to
comply with this warning could result in
severe personal injury or equipment
damage.
Note
Never attempt to remove dirt from the
machine by blowing it out with compressed air.
This can cause the dirt to be blown inside the
motor and onto sliding surfaces which may
cause premature equipment wear. Never
wash down or subject equipment to conditions
causing moisture condensation on
components. Serious equipment damage
could result.
TAPING HEAD LUBRICATION See Section
II
,
"Maintenance Lubrication", page 10.
Note
Wipe off excess oil and grease. It will
attract dust which can cause premature
equipment wear and jamming. Take care
that oil and grease are not left on the surface
of rollers around which tape is threaded, as it
can contaminate the tape's adhesive.
Regular slotted containers produce a great deal of
dust and paper chips when processed or handled in
equipment. If this dust is allowed to build-up on
machine components, it can cause component wear
and overheating of drive motor. The dust build-up
can best be removed from the machine by a shop
Cleaning
Lubrication
Most of the machine bearings, including the drive
motor, are permanently lubricated and sealed and
do not require additional lubricant.
The Lubrication Chart shown in Figure 4-1 indicates
the machine points that do require lubrication every
250 hours of operation. (The Reference Number in
the chart refers to parts drawings, pages 45-77.)
vacuum. Depending on the number and type of
boxes sealed in the case sealer, this cleaning should
be done approximately once per month. If the boxes
sealed are dirty, or if the environment in which the
machine operates is dusty, cleaning on a more
frequent basis may be necessary. Excessive dirt
build-up that cannot be removed by vacuuming
should be wiped off with a damp cloth.
Summary of Contents for 3M Matic 120af
Page 11: ...6 THIS PAGE IS BLANK ...
Page 21: ...16 THIS PAGE IS BLANK ...
Page 31: ...26 THIS PAGE IS BLANK ...
Page 37: ...32 THIS PAGE IS BLANK ...
Page 40: ...35 Special Set Up Procedure Continued Figure 6 3 Outer Column Re Positioning ...
Page 42: ...37 Figure 7 1 Pneumatic Diagram Electrical Pneumatic Diagrams ...
Page 43: ...38 Figure 7 2 Electrical Diagram Electrical Pneumatic Diagrams Continued ...
Page 44: ...39 31 32 23 24 ...
Page 45: ...40 THIS PAGE IS BLANK ...
Page 49: ...44 THIS PAGE IS BLANK ...
Page 50: ...45 120af Adjustable Case Sealer Frame Assemblies ...
Page 51: ...46 Figure 6227 1 of 3 120af Adjustable Case Sealer ...
Page 53: ...48 Figure 6227 2 of 3 120af Adjustable Case Sealer ...
Page 55: ...50 Figure 6227 3 of 3 120af Adjustable Case Sealer ...
Page 57: ...52 Figure 6228 120af Adjustable Case Sealer ...
Page 59: ...54 Figure 6229 120af Adjustable Case Sealer ...
Page 61: ...56 Figure 6230 120af Adjustable Case Sealer ...
Page 63: ...58 Figure 6231 120af Adjustable Case Sealer ...
Page 65: ...60 Figure 6232 120af Adjustable Case Sealer ...
Page 67: ...62 120af Adjustable Case Sealer Figure 6233 1 of 2 ...
Page 69: ...64 Figure 6233 2 of 2 120af Adjustable Case Sealer ...
Page 71: ...66 Figure 6234 120af Adjustable Case Sealer ...
Page 73: ...68 Figure 6235 120af Adjustable Case Sealer ...
Page 75: ...70 120af Adjustable Case Sealer Figure 6236 1 of 2 ...
Page 77: ...72 120af Adjustable Case Sealer Figure 6236 2 of 2 ...
Page 79: ...74 120af Adjustable Case Sealer Figure 6237 ...
Page 81: ...76 Safety and Information Labels 120af Adjustable Case Sealer ...


