2
WARNING:
Read entire manual: Failure to follow all guides and rules could cause personal injury or property damage.
• Check with your local public works department for plumbing codes. You must follow their guidelines as you install the Water Filtration system.
• Your Water Filtration system will withstand up to 125 pounds per square inch (psi) (862 kPa; 8,62 bar) water pressure. (100 psi (689 kPa; 6,89 bar) for B1175H-S &
B1175-S only). If your water supply pressure is higher than 80 psi (552 kPa; 5,52 bar), install a pressure reducing valve before installing the Water Filtration system.
To reduce the risk associated with choking:
• Do not
allow children under 3 years of age to have access to small parts during the installation of this product.
To reduce the risk associated with the ingestion of contaminants:
• Do not
use with water that is microbiologically unsafe or of unknown quality without adequate disinfection before or after the system.
NOTICE:
To reduce the risk associated with property damage due to water leakage or fl ooding:
• Read and follow
Use Instructions before installation and use of this system.
• Change the disposable fi lter cartridge at the recommended interval; the disposable fi lter cartridge MUST be replaced every 12 months or sooner.
• Failure to replace the disposable fi lter cartridge at recommended intervals may lead to reduced fi lter performance and failure of the fi lter, causing property damage from
water leakage or fl ooding.
• Protect from freezing
, remove fi lter cartridge when temperatures are expected to drop below 40° F (4.4° C).
• Do not
install systems in areas where ambient temperatures may go above 100° F (38° C).
• Do not
install on hot water supply lines. The maximum operating water temperature of this system is 100°F (38°C).
• Do not
install if water pressure exceeds 125 psi (862 kPa; 8,62 bar). (100 psi (689 kPa; 6,89 bar) for B1175H-S & B1175-S only). If your water pressure exceeds 80 psi (552
kPa; 5,52 bar), you must install a pressure limiting valve. Contact a plumbing professional if you are uncertain how to check your water pressure.
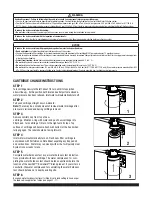
CARTRIDGE CHANGE INSTRUCTIONS
STEP 1
Turn cartridge slowly to the left, about 1/4 turn, until it stops (when
arrows line up). At this position, both inlet and outlet ports are closed &
water pressure has been relieved. Inlet water will automatically turn off.
STEP 2
Pull used cartridge straight down & discard.
Note:
There may be a small amount of residual water drainage after
pressure is relieved and during cartridge removal.
STEP 3
Remove sanitary cap from top of new
cartridge. Moisten o-ring with water and push new cartridge into
fi lter head. Turn cartridge 1/4 turn to the right until it stops. Top
surface of cartridge will become fl ush with bottom of the head when
fully engaged. The label should be facing forward.
STEP 4
Inlet water will automatically turn on. Flush new fi lter cartridge in
accordance with Performance Data Sheet expelling any trapped air
and carbon fi nes. Water may run cloudy with air but will quickly clear.
System is now ready for use.
STEP 5
Complete water hardness test as per water hardness test kit instruc-
tions provided with new cartridge. The water sample used for com-
pleting the water hardness test should be taken upstream before the
location of the new 3M™ ScaleGard™ Blend product. If your site is a
new build, the water sample used for completing the water hardness
test should be taken at a nearby existing site.
STEP 6
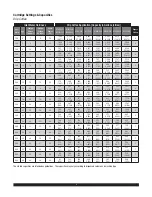
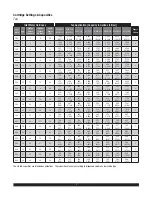
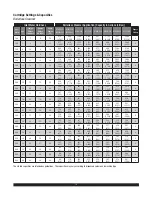
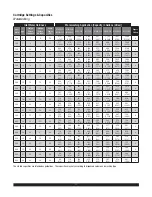
Based on water hardness test results (Step 5), set blend setting in head as per
the food service application tables (see pages 3 - 11).
1
2
3


