background image

6

NOTICE

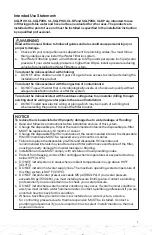
To reduce the risk associated with water leakage or flooding:

• Change the disposable pre-filter at the recommended interval; the disposable pre-filter 

MUST be replaced every 12 months or sooner.

• Change the disposable filter RO membrane at the recommended interval; the 

disposable RO membrane MUST be replaced every 24 months or sooner.

• Failure to replace the disposable pre-filter and RO membrane at recommended 

intervals may lead to reduced filter performance and failure of the filter, causing 

property damage from water leakage or flooding.

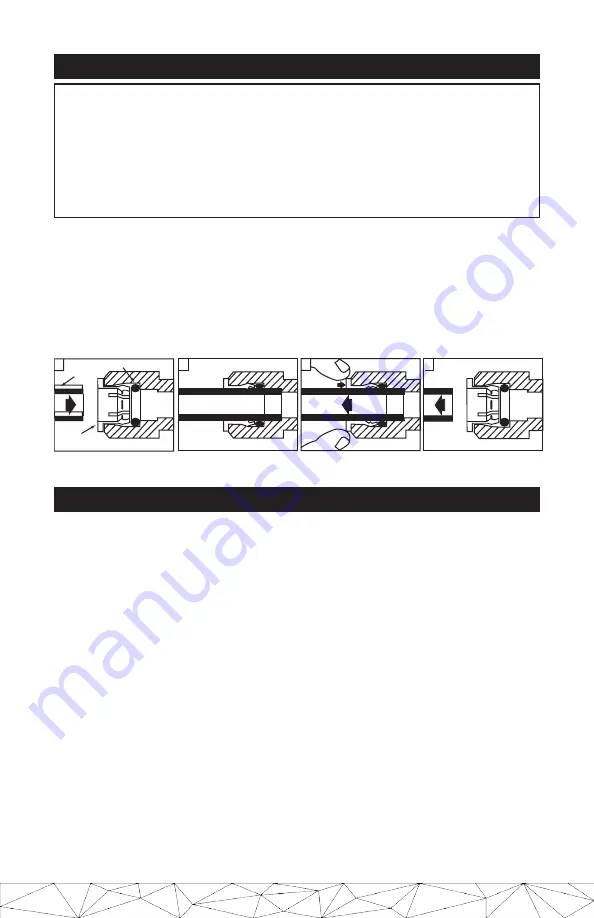
This product is outfitted with user friendly ‘Push In’ connectors. Proper use of the 

connectors is shown in the diagrams. It is most important that the tubing selected for use 

with these connectors be of high quality, exact size and roundness, and with no surface 

nicks or scratches. If it is necessary to cut the tubing, use a plastic tubing cutter or sharp 

razor knife. Make a clean square cut.

Should a leak occur at a ‘Push-In’ connector, the cause is usually a problem with the tubing.

To Fix: 

1. Relieve pressure.


4. Reattach tubing

2. Release tubing


5. Confirm connection is leak free

3. Cut off at least 

1/4”from end

HOW TO USE ‘PUSH-IN’ FITTING

SYSTEM START-UP

1.  Remove the pre-filter cartridge from its packaging. Remove the red cap from the 

cartridge and moisten the o-rings with water. Insert the cartridge into the filter head. 

Then, turn the cartridge 1/4 turn to the right.

2a. For SGLP100-CL and SGLP100-CL-BP, remove the red cap from the RO-membrane 

cartridge and moisten the o-rings with water. Insert the cartridge into the filter head. 

Then, turn the cartridge 1/4 turn to the right.

2b. For SGLP200-CL and SGLP200-CL-BP, remove the red caps from both the RO-

membrane cartridges and moisten the o-rings with water. Insert the RO-membrane 

cartridges into the filter heads. Ensure that the RO-cartridge with the blue-control is 

inserted into the RIGHT-side head, while the other RO-membrane cartridge is inserted 

into the LEFT-side head. Turn both the RO-membrane cartridges 1/4 turn to the right.

3.  Check that all plumbing connections are secure.

4.  Open the tank shut-off valve. Turn on the incoming water supply or beverage booster 

pump (if applicable) and check the system for leaks. If any leaks are noted, turn off the 

water supply and/or booster pump and correct the leak before proceeding. If a leak is 

detected at a push-in fitting, refer to Figure 2.

5.  Open downstream valve (not included) and let water run through the RO to drain for  

10 minutes.

6.  Close sample valve.

7.  Allow tank to fill (Approximately 60 minutes).

8.  Open Water Sample Valve outlet to drain. Empty tank. Water flowing from tank will 

reduce to a fast drip when tank is empty.

9.  Allow product water to run to drain for 24 hours.

10. Close sample valve and allow the tank to fill (Approximately 60 minutes).

11.  System is now ready for use.

Figure 2

1

Push in collet to release tubing.

2

Tubing is secured in.

Grey Collet 

Tube O-Ring

1

Pull tubing straight out.

2

 g

n

i

b

u

T

 e

s

a

e

l

e

R

 o

T

 g

n

i

b

u

T

 h

c

a

tt

A


o

T

Push tubing straight in as far  

as it will go.

Summary of Contents for 5636201

Page 1: ...ion Manual for SGLP CL Series Reverse Osmosis Filtration Systems Note Installer please leave with owner operator Register your system and sign up for reminders at www 3m com FSfilterreminder SGLP100 CL SGLP100 CL BP SGLP200 CL SGLP200 CL BP ...

Page 2: ...operty damage due to water leakage or flooding Read and follow Use Instructions before installation and use of this system Change the disposable pre filter at the recommended interval the disposable pre filter MUST be replaced every 12 months or sooner Change the disposable filter RO membrane at the recommended interval the disposable filter RO membrane MUST be replaced every 24 months or sooner F...

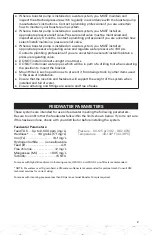
Page 3: ...n to mount the bracket Mount filter in such a position as to prevent it from being struck by other items used in the area of installation Ensure that the location and fasteners will support the weight of the system when installed and full of water Ensure all tubing and fittings are secure and free of leaks FEEDWATER PARAMETERS These systems are intended for use on feedwater meeting the following p...

Page 4: ...ed are at a water pressure and temperature of 60 PSI and 77 F producing water at atmosphere PARTS LIST The following parts are included with the SGLP100 CL SGLP200 CL SGLP100 CL BP and SGLP200 CL BP Reverse Osmosis Water Filtration systems Please unpack the contents from the product box and check to verify that all of the parts listed below are included Should any parts be missing please contact 3...

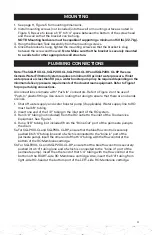
Page 5: ...hed into 1 4 tubing one end of which is connected to the brine in port of the permeate pump Insert the other end of that 1 4 tubing with the flow control at the bottom of the RO Membrane cartridge 5b For SGLP200 CL and SGLP200 CL BP ensure that the blue flowcontrol is securely pushed into 1 4 tubing one end of which is connected to the brine in port of the permeate pump Insert the other end of tha...

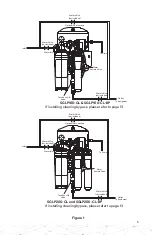
Page 6: ...ase refer to page 13 Water Valve not included Water Valve not included SGLP100 CL SGLP100 CL BP To Drain Outlet To Equipment Water Inlet Inlet Optional Service Loop Water Valve not included Water Sample Valve Tank Shut Off Valve If installing cleaning bypass please refer to page 13 Water Valve not included Water Valve not included SGLP200 CL and SGLP200 CL BP Figure 1 ...

Page 7: ...100 CL and SGLP100 CL BP remove the red cap from the RO membrane cartridge and moisten the o rings with water Insert the cartridge into the filter head Then turn the cartridge 1 4 turn to the right 2b For SGLP200 CL and SGLP200 CL BP remove the red caps from both the RO membrane cartridges and moisten the o rings with water Insert the RO membrane cartridges into the filter heads Ensure that the RO...

Page 8: ...ears on the cartridge line up with the spaces in the head 10 Turn new cartridge 1 4 turn to the right 11 Repeat steps 5 12 from System start up Remove the tubing from the fitting before completely removing the RO membrane CARTRIDGE RO MEMBRANE CHANGE INSTRUCTIONS Pre filter Cartridge Replace every 12 months 1 Close tank shut off 2 Turn used pre filter cartridge 1 4 turn to the left 3 Pull down on ...

Page 9: ...w the cap on the side of the tank to expose the Schrader Air Valve 3 Using a standard bicycle or automobile tire pressure gauge that is capable of reading pressure accurately from 0 10 psi Connect the air pressure gauge to the Schrader Air Valve on the water tank 4 Read the tank s air pressure 5 The air pressure should be between 8 and 10 psi 6 If the air pressure is below 8 psi or above 10 psi co...

Page 10: ...S CENTRALLY LOCATE AS SHOWN BY ISSUED SIZE CODE IDENT NO DRAWING NO D 15472 SCALE DO NOT SCALE D Apicella SHEET 1 OF 2 56362 DATE APRVD CHECKED UNLESS OTHERWISE SPECIFIED DATE FORM NO ENG 132 0110 04 21 15 DRAWN SYSTEM SGLPX00 CL BREAK EDGES MODEL 56362 MACHINED SURFACES 3M Purification Inc 12 7 8 44 22 5 8 3 5636203 SGLP200 CL BP 2 W AUTOBYPASS KIT 5636202 SGLP200 CL 2 5636201 SGLP100 CL 1 PART N...

Page 11: ... Sediment Particles Replace Pre Filter A more frequent pre filter change out schedule may be needed or use HF60 CL or HF90 CL for high sediment load area Slow Leak In the Distribution Line Repair Leak The unit produces water slowly A dripping leak can prevent the tank from filling Unit Never Shuts Off Continually Runs to Drain RO Membrane Partially Fouled Unit cannot produce enough water to keep u...

Page 12: ...11 Figure 5 5 8 4X 10 1 2 2X 3 4 4X 9 2X 3 8 8X 1 4 4X ...

Page 13: ... EXPRESS OR IMPLIED INCLUDING BUT NOT LIMITED TO ANY IMPLIED WARRANTY OR CONDITION OF MERCHANTABILITY OR FITNESS FOR A PARTICULAR PURPOSE OR ANY IMPLIED WARRANTY OR CONDITION ARISING OUT OF A COURSE OF DEALING CUSTOM OR USAGE OF TRADE This warranty does not cover labor If the 3M product does not conform to this warranty then the sole and exclusive remedy is at 3M s option replacement of the 3M pro...

Page 14: ...13 ...

Page 15: ...14 NOTES ...

Page 16: ...operty of their respective owners 34 8719 5112 4 2016 3M Company All rights reserved Please Recycle Printed in U S A System tested and certified by NSF International against NSF ANSI Standard 42 Standard 58 and CSA B483 1 for the reduction of the claims speci fied on the Performance Data Sheet NSF Certification applies to models SGLP100 CL and SGLP200 CL ONLY Models SGLP100 CL BP SGLP200 CL BP are...

Reviews: