background image

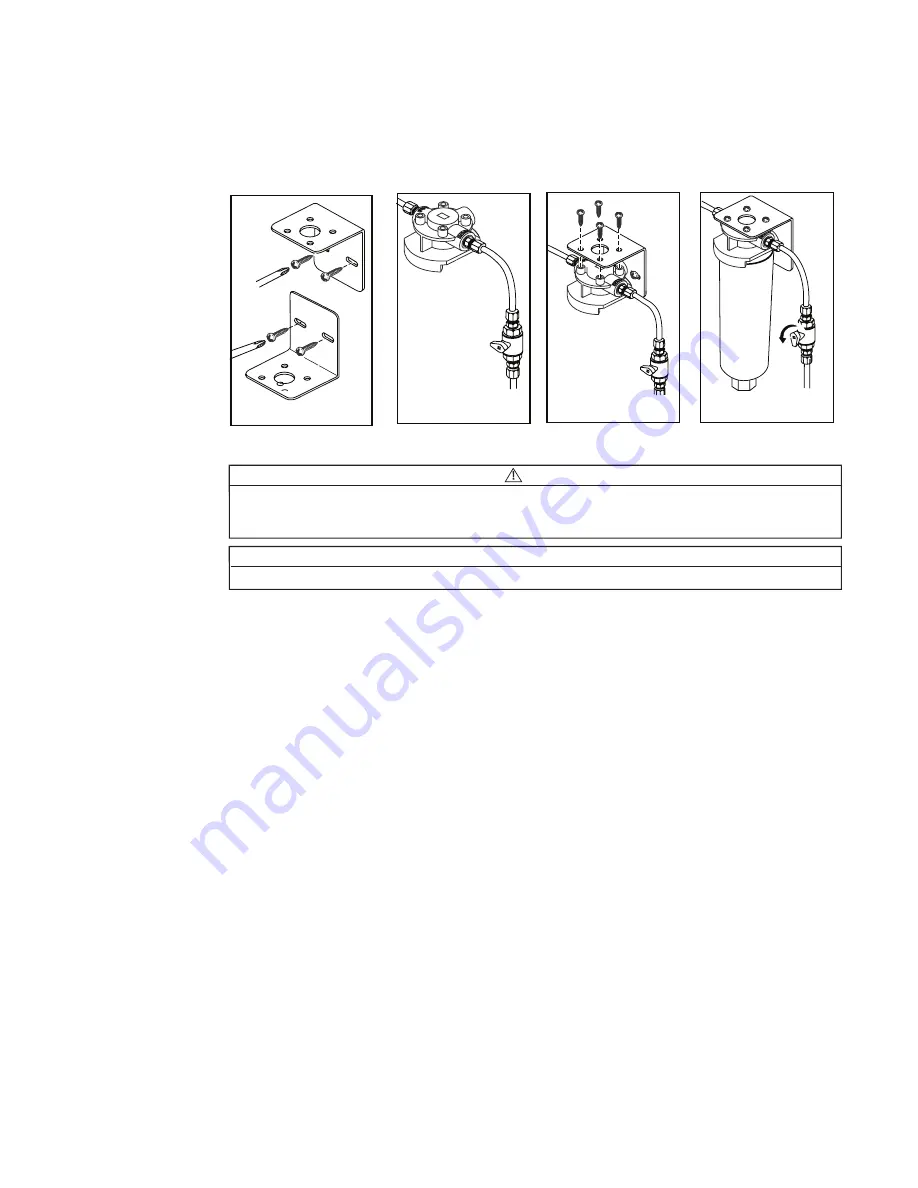
Step 1

Step 2

Step 3

Step 4

3M


Water Filtration Products

2

Procedure for Installing CS-400 Series Water Filtration Systems

Before starting, close shut-off valve on cold water line.

Step 1.

 The Mounting Bracket may be installed with the back of the bracket in the up or down position 


Screws may be used to attach the bracket to the desired surface or the industrial double-sided tape  


strip can be cut in half and used to mound the bracket. (Be sure that both the surface of the bracket  


and the mounting surface are clean. Be sure to allow at least 2” (5 cm) of clearance below the unit.)

 
Step 2.

 The filter must be installed with inlet and outlet ports as labeled. Make sure not to reverse the con-  


nections. 

IMPORTANT:

 ON TOP OF THE FILTER HEAD you will see the numbers 1, 2, and 3 molded    


into the plastic head.


  Port 3 is labeled inlet.


  Port 1 is labeled outlet.


  Port 2 is not an option and is not threaded for fittings


The shut off valve should be located in line somewhere between the incoming water line and the inlet fitting.

Step 3.

 Attach the head to the bracket with the screws provided. All four screws can be used, or two can be  


used to mount the bracket to the desired surface.

Step 4.

 Install cartridge, (see Cartridge Change instructions on next page and follow Steps 3 and 4) and  

make any required connections. Pressurize the system and check for leaks. Flush system in accor-
dance with Performance Data Sheet. Water may run cloudy but will quickly clear.

 WARNING

To reduce the risk associated with hazardous voltage:

• Do not install near electric wiring or piping which may be in path of a drilling tool when selecting the position to moun

t the 

  filter bracket.

IMPORTANT NOTES

• Note adjacent equipment which may interfere with system fastening screws.

Summary of Contents for CS-451

Page 1: ...r water pressure Do not install on hot water supply lines Install on cold water lines only Installed on cold water lines only maximum temperature 100 F 37 8 C Do not install where water hammer conditions may occur If water hammer conditions exist you must install a water hammer arrester Contact a plumbing professional if you are uncertain how to check for this condition Do not install on hot water...

Page 2: ...3 molded into the plastic head Port 3 is labeled inlet Port 1 is labeled outlet Port 2 is not an option and is not threaded for fittings The shut off valve should be located in line somewhere between the incoming water line and the inlet fitting Step 3 Attach the head to the bracket with the screws provided All four screws can be used or two can be used to mount the bracket to the desired surface ...

Page 3: ...n tabs of new cartridge with head and insert new cartridge into head Turn cartridge to the right until the filter stops Step 4 Place the inlet shutoff valves in regular working position Due to air and carbon fines water may initially run cloudy but will clear Flush system in accordance with Performance Data Sheet 3 3M Water Filtration Products Replacement Cartridge Change Instructions CAUTION The ...

Page 4: ... date of shipment from the factory under normal use and service and otherwise when such equipment is used in accordance with instructions furnished by Seller and for purposes disclosed in writing at the time of purchase if any The disposable filter cartridge is war ranted from defects in material and workmanship for a period of one 1 year from the date of purchase Any unauthorized alteration or mo...

Reviews: