background image

December 2005 • 78-6970-9432-0 • Copyright © 2005, 3M Company. All Rights Reserved.

Product Safety Guide

Including Installation Instructions

3


Digital Easel

Summary of Contents for DE343

Page 1: ...December 2005 78 6970 9432 0 Copyright 2005 3M Company All Rights Reserved Product Safety Guide Including Installation Instructions 3 Digital Easel ...

Page 2: ...2 3M Digital Easel 3M 2005 All Rights Reserved ...

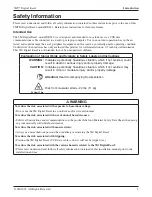
Page 3: ...ould result in death or serious injury and or property damage CAUTION Indicates a potentially hazardous situation which if not avoided may result in minor or moderate injury and or property damage Attention Read Accompanying Documentation 24 Lbs 11 Kg Risk from muscular strain 24 lbs 11 kg WARNING To reduce the risk associated with exposure to hazardous voltage Do not use the 3M Digital Easel in a...

Page 4: ...an result from dropping the 3M Digital Easel To reduce the risk associated with choking Keep batteries away from children and pets CAUTION To reduce the risk associated with impact Always provide proper adult supervision when using the 3M Digital Easel around children Always place the 3M Digital Easel on a stable and level surface Install the 3M Digital Easel on a wall with 1 2 inch thick drywall ...

Page 5: ... Use only 3M recommended wall mounting hardware Follow all installation instructions carefully Make sure mounting screws are properly sized to handle the weight of the 3M Digital Easel Make sure mounting hardware is securely anchored to a solid structure Proper installation must be performed by qualified service technicians as outlined in the installation instructions Failure to do so could result...

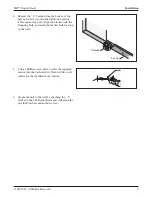
Page 6: ...1 If possible position the 3M Digital Easel in front of the wall where the bracket is located Position the unit on the floor on its backside so that the top is closest to the wall 2 Clear the path from the unit to the wall where it will be hanging WARNING To reduce the risk associated with muscle strain Always use more than one person when installing or removing the 3M Digital Easel 3 With one per...

Page 7: ...he wall Align the bracket with the mounting hole and mark the bracket hole location on the wall 5 Using a Phillips screw driver screw the supplied anchor into the wall until it is flush with the wall surface for the identified hole location 6 Secure the unit to the wall by attaching the L bracket to the 3M Digital Easel and wall using the provided washers and anchor screws ...

Page 8: ...ned on your purchase order shall have no force or effect unless expressly agreed upon in writing by an authorized officer of 3M Warranty Limited Remedy Limited Liability This product will be free from defects in material and manufacture for a period of 90 days from the time of purchase 3M MAKES NO OTHER WARRANTIES INCLUDING BUT NOT LIMITED TO ANY IMPLIED WARRANTY OF MERCHANTABILITY OR FITNESS FOR ...

Reviews: