background image

1-800-328-1371

www.

3M.com/meetings

3

Digital Wall Display

appareils vidéo / videogeräte /  

dispositivi video / dispositivos de vídeo
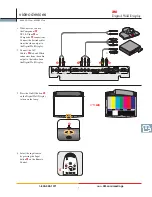
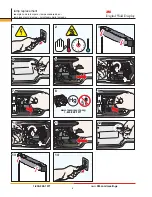
1.  Conecte el cable 

S-Vídeo 

  de la toma de 

salida de vídeo a la toma 
de entrada de S-Vídeo del 
dispositivo Digital Wall 
Display.

2.  Enchufe los conectores 

rojo y blanco del cable 
A/V 

 de la salida de 

audio a la entrada de audio 
del dispositivo Digital Wall 
Display.

1.  Collegare il cavo S-

Video 

 dall’uscita video 

all’entrata S-Video del 
Digital Wall Display.

2.  Collegare i connettori 

rosso e bianco del cavo 
A/V 

 dall’uscita Audio 

all’entrata Audio del 
Digital Wall Display.

1.  Schließen Sie das 

S-Video-Kabel 

 am 

Video-Ausgang und am 
Anschluss „S-Video In“ 
am Digital Wall Display 
an.

2.  Schließen Sie den roten 

und den weißen Stecker 
des A/V-Kabels 

 am 

Audio-Ausgang und am 
Anschluss „Audio In“ am 
Digital Wall Display an.

1.  Connectez le câble 

vidéo S 

 de la sortie 

vidéo à l’entrée vidéo S 
sur le Digital Wall Display.

2.  Connectez les connecteurs 

blanc et rouge du câble 
A/V 

 de la sortie audio 

avec l’entrée audio sur le 
Digital Wall Display.

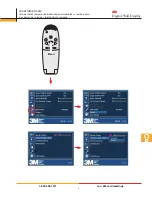
3.  Appuyez sur le bouton 

Marche/Arrêt 

 sur le 

Digital Wall Display pour 
allumer la lampe.

4.  Sélectionnez la source 

d’entrée en appuyant sur 
le bouton entrée 

 dans le 

contrôle à distance.

3.  Drücken Sie am Digital 

Wall Display auf die 
Taste ON/OFF (EIN/
AUS) 

, um die Lampe 

einzuschalten.

4.  Wählen Sie die 

Eingangsquelle, indem Sie 
auf der Fernbedienung die 
Taste „Input“ (Eingang) 


drücken.

3.  Premere il tasto On/Off 


del Digital Wall Display 
per accendere la lampada.

4.  Selezionare il tipo di 

input di origine premendo 
il tasto Input 

 del 

telecomando.

3.  Pulse el botón de 

encendido/apagado 

  del 

dispositivo Digital Wall 
Display para encender la 
lámpara.

4.  Seleccione la fuente de 

entrada pulsando el botón 
de entrada 

 del mando a 

distancia.

Summary of Contents for Digital Walldisplay 9000PD Plus

Page 1: ...r the 9000PD Plus or 9200IC IW Plus Operator s Guide prior to installation and use Avant l installation et l utilisation s il vous plait veuillez lire comprendre et suivre toutes les informations de s...

Page 2: ...onnectez le c ble PC audio de la prise casque sur l ordinateur avec le PC audio sur le Digital Wall Display 4 Appuyez sur le bouton Marche Arr t sur le Digital Wall Display pour allumer la lampe Remar...

Page 3: ...to either of the Audio In Computer jacks on the Digital Wall Display 4 Press the On Off button on the Digital Wall Display to turn on the lamp Note If you are using a laptop toggle the display functi...

Page 4: ...ettare ciascuno dei bersagli evidenziati con lo stilo interattivo 8 Usare lo strumento di annotazione eBeam per inserire appunti nella propria presentazione Hinweis Wenn eBeam nicht auf Ihrem Computer...

Page 5: ...from the headphones jack on the computer to either of the Audio In Computer jacks on the Digital Wall Display 4 Press the On Off button on the Digital Wall Display to turn on the lamp Note If you are...

Page 6: ...d am Anschluss Audio In am Digital Wall Display an 1 Connectez le c ble vid o S de la sortie vid o l entr e vid o S sur le Digital Wall Display 2 Connectez les connecteurs blanc et rouge du c ble A V...

Page 7: ...video output to the Digital Wall Display 2 Connect the A V Cable s Red and White connectors from the audio output to the Audio In on the Digital Wall Display 3 Press the On Off button on the Digital...

Page 8: ...gs 3 Digital Wall Display lamp replacement reemplazo de la l mpara lampe wiedereinbau remplacement de lampe rimontaggio della lampada 1 11 10 6 12 1 2 3 4 5 7 8 9 2 3 4 5 6 www lamprecycle org 1 800 3...

Page 9: ...ww 3M com meetings 3 Digital Wall Display reset lamp hours reiniciar horas l mpara betriebsstunden zur cksetzen remise z ro des heures de la lampe reimposta ore lampada MUTE POWER BLANK MENU INPUT A B...

Page 10: ...ne sono reperibili dal sito www 3M com Wall Display 1 Inserire il CD ROM nell unit CD ROM del computer 2 Selezionare Installa software Leggi documentazione oppure Tutorial online Die CD ROM enth lt di...

Page 11: ...please contact your local 3M distributor and order a CD ROM part number 78 6970 9427 0 Si vous ne pouvez pas obtenir de CD ROM cette adresse veuillez contacter votre revendeur local 3M et commander un...

Page 12: ...or implementation Any statements related to the product which are not contained in 3M s current publications or any contrary statements contained on your purchase order shall have no force or effect...

Reviews: