background image

NR Series Precision Colorimeter 


34 

Power source 

Rechargeable 

lithium-ion 

battery 

3.7VDC@3200mAh 

Battery life 

3 years, more than 1.6 million times 

Measuring 

times 

before 

recharge 

More than 3000 times 

Display 

TFT True Color 2.8inch@ (16:9) 

Operating temperature 

-10~40

 (14

~104

Humidity range 

relative 

humidity 

0~85% 

with 

no 

condensation 

PC Software 

CQCS3 

Color 

Quality 

Management 

Software 

Data interface 

USB RS232 

Portable packing bag 

Original 

Standard accessories 

Powder  adapter,  Li-ion  battery,  operating 
instruction, 

white 

calibration 

cover, 

wristband, 

cross 

platform, 

4mm 

measuring aperture, software, USB cable, 
4mm  aperture  for  small  concave-convex 
surface 

Optional accessories 

Miniature thermal printer 


*Note: The specifications are subject to change without notice.


Summary of Contents for NR60CP

Page 1: ......

Page 2: ...easurement Locating 9 2 Standard Measurement 9 3 Sample Measurement 10 III Connect Colorimeter to PC 11 IV Print 13 VI System Function Description 14 1 Record and Standard Entering 14 2 White and Blac...

Page 3: ...ng aperture for more measurement occasions Save data automatically The precise and stable hand head structure to make the measurement easier Cautions This colorimeter is a precise measuring instrument...

Page 4: ...cabinet when not in use Please take out the battery to prevent the colorimeter from damage if you don t use it for a long time Please keep the colorimeter in a cool dry place Any unauthorized changes...

Page 5: ...olorimeter 3 I Button Description The following is a brief introduction of the buttons We will give more detailed information about its function separately in next chapters Figure 1 Button Function Up...

Page 6: ...NR Series Precision Colorimeter 4 Figure 2 Testing Button Diagram Button Function Introduction 1 Menu 2 Up 3 Down 4 Enter 5 Back 6 Testing Testing...

Page 7: ...s used to connect to external power source The speci cation of external power source is 5V 2A 3 USB Interface RS 232 Interface This interface is a common interface The instrument judges the connection...

Page 8: ...external power source or USB cable to connect the PC Meanwhile push the switch to 1 and then the battery will be charging If not charge the battery then take out the battery and connect external power...

Page 9: ...NR Series Precision Colorimeter 7 Figure 4 Battery Installation Li ion Battery Battery Cover...

Page 10: ...th integrating sphere Then the installation is nished 2 Measuring Aperture Dismantlement As shown in Figure 5 gently turn measuring aperture clockwise When hear slight Da it means the measuring apertu...

Page 11: ...rement or Sample Measurement interface press the Testing key and hold it The facula will appear at the moment You can observe the matching status between the facula and the measured sample At the same...

Page 12: ...ment Interface 3 Sample Measurement After completing standard measurement press Enter button the instrument will enter Sample Measurement interface automatically as shown in Figure 7 Align the measuri...

Page 13: ...nect Colorimeter to PC only for models equipped with software Press MENU button to enter the main menu as shown in Figure 8 Then select Comm to enter an interface shown in Figure 9 Follow the tips in...

Page 14: ...NR Series Precision Colorimeter 12 Figure 8 Main Menu Figure 9 USB Communication...

Page 15: ...Colorimeter 13 Figure 10 Communicating Interface IV print Connect colorimeter to the printer When the colorimeter is in Standard Measurement or Sample Measurement interface you can print measurement...

Page 16: ...menu to enter Standard Record as shown in Figure 11 The gure shows the standard sample data You can check di erent standard data through Up and Down T002 is a standard number After selecting a standa...

Page 17: ...standard record is entered to the measurement interface press Enter you can perform sample measurement under this standard c Sample Record Entered to a Standard In some cases it s needed to use a stor...

Page 18: ...aperture upwards then put the white calibration board in the center of the colorimeter and make sure it is closed to measuring aperture Re press Testing key to perform white calibration Next step is...

Page 19: ...owing occasions first use great change of the environment long term unused or inaccura te data 3 Tolerance Setting Select Tolerance in main menu to enter tolerance setting interface as shown in Figure...

Page 20: ...nagement If E is smaller than tolerance value then it is quali ed If E is bigger than tolerance value then it is unquali ed As shown in Figure 14 1 the E in sample measurement interface is unquali ed...

Page 21: ...les When select Delete All Samples it will delete all test samples in the instrument and save the standard records Then the instrument will display a warning interface as shown in Figure 16 Press Ente...

Page 22: ...ords in the instrument will be deleted including all standard records and all sample records Then the instrument will pop up a warning interface as shown in Figure 17 Press Enter button all records in...

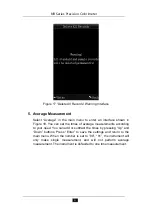
Page 23: ...18 You can set the times of average measurements according to your need You can add or subtract the times by pressing Up and Down buttons Press Enter to save the settings and return to the main menu...

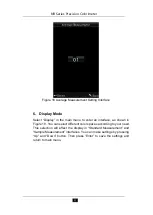
Page 24: ...in menu to enter an interface as shown in Figure 19 You can select di erent color spaces according to your need This selection will a ect the display in Standard Measurement and Sample Measurement int...

Page 25: ...Colorimeter 23 Figure 19 Display Mode Interface The display mode will default to CIE L a b C H Other options are CIE L a b CIE XYZ Measurement interfaces of each option are corresponding Figure 20 Fig...

Page 26: ...NR Series Precision Colorimeter 24 Figure 20 CIE L a b C H Measurement Interface Figure 21 CIE L a b Measurement Interface...

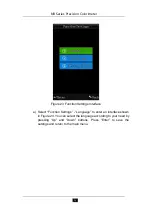
Page 27: ...ttings in main menu to enter an interface shown in Figure 23 You can select the object according to your need by pressing Up and Down buttons Press Enter to enter the corresponding setting interface A...

Page 28: ...nction Settings Interface a Select Function Settings Language to enter an interface shown in Figure 24 You can select the language according to your need by pressing Up and Down buttons Press Enter to...

Page 29: ...on Up and Down In Figure 26 and Figure 27 you can add or subtract time and date by pressing the button Up and Down In Figure 28 and Figure 29 you can set display format of time and date by pressing Up...

Page 30: ...NR Series Precision Colorimeter 28 Figure 25 Time Date Setting Figure 26 Time Setting...

Page 31: ...NR Series Precision Colorimeter 29 Figure 27 Date Setting Figure 28 Time Format...

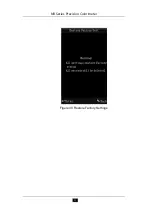
Page 32: ...ter an interface shown in Figure 30 Press Enter button The instrument will restore to factory default setting and clear all records Note When you choose this setting it will pop up a warning Please op...

Page 33: ...NR Series Precision Colorimeter 31 Figure 30 Restore Factory Settings...

Page 34: ...y and accurately Small measuring aperture easy to measure concave convex object No need to calibrate each time which simplify the operation New integrating sphere optical path design improve measureme...

Page 35: ...face Detector Silicon photoelectric diode Color Space CIEL a b C h CIEL a b CIEXYZ Color Di erence Formula E ab L a b E C h Light Source D65 Measuring light source LED blue light excitation Errors bet...

Page 36: ...y range relative humidity 0 85 with no condensation PC Software CQCS3 Color Quality Management Software Data interface USB RS232 Portable packing bag Original Standard accessories Powder adapter Li io...

Page 37: ...have modulated the light source spectrum Di erent objects have di erent re ectance spectra transmittance spectra The light source spectrum modulates the re ectance spectra transmittance spectra of di...

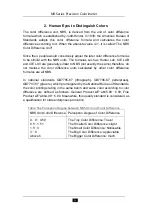
Page 38: ...the color di erence units calculated by other color di erence formulas are all NBS In national standards GB7705 87 lithograph GB7706 87 letterpress GB7707 87 gravure which promulgated by the National...

Page 39: ......

Reviews: