background image


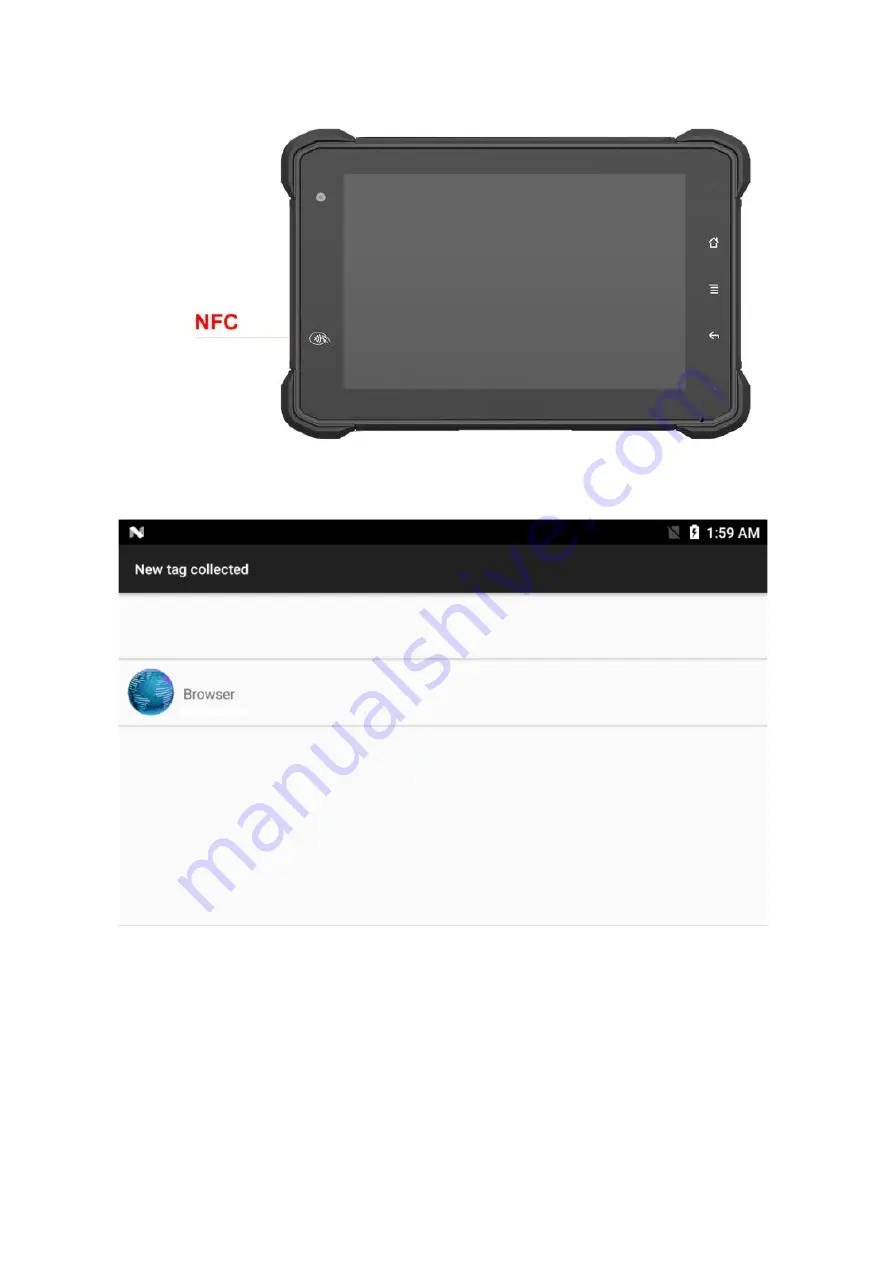
Figure 5 


Figure 6 


Summary of Contents for VT-7 Pro

Page 1: ...VT 7 Pro 7 Inch Rugged Android Vehicle Display Terminal User Manual Version 1 0 ...

Page 2: ...the manufacturer Under no circumstances will the manufacturer be liable for any direct indirect special incidental or consequential damages arising from the use or inability to use the product or documentation even if advised of the possibility of such damages About This Manual This user s manual provides the general information and installation instructions for the product The manual is meant for...

Page 3: ...g the Battery 18 2 4 Optimizing Battery Life 19 Chapter 3 Using VT 7 Pro Hardware Interface 21 3 1 Transferring Files between Computer and the Device 21 3 1 1 Connection 21 3 2 Using Serial Port Demo App 23 3 3 Using ACC 24 3 3 1 ACC Connection Instruction 24 3 3 2 ACC Functions 24 3 3 3 ACC Settings Path 25 3 3 4 ACC Settings 26 3 4 Using GPIO 27 3 3 1 GPIO Tail Lines Instruction 27 3 3 2 GPIO Ty...

Page 4: ...ere is a danger of injury to the user or a risk of damage to the product should warning no tices be disregarded Battery Recycle This symbol indicates electrical warning Important Safety Instructions Read these safety instructions carefully Read all cautions and warnings on the equipment Place this equipment on a reliable surface when installing Dropping it or letting it fall may cause damage Make ...

Page 5: ...o fully charge approx 4 hours the equipment when charging the equipment for the first time Long Term Storage Maintenance If you are putting away the battery for more than three months it is recom mended that the battery should be stored separately and fully charged and get recharged every three months If you store an uncharged battery it could fall into a deep worn out state which would render it ...

Page 6: ...ill not be liable for any claim made by any other related party Return authorization must be obtained from the vendor before returned mer chandise will be accepted Authorization can be obtained by calling or email ing the account representative from vendor and requesting a Return Merchan dise Authorization RMA number Returned goods should always be accom panied by a clear problem description ...

Page 7: ...core processor 1 8G Android 9 0 Operation System Comply with IP67 rating WIFI Bluetooth LTE GNSS and 5000mAh rechargeable battery supported 7 Inch IPS Display physical 1280x800 resolution 800cd m multi point capaci tive touch Portable with Docking Station 1 2 Parts of the Device ...

Page 8: ...RS232 dev ttyHSL0 4 ACC Input Connect with vehicle ACC power Voltage range 0 30V Note With ACC function the device is requested to connect the power source via DC adaptor simultaneously to power on after ignition please refer to 3 2 for the DEMO and source code of ACC 5 Power DC input Voltage DC8 36V ISO 7637 2 compliant 6 GPIO Red White Green Yellow Black Input 1 Input 2 Output 3 Output 4 GND 7 U...

Page 9: ... 14 15 16 Reserved Bus nega tive line of SAE J1850 Reserved Reserved Reserved CAN_L line of ISO 15765 4 L_line ac cording to ISO 9141 2 and ISO 14230 4 Permanent positive voltage 3 COM RS232 dev ttyHSL0 4 ACC input Connect with vehicle ACC power Voltage range 0 30V Note With ACC function the device is requested to connect the power source via DC adaptor simultaneously to power on after ignition pl...

Page 10: ...tocol High Line i e CAN J1708 J193 9 High Protocol Low Line i e CAN J1708 J1939 Low 3 COM RS232 dev ttyHSL0 4 ACC input Connect with vehicle ACC power Voltage range 0 30V Note With ACC function the device is requested to connect the power source via DC adaptor simultaneously to power on after ignition please refer to 3 2 for the DEMO and source code of ACC 5 GPIO out put Red White Green Yellow Bla...

Page 11: ...S232 dev ttyHSL0 4 ACC in put Connect with vehicle ACC power Voltage range 0 30V Note With ACC function the device is requested to connect the power source via DC adaptor simultaneously to power on after ignition please refer to 3 2 for the DEMO and source code of ACC 5 GPIO Red White Green Yellow Black Input 1 Input 2 Output 3 Output 4 GND 6 USB USB Type A can t be used simultaneously with USB Ty...

Page 12: ... Integrated speaker 2W 1 x 3 5mm stereo headphone jack Navigation AGPS E com pass GPS 1575 42MHz 1 023MHz GLONASS 1597 5MHz 1605 8MHz BeiDou 1561 098MHz 2 046MHz WWAN US Version North America LTE FDD B2 B4 B5 B7 B12 B13 B14 B17 B25 B26 B66 B71 LTE TDD B41 WCDMA B2 B4 B5 EU Version EMEA Ko rea Thailand LTE FDD B1 B2 B3 B4 B5 B7 B8 B20 B28 LTE TDD B38 B39 B40 B41 WCDMA B1 B2 B4 B5 B8 GSM 850 900 180...

Page 13: ...EC 14443 A B at 106 kbit s Camera op tional Front 5 0megapixel camera Rear 16 0megapixel camera Mounting optional RAM Mount 1 912 Inch RAM mount compatible AMPS holes VESA Bracket VESA 75mm Folder Bracket I O Interface standard Serial Port 2 x RS232 USB Port 1 x USB Host 1x USB Device high speed up to 480Mbps SD Slot 1 x Micro SD card 1 8v 2 95v up to 128G SIM Socket 1 x Micro SIM Card slot 1 8v 2...

Page 14: ...2 Output See 3 4Extended Cable Definition for details ACC See 3 3Extended Cable Definition for details Power Supply Power System External AC Power Adapter Battery Type Lithium ion rechargeable battery Field replaceable for maintenance Battery Capac ity 3 7V 5000mAh battery Typically around 5hours Power Con sumption Normal mode 5W Charging mode 8W Adapter Input AC 100 240C 50 60Hz Adapter Output DC...

Page 15: ...ory for re pair 2 1 1 Power on the Device 1 Power on by pressing the button Long press the power button for more than 2 seconds until the boot screen dis played It needs around 40 seconds to start the system The indicator is on when VT 7 Pro activate normally 2 Power on by connecting ACC see the details in Chapter 3 3 Using ACC 3 Power consumption during operation 5w typical 2 1 2 Power off the De...

Page 16: ...rface cover with screws 2 3 Charging the Battery The battery is partially drained during the transportation Be sure to charge the bat tery to full when you are charging it for the first time Tips Please keep the DC in charging status at work if available Owe to the unique power supply design Patent No CN201821205954 6 the device using the power supplied by DC input or USB type C input in priority ...

Page 17: ...able Warning Please ensure that the input voltage of the DC interface is within the range of 8V 36V or use the 12V adapter coming with device If the input voltage of the DC is outside this range the VT 7 Pro may be unable to charge or damaged It may cause the warranty invalid 2 3 2 Checking the Battery Level a When the charging is in process a battery indicator will appear in the status bar showin...

Page 18: ...tails in 2 3 Charging the Battery 2 3 3 Installing Replacing the Battery In case you need to install or replace the battery follow the steps below to access the battery chamber and replace the battery 1 Place the device on a flat surface with the rear side facing up Loosen the re taining screws on the back cover by using a Hexagon socket screwdriver with flat head ...

Page 19: ...ptimize the op erating time of the battery it is recommended that you do the following Decrease the LCD display brightness Set a shorter timeout of inactivity to allow the screen enter sleep mode Turn off the display if you are not using it Turn off Wi Fi Bluetooth or GPS function if you are not using it Turn off the App that heavily drains the battery if you are not using it To view the battery u...

Page 20: ...ery settings page to limit the maxi mum CPU performance to conserve battery life and lower device tempera ture To access the battery settings page swipe down the Status Bar in the up per right corner and then tap and hold the Battery icon ...

Page 21: ... files such as pictures or audio files between your computer and your device using the provided USB cable 3 1 1 Connection Connect the device to the computer by using the USB type c cable and open the prompt message of the device Refer to the following figure and click USB charging this device to charge the battery ...

Page 22: ...Then select File Transfer Find out the Device in This PC ...

Page 23: ...ans COM port switch to switch on off corresponding COM port 5 The boxes in red means auto send interval time setting 6 The boxes in red means auto send mode selection and COM port info send ing button 7 COM port info sending button 8 The boxes in red means text rows counting in the information receiving text box the above numbers corresponding to the COM port information receiving box on the left ...

Page 24: ... ACC wire on extended cable of the tablet with ACC of vehicle Figure 1 1 3 3 2 ACC Functions I Power on the tablet by ACC II Light up the screen by ACC III To turn off the screen by ACC trigger based upon the setting delayed time IV To shut down the tablet by ACC trigger based upon the setting delayed time Note a The ACC is triggered by the electric level b Function of Power on the tablet by ACC c...

Page 25: ...3 3 3 ACC Settings Path Find ACC Settings from Settings as the Figures2 1 shown Figure 2 1 Figure 2 2 ...

Page 26: ... to turn off the screen function 3 Click to pop up the dialog box in Figure 2 6 to set the delay time to turn off the screen display after ACC is disconnected 4 Display current delay time 5 ACC controls switch to turn off the tablet 6 After clicking the dialog box shown in Figure 2 7 to set the delay time for shutdown after ACC is disconnected 7 Display current delay time Figure 2 4 ACC Settings i...

Page 27: ... Using GPIO 3 3 1 GPIO Tail Lines Instruction Regarding the definition diagram of GPIO interface please see the details in Chapter 1 5 Cable Definition 3 3 2 GPIO Typical Connection The following figure is a typical connection method of GPIO In order to ensure communicate normally please connect the GPIO interface of VT 7 Pro as shown in the following figure GPIO Cable GPIO Cable GND ...

Page 28: ...ut VOH 3 4 V Internal weak pull up VOL 0 0 1 V GND Black Ground Note Black wire Ground should be connected to common ground of connecting devices 3 3 4 GPIO_DEMO Instruction a Introduction This software is only used for developing GPIO functions of device and it isn t suitable for factory s standard software b GPIO_DEMO Main Interface Figure 2 1 c Introduction of Main Components The part marked wi...

Page 29: ...arked with a red box shown in Figure 2 3 It can read the value at once when GPIO is set as the input direction Figure 2 3 The button marked with a red box shown in Figure 2 4 used to set the high or low of GPIO output at once ...

Page 30: ...Figure 2 4 ...

Page 31: ...3 5 Using NFC Function 3 5 1 NFC Activation Method Activate the NFC function according to Fugure1 to 4 Figure 1 Figure 2 ...

Page 32: ...igure 4 shows A prompt tone would be heard if the card is successfully identi fied If the card contains some information such as manufacturer s information there will be an interface popped up as shown in Figure 5 Note If the card has been identified it does not always pop up an interface but there must be a prompt tone ...

Page 33: ...Figure 5 Figure 6 ...

Page 34: ...following figure to enter the Root privilege on off function set ting interface 3 6 2 The root switch setting interface is as follows In the figure 1 is the Root permission on off switcher In the figure 2 to modify the password Initial password qwertyuiop ...

Page 35: ...on OBD II is a set of standards for implementing a computer based system to control emissions from vehicles by Society of Auto motive Engineers SAE in 1988 It was first introduced in the United States in 1994 and became a requirement on all 1996 and newer US vehicles Other countries including Canada parts of the European Union Japan Australia and Brazil adopted similar legislation A large portion ...

Page 36: ...d for heavy duty truck applica tions And it supports SAE J1939 and SAE J1708 J1587 protocols SAE J1939 hereinafter referred to as J1939 is the recommendation of Society of Automotive Engineers SAE which provides a standard architecture for com munications between electronic components on medium heavy vehicles It is developed and written by Track Bus Control and Communications Network Subcommittee ...

Page 37: ...biles to save on copper but can also be used in many other contexts For each device the data in a frame is transmitted sequentially but in such a way that if more than one device transmits at the same time the highest priority device is able to continue while the others back off Frames are received by all devices including by the transmitting device 3 9 2 support protocol ISO 11898 2 ISO 11898 3 3...

Page 38: ... 1 4 1 2 Pull the buckle up as the Fig 4 2 shown Fig 4 2 4 1 3 Push VT 7 Pro to make it attached the docking via snap joint as Fig 4 3 shown Fig 4 3 4 1 4 Release and finish the installation as Fig 4 4 shown ...

Page 39: ...Fig 4 4 4 2 Docking Station Disassemble Steps 4 2 1 Stretch upwards the buckle to release it from the device as Fig 4 5 shown Fig 4 5 4 2 2 Take out the device as Fig 4 6 shown Fig 4 6 ...

Page 40: ...1 of 4 Docking Station 1pc USB to Type C cable 1pc Allen Wrench 1pc Screws for RAM 4pc Screws for SIM card 2pc 5 2 Optional accessories 1 Docking Station Lock 1 pc 2 DC 12V 1 pc 3 J1939 female to open cable 1 pc 4 OBD II female to open cable 1 pc ...

Page 41: ...torizovaný distributor a servisní partner pro Českou republiku a Slovensko Shiran Tower Lužná 716 2 Vokovice 160 00 Praha 6 Telefon 420 220 105 560 Telefon2 420 728 955 443 Email info dataflex security com ...

Reviews: