7
Eng
lish
Step 4: Connecting the power supply
Connect the power supply unit to the
XSJackT3 and the other end into a mains
socket.
Step 5: Entering the PIN of your SIM card
Your XSJackT3 will now start up and may require the PIN of your SIM
card to be entered, if this security feature is enabled on your card. The
necessity of entering the PIN will be indicated by the rightmost LED
flashing (refer to page 4). If so, lift the telephone receiver, wait for the
corresponding dial tone, press the # key, enter your PIN, and confirm
by pressing the # key again. Depending on if the entered PIN was cor-
rect or not, you will hear a positive or negative acknowledgment tone.
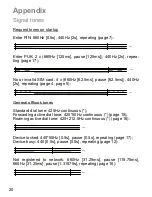
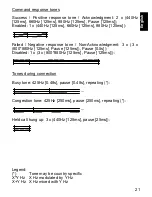
Refer to page 20 for an overview of all tones. The PIN remains stored
in the XSJackT3.
After you have entered the correct PIN code or if your SIM is not PIN-
secured at all, the device will automatically log onto the GSM network,
which may take up to 45 seconds. When the signal strength is shown
and a continued dial tone can be heard in the receiver, the XSJackT3
is ready for operation.
Note:
To minimize interference, you should position the XSJackT3,
the antenna, your telephone, and all their cables as far apart as possi-
ble. Ensure an adequate distance between the device and potential
sources of interference such as microwaves or electrical devices with
metal housings or metal objects in general.
,
, PIN,
,
Summary of Contents for XSJack T3i
Page 1: ...XSJack T3i User Manual XSJack T3e English Deutsch...
Page 19: ...19 English This page intentionally left blank...
Page 25: ...25 English Dimensions for wall mounting 50 0 mm 87 0 mm 13 0 mm 3 5 mm max 7 0 mm 100 0 mm...
Page 28: ...This page intentionally left blank Diese Seite wurde absichtlich leer gelassen...
Page 29: ...XSJack T3i XSJack T3e Deutsch Benutzerhandbuch...
Page 51: ...23 Deutsch Diese Seite wurde absichtlich leer gelassen...
Page 57: ...29 Deutsch Ma e f r die Wandmontage 50 0 mm 87 0 mm 13 0 mm 3 5 mm max 7 0 mm 100 0 mm...
Page 60: ...4601 000018 02...


