background image

Owner

s

Manual

Summary of Contents for FLiiiight

Page 1: ...Owner s Manual...

Page 2: ...3 2 2 Compatible apps 4 2 3 Smart trainer modes 5 Getting Started 3 1 Before installing the bike trainer 6 3 2 Installing the bike in the trainer first time set up 7 3 3 Activate the trainer 11 3 4 Ca...

Page 3: ...18 6 3 Storage 19 6 4 Longterm storage 19 Troubleshooting 7 1 What is the status light indicating 20 7 2 Using the 4iiii app for troubleshooting 21 7 3 Troubleshoot connection over ANT or Bluetooth 22...

Page 4: ...1 1 What s in the box 1x Fliiiight Smart Trainer 1x Trainer skewer 3x Speed index 1x USB type C charging cable 1x Quick start guide 1 1 INTRODUCTION...

Page 5: ...nuts 6 Threaded rods 7 Skewer cups Resistance Unit 8 Electronics case 9 Caliper arms 10 Speed sensor 11 Anti wear stickers 12 Magnet array 13 Status light 14 Power switch 15 Charging port 16 Charging...

Page 6: ...k Computers Laptops Apple TVs Your device needs either Bluetooth Smart or ANT in order to communicate with the trainer Smartphones tablets and Macbook Computers have Bluetooth built in whereas you ll...

Page 7: ...ws iOS Android Zwift Mac Windows iOS In order to be compatible an app must be capable of sending smart trainer commands using one of two standard connection protocols ANT FE C Fitness Equipment Contro...

Page 8: ...r easing up if you pedal faster Always use your bike s fastest gear large front chainring SIM SIM mode simulates an outdoor ride tougher on the climbs than the downhills Use your gears like you would...

Page 9: ...flat surface of the wheel rim Ensure you check opposite the valve stem Do not use the trainer with an incompatible wheel Go to 4iiii com support for assistance 2 Install the included trainer skewer in...

Page 10: ...atter which spoke Slide the index towards the rim DO NOT install the spare indexes Doing so will will affect the functionality of the unit 2 Open Fliiiight s legs to full extension and place the train...

Page 11: ...8 3 GETTING STARTED 2 3 2 Front of Bike This Way...

Page 12: ...all the way This will open up the skewer cups enough to place the bike and make it easier to mount 5 Back the rear wheel of the bike into the trainer frame Aim the wheel between the magnet arrays Tip...

Page 13: ...closest skewer cup The bike should be approximately centered 7 Keeping the bike upright tighten the other knob until both skewer cups firmly secure the trainer skewer 8 Tighten the lock nuts against...

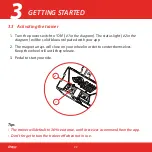
Page 14: ...l paired with your app 2 The magnet arrays will close on your wheel in order to center themselves Keep the wheel still until they release 3 Pedal to start your ride Tips The trainer will default to 36...

Page 15: ...m circumference if you have a different wheel size Section 5 1 You will not need to do regular re calibrations 3 5 Removing your bike It is not necessary to undo both threaded rods Leave one threaded...

Page 16: ...iii iOS app via the Apple App Store Android Download the 4iiii Android app via the Play Store Use the app to Calibrate the trainer for a different wheel size Section 5 1 View your current battery leve...

Page 17: ...if you have a different wheel size 1 Download the 4iiii app 2 Sign in If this is your first time sign up for an account 3 Select Add a Device Select Fliiiight then press Connect 4 Select for more opti...

Page 18: ...re connecting via ANT install the ANT dongle in the USB port Or for Android devices with built in ANT ensure ANT Radio Service and ANT Plugins are installed 2 Start up your cycling app 3 Turn the trai...

Page 19: ...have paired with the trainer many apps will pair with it automatically next time you start up the app and trainer Find more Bluetooth and ANT troubleshooting assistance online at 4iiii com support 16...

Page 20: ...deteriorate more quickly when left in a fully depleted state To maximize the life of your trainer charge it regularly or plug it in during use If the battery is fully drained charge Fliiiight overnigh...

Page 21: ...ccount 3 Select Add a Device Select Fliiiight then press Connect You should now see the battery level in the device information Charging Light The charging light is located above the charging port It...

Page 22: ...with the frame When moving the trainer carry it by the top of the frame above the legs To prolong the battery life do not store the trainer with a fully or nearly depleted battery Ideally charge the...

Page 23: ...dicates the number of Bluetooth channels that are connected Red rapid blinking Error message check the debugging page in the 4iiii app Yellow alternating with Blue Battery power is approximately 50 25...

Page 24: ...ign in If this is your first time select sign up for an account 3 Connect to the trainer 4 Select Diagnostic Tools and scroll down to Trainer Sensors 5 This screen will give you feedback on the qualit...

Page 25: ...uetooth menu put the device briefly into then out of airplane mode and connect from within the app Allow Bluetooth and location permissions for the app Make sure Bluetooth and location services are en...

Page 26: ...on your avatar keeps stopping even if your wheel is spinning Things to know and check If the trainer is low on batteries this will affect the range of its broadcasts Charge the trainer Try moving your...

Page 27: ...ainer is not able to hit your resistance targets Alignment steps With the bike installed in the trainer and the trainer off push the resistance unit over to one side until the magnet array touches the...

Page 28: ...ours Recharge during use Yes Battery type Rechargeable lithium ion pouch cell 3000mAh Charging cable Type C USB 5V 2A charging cable Charging temperature 5 C to 45 C 41 F to 114 F Storage temperature...

Page 29: ...or Bluetooth Smart Firmware updates Over the air Compatible wheels Aluminum alloy rims with a welded or aluminum sleeve joint Compatible wheel sizes 650C 700C or 26 29 Skewer Compatible with typical r...

Page 30: ...near the magnets When moving the trainer carry it by the top of the frame above the legs to avoid the legs closing on your fingers Use the designated charging cable 2A USB Type C charger The electron...

Page 31: ...a depleted state will deteriorate faster Do not expose the battery to temperatures below 20 C 4 F or above 45 C 114 F Doing so will degrade the battery Lithium ion batteries are recyclable For informa...

Page 32: ...repaired or replaced Replacement products may be new refurbished or reconditioned and are warranted for the unexpired period of the original purchase or 30 days from the date of shipment whichever is...

Page 33: ...OTE ThisequipmenthasbeentestedandfoundtocomplywiththelimitsforaClassBdigitaldevice pursuanttopart 15oftheFCCRules Theselimitsaredesignedtoprovidereasonableprotectionagainstharmfulinterferenceina resid...

Page 34: ...a applicables aux appareils radio exempts de licence L exploitation est autoris e aux deux conditions suivantes 1 il ne doit pas produire de brouillage et 2 l utilisateur du dispositif doit tre pr t a...

Page 35: ...4iiii authorized dealer or go to 4iiii com support 4iiii International Head Office Physical Address 4iiii Innovations Inc 141 2 Ave E Cochrane Alberta Canada T4C 2B9 Contact Information Web 4iiii com...

Page 36: ...Owner s Manual IPN 220003002 09MAR2020...

Reviews: