H. FUN FACTS
C
A
Black
Red
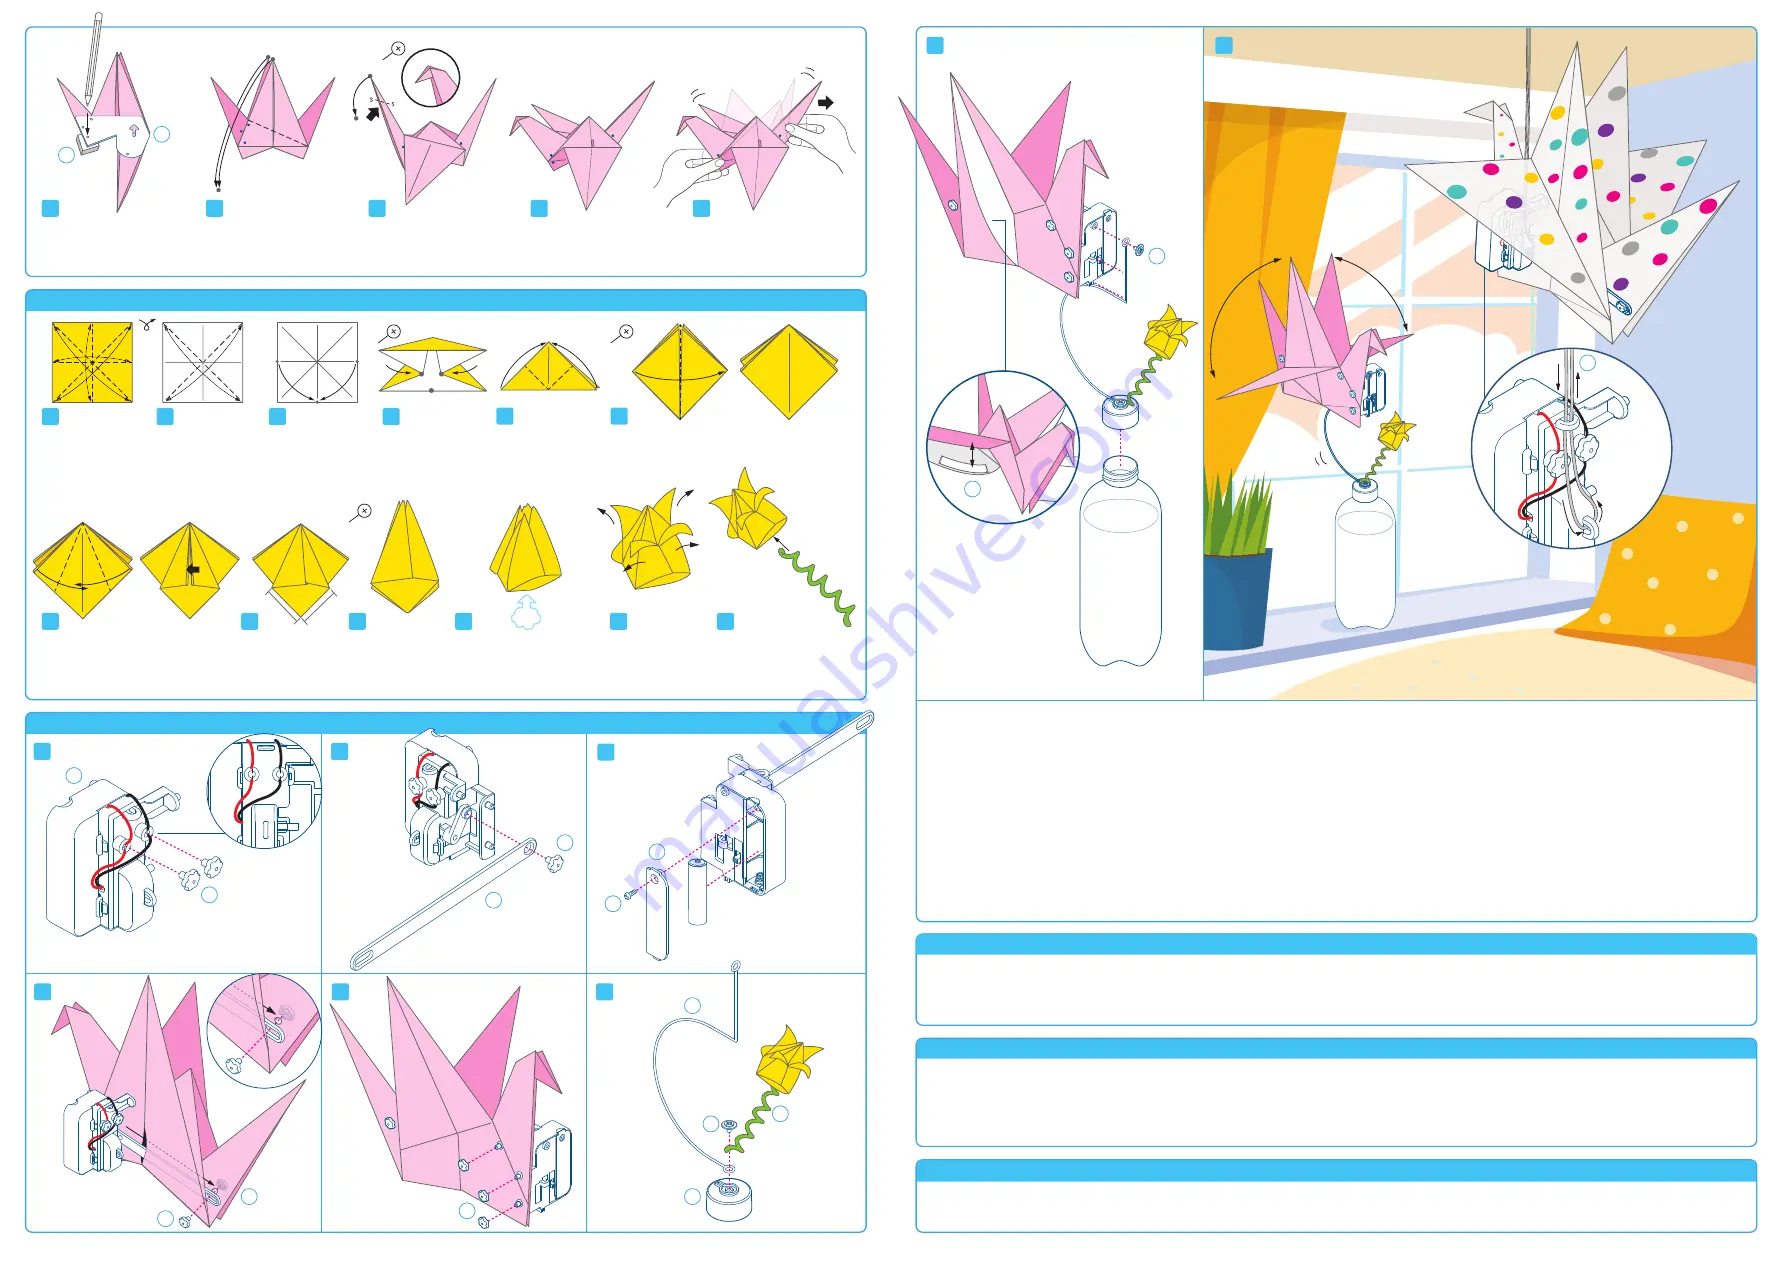
Align the template with the
folded shape. Put a foam
piece underneath and use a
pencil to pin 4 holes heavily.
Fold the top corner
downwards along the crease.
Repeat on the back.
Inside reverse fold along
the SS line to form the
beak.
Your flapping bird is
complete!
A
B
When you flatten
this, make sure the
distances A & B
shown are equal.
You will find a small hole
created underneath. Blow
into the base to inflate and
shape the flower.
Use a pencil to curl the
pipe cleaner and insert the
tip at the bottom of tulip.
Your tulip is now ready!
Peel each petal
down, slowly and
carefully.
When you switch on the motorised bird, you make a circuit, which connects the battery to the electric motor inside the gearbox housing.
Electrical energy flows from the battery to the motor, which converts this energy into a rotating mechanical force. The motor axle turns at a
very high speed but with little power, and therefore it cannot move the bird on its own. Inside the gearbox housing, the motor turns the gear
- this slows the speed and increases the power of the motor's mechanical force, making it more useful. Most common machines use a gearbox
to change the power and speed of a force in this way.
Origami is the art of paper folding and originates from Japan. It is now used as an inclusive term for all folding practices and is frequently used
in engineering and a science. Origami structures are used in space exploration to launch structures compactly and deploy them in space.
1. If the bird stops moving, try opening the lower layer of the wings, or pull the bird’s tail.
2. Check that the pegs are fitted as instructed in section F, and that all the fixings are fitted tightly with the paper.
3. Check that the battery is fresh and inserted in correct orientation.
4. Check that the wires are fitted correctly with the ends of the wires in contact with the metal terminals and secured with the pegs.
H. HOW DOES IT WORK?
I. FUN FACTS
G. TROUBLESHOOTING
E. ORIGAMI FLOWER
F. ASSEMBLY
13
14
15
16
7
8
11
1
2
7
8
3
12
9
10
5
1
2
6
3
4
F
H
D
C
1. Connect the wires by inserting them into the holes, and then secure with the plastic flower-shaped terminal pegs. Wires that are the same
colour should be connected together as illustrated.
2. Slot the push rod onto the gearbox housing and secure with a flower-shaped terminal peg.
3. Insert one 1.5 V AAA battery into the battery compartment. Make sure you insert the battery in the correct orientation polarity (the flat,
negative end of the battery should rest against the coiled spring).
4. Carefully insert the push rod through the precut holes on the origami bird as shown in the diagram. Secure with a flower-shaped terminal
peg and a terminal cap.
5. Align the 3 protruded ends of the gear box housing with the 3 punched holes on the origami bird. Secure with the flower-shaped terminal caps.
6. Secure the bottom part of the wire stand and the pipe cleaner on the bottle hub with a washer screw.
7. Fix the top part of the wire stand in place with a washer screw. Fill a recycled bottle with water and place it on a desk or window sill. Fit
the bottle hub onto the bottle. To enhance performance, open the lower part of the wings and stick the adhesive tape inside the wings.
8. You may also hang the bird from the ceiling with the string provided. Tie the gearbox housing as illustrated. The motorized flapping bird
is now ready for use.
Move the upper flaps toward each
other, and tuck one into the other, as
far as it goes.
Repeat steps 7 & 8
on the back of the
folded shape to get
this.
I
C
6
D
5
Pull the tail to see it
flaps.
17
J
©2018 4M INDUSTRIAL DEVELOPMENT LIMITED. ALL RIGHTS RESERVED.
M
K
4
F
L
N
G
B
+
1.5V AAA
-
E
Fold and unfold in
half diagonally and
in both directions.
Crease well and
open out once again.
Fold and unfold 4
times to make crease
lines along the centre
lines and diagonals.
Turn the paper over.
Holding the points
shown, bring them
in. Flatten model.
It will look like this.
Fold bottom corners
of front flaps up to
the top corner.
Repeat this on the
back as well.
Turn the front flap to the right, like turning the
pages in a book. Do the same to the other side.


