3. INSTALLATION
3.1 Unpacking and start-up
After unpacking retain all packing material and fixtures, as the unit must
always be transported in its original packaging to avoid damage.
The manufacturer accepts no responsibility for damage incurred unless the unit
is correctly packed and transported in this way.
Remove the 4s2 unit from its packaging.
The unit has to be placed on a level surface, away from direct sunlight
ensuring access to the power switch at the back of the unit.
Ensure that the vents on the casing are not obstructed.
The mains voltage selector switch should be checked to ensure that the voltage
has been set at the correct value.
Connect the unit to the mains power supply and switch on the switch I/O of
the rear power interface.
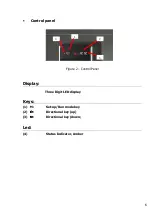
If the heater within the unit is receiving power the amber LED on the control
panel will be illuminated.
After switching on wait until the amber LED light stops flashing (the set
temperature is reached and the unit is ready to seal).
3.2 Voltage Check
Be sure that the equipment is not connected to the mains power.
At the rear of the 4s2 is the connection panel with
Power setting 230/115 Vac and Fuse Holder
I/O Power Switch
Mains Power Plug.
The set voltage is displayed in white on red background on the power setting
and fuse holder.
Chapter
3
8

