background image

13

Battery charging 

IMPORTANT.

 Before attempting to charge the battery, 

check the charger, the charger base and the battery 

to ensure the charging equipment matches the battery 

supplied. The components are all labelled with  

component numbers.

IMPORTANT.

 The battery will be fully charged after aprox 

3-5 hours: remove it from the charger after this time.  

Do not leave a battery charging for longer than 24 hours. 

Note.

 The battery pack will not charge if the battery cells are 

hot. If the pack has been directly taken from the drill after 

heavy or constant use, the cells will be hot.
Allow the cells to cool before fitting to the charger adaptor. 

If a hot pack is placed on charge the charge process will be 

delayed until the battery pack cools when then the charge 

process will  start automatically.
If the green light does not come 

on and the red light is illuminated 

on the adaptor, the cells are not 

charging and  

the cells require some time to 

cool.
DO NOT force cool the pack.
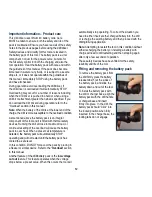
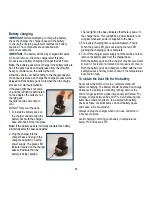
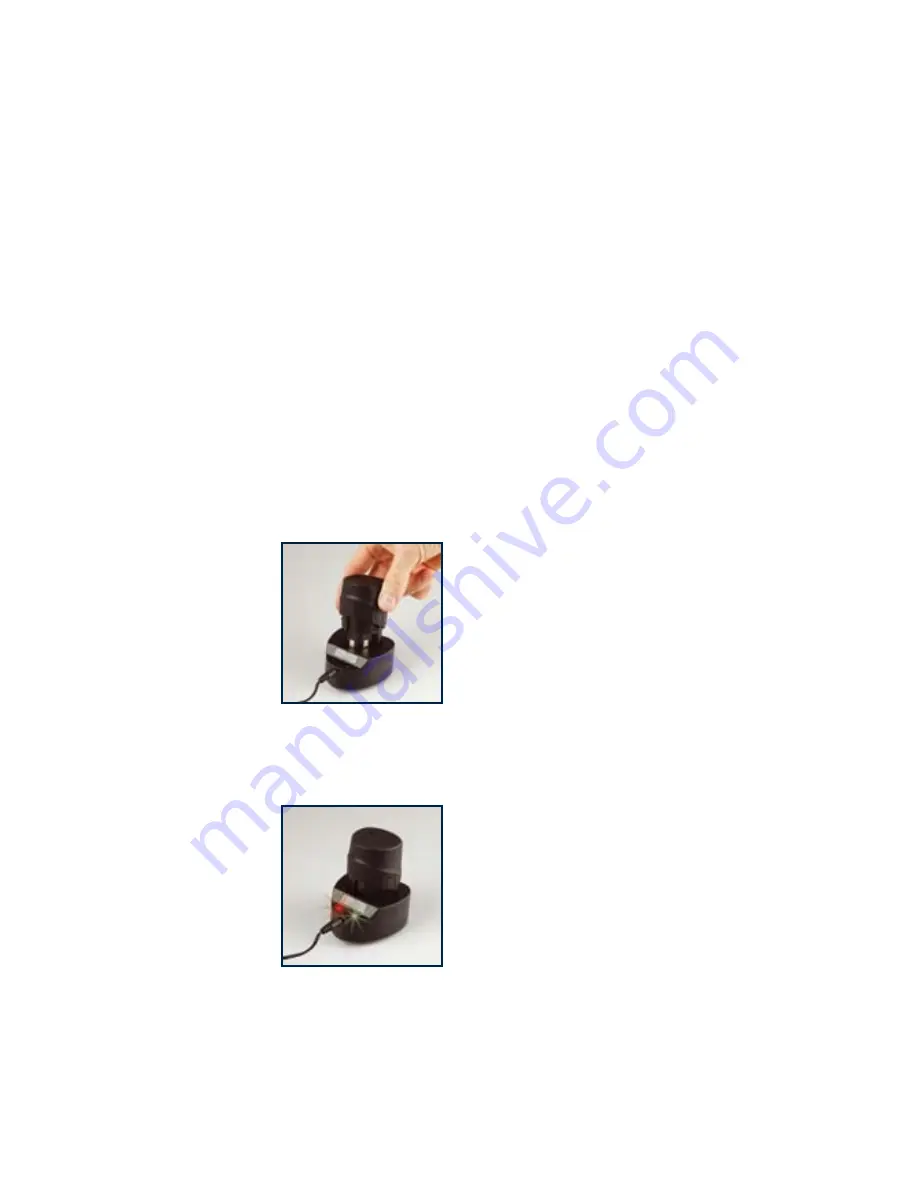
1. To install the battery pack on 

the charger adaptor, align the 

battery pack with the charger 

base and insert firmly into place. 

Note:

 If the battery pack is incorrectly orientated the battery 

will not fully enter the base as depicted.
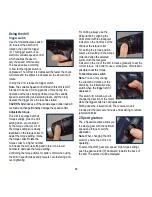
2. Plug the charger into the 

charger base and plug in the 

charger and switch on at the 

power supply. The green LED 

indicator located on the charger 

base will indicate that the 

battery is being charged. 

  The red light on the base indicates that there is power to 

the charger base. This red light is a power indicator and 

will glow whenever power is supplied to the base.

3. The battery charging time is approximately 3-5 hours. 

When the green LED goes out leaving the red LED 

glowing the charging cycle is complete.

4. Turn off the charger power supply from the mains and then 

remove the battery pack from the charger base.

  Both the battery pack and the charger may become warm 

to touch. This is also normal and not an issue of concern. 

Both the battery pack and charger are fitted with thermal 

safety devices and they will shut down if the temperatures 

become too high.

To obtain the best life for the battery 

Never allow the drill to come to a complete stand still 

before recharging. The battery should be placed on charge 

whenever the battery is noticeably running down or the 

drill no longer performs a task it previously performed. For 

storage, charge between 50 and 75%. Avoid allowing lose 

items like screws or nails etc. to be stored with battery 

packs as these or similar items can short battery packs  

and cause a fire or explosion.  
Always unplug the charger when not in use and store in  

a dry secure place. 
Avoid charging or storing your battery in temperatures  

below 0ºC and above 40ºC. 

Summary of Contents for 12V2BLI

Page 1: ...INSTRUCTION MANUAL 12V2BLI 12V Lithium Drill Driver ...

Page 2: ... to the battery pack and battery safety 9 When to charge the battery 10 Unpacking 10 Know your product 11 Important information Product care 12 Fitting and removing the battery pack 12 Battery charging 13 To obtain the best life for the battery 13 Battery indicator under no load 14 Battery indicator 14 Side auxiliary handle hammer models only 14 Using the drill 15 2 Speed gearbox 16 Inserting and ...

Page 3: ...as been manufactured under stringent 909 Quality Standards to meet superior performance criteria You will find your new tool easy and safe to operate and with proper care it will give you many years of dependable service CAUTION Carefully read through this entire Instruction Manual before using your new 909 Power Tool Take special care to heed the Cautions and Warnings Your 909 power tool has many...

Page 4: ... 3 5 Hrs Drill no load speed 0 400 0 1300min 1 Torque settings 24 Torque 1 x drill Drill chuck capacity 10mm Keyless Max drilling capacity Steel MAX 8mm Timber MAX 20mm Weight drill and battery 1 125kg Battery 12LBAT Charger 12LCHG Charger Base Adaptor 12LA Charge times are aprox and based on battery level when performance begins to decrease when tool is being used ...

Page 5: ...rease the risk of electric shock e When operating a power tool outdoors use an extension cord suitable for outdoor use Use of a cord suitable for outdoor use reduces the risk of electric shock 3 Personal safety a Stay alert watch what you are doing and use common sense when operating a power tool Do not use a power tool while you are tired or under the influence of drugs alcohol or medication A mo...

Page 6: ... or mental capabilities or lack of experience and knowledge unless they have been given supervision or instruction concerning use of the appliance by a person responsible for their safety i Children should be supervised to ensure that they do not play with the appliance 5 Battery tool use and care a Ensure the switch is in the off position before inserting battery pack Inserting the battery pack i...

Page 7: ...ith this Manual and must be informed about its potential hazards Children and frail people must not use this tool Children should be supervised at all times if they are in the area in which the tool is being used It is also imperative that you observe the accident prevention regulations in force in your area The same applies for general rules of occupational health and safety The manufacturer shal...

Page 8: ...in or water has touched the tool Battery Pack or charger If the tool or charger does not operate normally after you follow the operating instructions If the tool or charger has been dropped or damaged If the tool or charger exhibits a distinct degradation in performance If the tool or charger is damaged in any way If the battery pack is not charged within the time frame as specified in this manual...

Page 9: ...e fumes or salt air or similar conditions Try and store the tool in the packaging supplied with the tool Do not dispose of the battery in a fire or put the battery into a microwave oven conventional oven dryer or high pressure container Under these conditions the battery may explode Never attempt to open the battery pack puncture the battery or subject the battery to strong physical shock If the p...

Page 10: ...e undertaken casually Through the charging cycle the condition of the battery pack should be monitored and the charge cycle turned off at completion or at the end of the recommended time Unpacking Due to modern mass production techniques it is unlikely that your 909 Power Tool is faulty or that a part is missing If you find anything wrong do not operate the tool until the parts have been replaced ...

Page 11: ...plications All other applications are expressly ruled out 1 Keyless chuck 2 Torque adjustment drill selection 3 Trigger with variable speed control 4 Forward reverse switch 5 Battery pack release tab 6 Rechargeable battery pack 7 Charger base adaptor 8 Plug Pack Charger 9 2 gear selector 10 Spirit level 11 Screwdriver Bits 2 1 3 4 10 9 5 2 6 8 11 7 ...

Page 12: ...ty devices Running the drill at close to maximum load or continual resetting of the overload will cause the battery pack to over heat When a preset cell temperature is detected the battery pack will automatically STOP operating and will not restart until the battery pack has cooled to a safe level In this condition DO NOT force cool the pack by placing in a freezer or similar device Refer to the O...

Page 13: ...se and plug in the charger and switch on at the power supply The green LED indicator located on the charger base will indicate that the battery is being charged The red light on the base indicates that there is power to the charger base This red light is a power indicator and will glow whenever power is supplied to the base 3 The battery charging time is approximately 3 5 hours When the green LED ...

Page 14: ... torque setting and rotate it to a lower number to decrease the torque setting Controlling the torque allows for better control when using the drill on specific tasks and prevents over fastening and over tightening For drilling always use the Drill position by aligning the Drill symbol with the triangular indicator on the front face of the drill near the torque collar For setting the torque positi...

Page 15: ...the overload has been reset but reduce the load by using a smaller drill bit or re sharpen the existing drill bit and reduce the amount of force placed on the drill If the 2 speed gear selector is in HIGH SPEED move the selector 9 to low speed to reduce the motor overload condition CAUTION Do not continue to overload the drill and constantly reset the overload Doing this will cause the battery cel...

Page 16: ...e as the drill is about to break through the item being drilled Chuck replacement The chucks of reversible drills are always fixed by a screw with a left hand thread The screw which is located in the centre of the chuck must be removed before the chuck can be removed To remove the screw turn it in a clockwise direction The chuck can now be removed by unscrewing it anti clockwise If you have troubl...

Page 17: ...17 ...

Page 18: ...18 ...

Page 19: ...19 ...

Page 20: ......

Reviews: