background image

5

Assembly

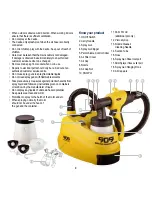
Fitting the Flexible Hose

1.  The hose (15) needs to be connected to both the ports on the 

paint sprayer and the spray gun (3).

   Note

: This hose has identical fittings on both ends so can be 

connected using either end.

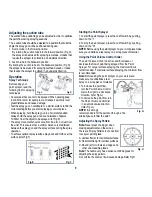
2.  Insert one end of the hose (15) 

into the paint sprayer outlet port 

(17) by pushing it into the port 

until firm. (Ref Fig A)

3.  Repeat this step connecting the 

other end of the hose (15) to 

the spray gun inlet port (16).

What substances can this 

Paint Sprayer  

be used with?

The following substances are suitable for use with this  

Paint Sprayer:

•  Water- and solvent-based paints, finishes, primers, 

2-component paints, clear finishes, automotive finishes,  

staining sealers and wood sealer-preservatives.

DO NOT

 use the following:

•  Dispersion and latex paints 

•  Materials containing strong abrasives, 

•  Glazes with coarse particles, 

•  Strippers and caustic solutions, 

•  Silicate paints.

•  Wall paints (emulsions) 

•  Lyes and acid containing coating materials.

Note:

 The use of these spray materials can lead to increased 

wear or corrosion damage in the nozzle of the sprayer, which is 

not covered by warranty.

Preparation of Spray Material

Most paints will require dilution before using with your Paint 

Sprayer.  Refer to the guidelines in the viscosity table below for 

the recommended required dilution. The correct dilution can be 

achieved by using the viscosity test cup supplied with your paint 

sprayer. (Note: Viscosity = consistency of the paint).

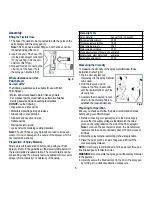
Measuring the Viscosity

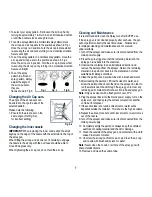
To measure the viscosity of the spray material follow these 

instructions (refer Fig B):

1.  Dip the viscosity test cup 

completely into the spray material 

to be used.

2.  Hold the test cup up and 

measure the time (in seconds) 

until the liquid empties out of the 

viscosity cup. 

3.  Compare the measured “runout 

time” with the Viscosity Table to 

establish the required viscosity

Preparing for Operation

Ensure you check and follow the below recommended steps 

before using your Paint Sprayer

1.  Before connecting your paint sprayer to the mains supply, 

ensure that the supply voltage is identical with the value 

given on the rating label (on the side of the Paint sprayer). 

Note:

 To reduce the risk of electric shock, the manufacturer 

recommends the use of a residual current of 30mA or less at 

all times.

2. Dilute the spray material according to the viscosity table.

3.  Place the paint pot on a sheet of paper and fill it with the 

prepared spray material.

NOTE:

 It is strongly recommended to fill the paint pot through a 

fine strainer/gauze to filter the paint.

WARNING:

 Do not operate the spray gun without spray material 

in the paint pot.

4.  Carefully secure the filled paint pot to the lid on the spray gun 

by turning it in a clockwise direction until secure.

Fig. A

Fig. B

Viscosity Table

Spray material                               Run out Time in Seconds

Thinner-soluble primers 

   25-40

Thinner-soluble varnishes             15-40

Water-soluble primers                  25-40

Water-soluble varnishes               20-35

Wood preservatives, strippers, oils  undiluted

Disinfectants, plant protectants      undiluted

Automobile spray paint                 20-35

Summary of Contents for 909450P

Page 1: ...INSTRUCTION MANUAL 909450P 900W PAINT SPRAYER AND STATION ...

Page 2: ...device Save all warnings and instructions for future reference 1 WORK AREA SAFETY Keep work area clean and well lit Cluttered or dark areas invite accidents Rags cloths cord string and similar items should never be left around the work area Do not operate power tools in explosive environments such as in the presence of flammable liquids gases or dust Power tools create sparks which may ignite the ...

Page 3: ... reach of children and do not allow persons unfamiliar with the power tool or these instructions to operate the power tool Power tools are dangerous in the hands of untrained users Maintain power tools with care Check for misalignment or binding of moving parts breakage of parts and any other condition that may affect the power tool s operation If damaged have the power tool repaired before use Ma...

Page 4: ... solvents Take precautionary measures against potential hazards from spray liquid and follow any instructions given on containers or laid down by the manufacturer of liquid Do not spray any liquids of unknown hazard potential Keep work area clean and will lit Forbidden to spray to the hatch of the motor and etc When spraying normally the motor should not be under the head of the gun and the contai...

Page 5: ...osity consistency of the paint Measuring the Viscosity To measure the viscosity of the spray material follow these instructions refer Fig B 1 Dip the viscosity test cup completely into the spray material to be used 2 Hold the test cup up and measure the time in seconds until the liquid empties out of the viscosity cup 3 Compare the measured runout time with the Viscosity Table to establish the req...

Page 6: ...operation To achieve optimal spray results spray back and forth over the surface refer Fig F Starting the Paint Sprayer 1 To start the paint sprayer press the on off switch by pushing down on the I 2 To stop the paint sprayer press the on off switch by pushing down on the O NOTE Before using the paint sprayer on your work piece make sure you undertake a test spray on a scrap piece of material Usin...

Page 7: ...ill not perform correctly the next time of use Failures due to improper cleaning and maintenance are not covered under warranty 1 Turn off the sprayer and make sure it is disconnected from the mains power supply 2 Press the spray trigger so that the remaining material in the spray gun runs back into the container 3 Unscrew the container in an anti clockwise direction and remove the paint pot from ...

Page 8: ... suction tube is loose No pressure is built up in the paint pot Clean Clean Clean Turn to the right clockwise Tighten the suction tube Tighten paint pot The coating material drips from the nozzle The air cap nut is loose The nozzle is worn Build up of coating material in the air cap and nozzle Tighten Change Clean Spray too coarse Coating material has a too high viscosity Too much material Nozzle ...

Reviews: