background image

24

Storage

If you are going to store your generator for more than 30 

days, use the following information as a guide to prepare the 

generator for storage.

Never store generator with fuel in the tank indoors or in 

enclosed, poorly ventilated areas, where fumes can reach 

an open flame, spark or pilot light as on a furnace, water 

heater, clothes dryer or other gas appliances.

Ensure the fuel tank is fully drained of fuel.
Open the drain 16 on the carburettor to drain the fuel totally 

from the bowl.
Check the fuel tap is turned off.

Spark plugs

1. Remove spark plug (15) from the generator with the  

spark plug spanner socket supplied.

2. Remove carbon deposits using a wire brush.
3. Check for discoloration on the top of the spark plug.  

The standard colour should be a tan colour.

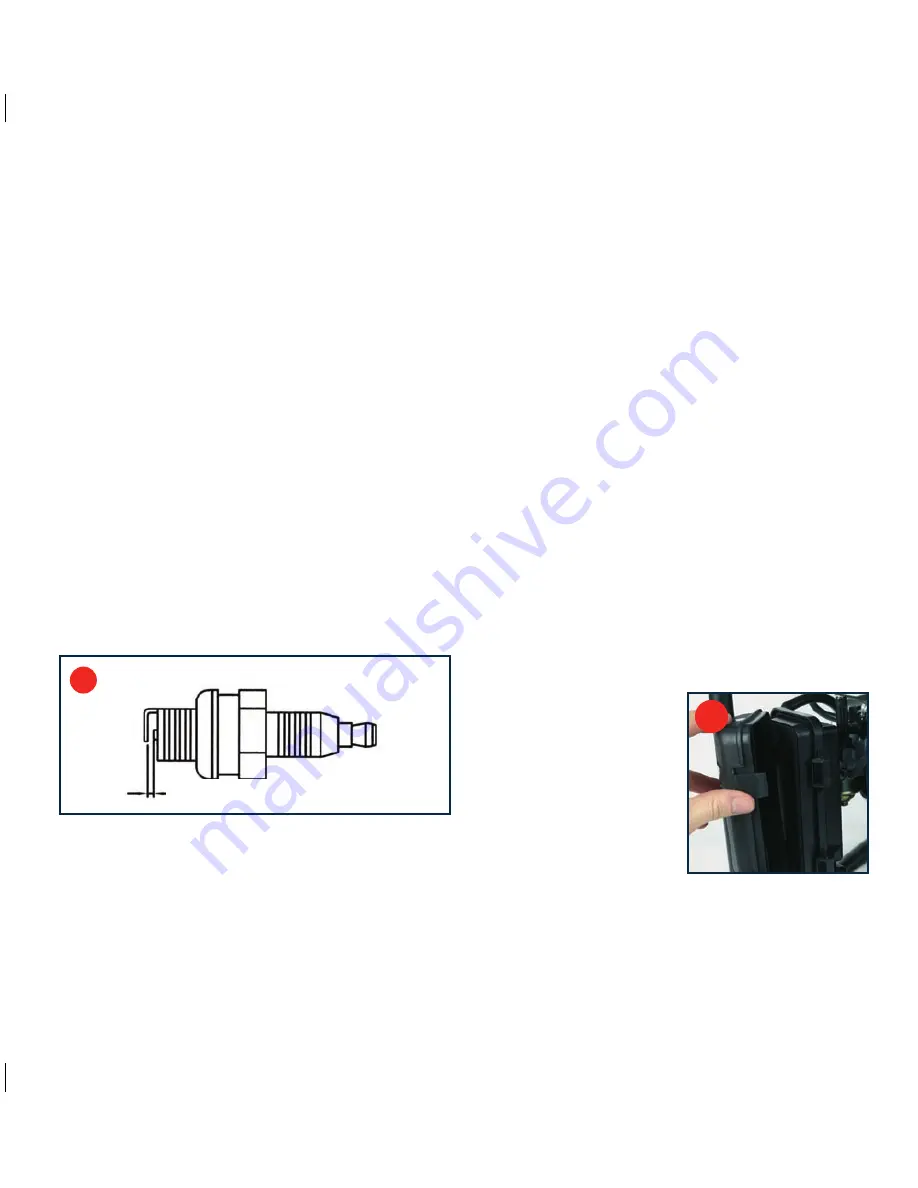
4. Check the spark plug gap. The acceptable gap should be 

between 0.7 – 0.8mm (Fig. T).

5. The recommended spark plugs are as follows:
  BPR6ES (NGK) 

  RN11YC (Champion) 

  WR6DC (Bosch)
Model G1100KU
  W7RBC (Bosch)   

  RL87BC(Champion)   

  BPR7HS (NGK)

Engine oil replacement

1. Place the generator on a level surface and warm up the 

engine for several minutes. The stop the engine.

2. Remove oil filler cap (7).
3. Place an oil pan under the generator and commence 

removing the oil drain plug (25) so that the oil can be 

completely drained.

4. Check the oil drain plug (25), gasket, oil filler cap (7) and 

O-ring. If damaged, have these replaced.

5. Reinstall the oil drain plug (25).
6. Add engine oil to the upper level. Recommended 4 stroke 

engine oil is SAE #30.

CAUTION.

 Check that no foreign material, debris, dust 

enters the crankcase.

Air filter

It is very important to maintain an air filter in proper 

condition. Damage to the generator may arise if the filter has:

  Improperly been serviced.

   Dirt and other foreign elements adhering to the filter due 

to improper installation and engine wear.

ALWAYS

 keep the filter clean at all times.

1a. (For A2300, G2300KU, 

G3800KU and G6000KU) 

Remove the air filter cover 

(13) on the side of the 

generator by unclipping the 

cover at the front side of 

the filter housing (Fig. U1).

U1

 0.7– 0.8mm (0.028”– 0.031”)

T

Summary of Contents for A2300

Page 1: ...Black Cyan Magenta Yellow Code 909 AVR IM Date 101220 Edition 09 Op DCR INSTRUCTION MANUAL G1100KU A2300 G2300KU G3800KU G6000KU AVR PETROL GENERATOR RANGE ...

Page 2: ...rs for 13 Preparing the generator 14 Checking the engine fuel 14 Checking the engine oil 15 Battery start connection electric start models only 15 Starting the engine with key start electric start models 16 Starting the engine manually 17 Stopping the engine 17 Connecting apparatus to the generator 17 AC circuit breaker 18 Safety switch tripping 18 To use the appliance outlet 18 To use the battery...

Page 3: ... Wear breathing protection Conforms to relevant standards for electromagnetic compatibility Introduction Your new 909 power tool will more than satisfy your expectations It has been manufactured under stringent 909 Quality Standards to meet superior performance criteria You will find your new tool easy and safe to operate and with proper care it will give you many years of dependable service CAUTI...

Page 4: ...t battery charge battery charge battery charge battery charge battery charge output Max 5 A output Max 5 A output Max 5 A output Max 5 A output Max 5 A USB output 5V Max 1 Amp 5V Max 1 Amp 5V Max 1 Amp 5V Max 1 Amp 5V Max 1 Amp Motor 2 4HP 4 stroke 5 5HP 4 stroke 5 5HP 4 stroke 9HP 4 stroke 13HP 4 stroke No load speed 3000 min 1 3000 min 1 3000 min 1 3000 min 1 3000 min 1 Fuel tank capacity 6L 15L...

Page 5: ...or use reduces the risk of electric shock Personal safety Stay alert watch what you are doing and use common sense when operating a power tool Do not use a power tool while you are tired or under the influence of drugs alcohol or medication A moment of inattention while operating power tools may result in serious personal injury Use safety equipment Always wear eye protection Safety equipment such...

Page 6: ...l s operation If damaged have the power tool repaired before use Many accidents are caused by poorly maintained power tools Keep cutting tools sharp and clean Properly maintained cutting tools with sharp cutting edges are less likely to bind and are easier to control Use the power tool accessories and tool bits etc in accordance with these instructions and in the manner intended for the particular...

Page 7: ...d charge conductive surfaces in contact with the generator Place generator on low conductivity surface such as a concrete slab ALWAYS operate generator a minimum of 2 meters from any conductive surface Use of worn damaged or ungrounded extension cords Contact with worn or damaged extension cords could result in electrocution Use of ungrounded cordsets could prevent operation of circuit breakers an...

Page 8: ...Engine speed has been factory set to provide safe operation Tampering with the engine speed adjustment could result in overheating of attachments and could cause a fire Never attempt to speed up the engine to obtain more performance Both the output voltage and frequency will be thrown out of standard by this practice endangering attachments and the user Inadequate ventilation for generator Materia...

Page 9: ...erator in clean dry well ventilated area Never operate unit in enclosed areas such as garages basements storage sheds or in any location occupied by humans or animals Keep children pets and others away from area of operating unit Risk of unsafe operation Hazard What could happen How to prevent it Operation of generator in careless manner All sources of energy include the potential for injury Unsaf...

Page 10: ...ing operation These parts are covered by guarding to prevent injury Never operate generator with guarding or cover plates removed Avoid wearing loose fitting clothing or jewellery which could be caught by moving parts Risk from lifting Hazard What could happen How to prevent it Lifting a very heavy object Serious injury can result from attempting to lift too heavy an object When lifting always kee...

Page 11: ...ance Ensure the generator has oil Before commencing the generator ensure that the unit has been filled with SAE 30 4 stroke oil Never fill fuel tank indoors Never fill fuel tank when engine is running or hot Do not smoke when filling fuel tank Never refuel when the generator is running Switch the generator to the off position prior to removing the fuel cap and refuelling Engine speed has been fact...

Page 12: ...10 DC appliance socket 11 USB power outlet 12a Electric start key start 12b Non electric start model engine start switch 13 Air filter cover 14 Choke lever 15 Spark plug 16 Fuel drain 17 Muffler 18 Exhaust spark arrestor 19 DC plug 20 Fuel valve 21 Voltmeter 22 Battery electric start models only 23 Recoil starter 24 Tap extension filter 25 Oil drain plug 2 3 1 Pictured model G2300KU 7 8 10 12b 12a...

Page 13: ...on electronic or sensitive equipment like computers televisions and similar devices This also includes caravans which have built in electronic inverter equipment G1100KU A2300 G2300KU G3800KU G6000KU Lights 900W 2000W 2000W 3200W 5000W Pumps 400W 1000W 1000W 1800W 3000W Refridgerators 400W 1000W 1000W 1500W 3000W Dryer 1800W 1800W 2600W 4000W Washing machine non electronic 1800W 1800W 2600W 4000W ...

Page 14: ... Preparing the generator It is important to check the generator before you commence operating the unit IMPORTANT Ensure that the engine is fully filled with oil When leaving the factory this generator has NO OIL in the engine Note The engine will not start if the generator has no oil or low oil Checking the engine fuel 1 Switch off engine by moving the ignition switch 12a or 12b to the off or O po...

Page 15: ...il level each time the generator is used Battery start connection electric start models only When unpacked this generator is not fully connected to the starting battery 22 and will require the negative wire to be connected to the battery as follows 1 Check the Red positive wire is connected to the battery terminal and the insulating cover is fully pulled over the terminal 2 Remove the nut and bolt...

Page 16: ...U Pull the choke loop outward 4 Turn the key start ignition 12a clockwise to the START position Fig G Note When the motor is started for the very first time it may require a number of attempts to start until the fuel has travelled from the tank to the motor 5 Once you hear the motor operating release the key to allow the position to move from START to ON Fig H 6 Move the choke lever 14 back to the...

Page 17: ...ever 14 back to the run position refer point 6 above Stopping the engine 1 Before stopping ensure that no electrical apparatus is connected to the generator 2 Turn the key start ignition 12a to the OFF position Fig J1 or on non electric start models push the engine switch 12b to OFF Fig J2 J3 3 Turn the fuel lever anti clockwise to the off position Connecting apparatus to the generator Start the g...

Page 18: ... in the case of a some failed appliances and assisting to protect people against an electric shock Safety switch tripping If the circuit breaker 4 has tripped and cuts off the power it may be due to substantial overloading Marginal overloading may not switch off the circuit breaker 4 but it will shorten the service life of the generator Be sure that all appliances are in good working order before ...

Page 19: ...n to reset Note The 12V appliance socket can also be used with the 240V AC outlets being used To use the battery charging outlet The generator is fitted with a socket outlet specifically for connection to a lead acid battery for charging and also for an additional power supply Fig O The output voltage is between 12 14 2V with a maximum output current of 5A The generator will charge lead acid batte...

Page 20: ...battery was originally in a low level of charge the battery will take many hours to recharge fully The time frame will depend on the size of the battery As a guide a standard car battery of around 480CCA will take approx 6 hours to charge from a low level of charge to approx 80 charged To start a car the battery may require less than this time frame and again it depends on the original state of ch...

Page 21: ... the Appliance plug connected to the appliance socket in the generator is fitted with a fuse Using the lead acid car battery as the power source the following ratings should not be exceeded 12V appliance socket 10 amp 5 V USB 1 amp Both sockets can be used at the one time Note A safety fuse is fitted to the internal wiring of the generator to prevent overloading of this feature Always ensure any p...

Page 22: ...s used for 4 hours run the generator for 1 hour at around 75 of rating This is only required if the generator has been used for less than 50 or rated load If the generator is being used for solely charging a battery it is recommended to run the 240Vac at around 500W for the generators up to 2000W and 1000W for the generators between 2000 and 5500W if the charging cycle will be run for many hours W...

Page 23: ...lace if necessary Valve clearance Check and adjust when engine is cold Fuel line Check fuel hose for crack or damage Replace if necessary Exhaust system Check for leakage Retighten or replace gasket if necessary Check muffler screen Clean replace if necessary Carburetor Check choke operation Starting system Check key start ignition operation Decarbonisation More frequently if necessary Fittings fa...

Page 24: ...R6DC Bosch Model G1100KU W7RBC Bosch RL87BC Champion BPR7HS NGK Engine oil replacement 1 Place the generator on a level surface and warm up the engine for several minutes The stop the engine 2 Remove oil filler cap 7 3 Place an oil pan under the generator and commence removing the oil drain plug 25 so that the oil can be completely drained 4 Check the oil drain plug 25 gasket oil filler cap 7 and ...

Page 25: ...e inlet side of the fuel valve 20 inside the tank This tap extension fuel filter 24 prevents any dirt in the fuel from entering the fuel system The procedure for removing this filter in order to replace or clean it is given below Note the following procedure should be performed in a well ventilated area with no naked flames sparks or cigarettes Safety glasses should also be worn and engine switch ...

Page 26: ...there are no leaks between the tap and the tank and with the fuel tap turned on ensure there are no leaks where the fuel hose is fitted to the outlet of the tap Cleaning 1 Keep your machine clean The outside of the machine can be cleaned using a damp soft cloth with a mild detergent if required Never use water to clean the generator as it may cause damage to internal parts 2 Some maintenance produ...

Page 27: ...pen fuel shut off valve 7 Unit loaded during start up 7 Remove load from unit 8 Spark plug wire loose 8 Attach wire to spark plug No electrical output 1 Faulty receptacle 1 Have service centre replace receptacle 2 Dirty or stale fuel in carburettor bowl 2 Open the drain screw on the carburetor bowl and allow the fuel to drain for approx 5 sec Close drain and retry start 3 Circuit breaker turned of...

Page 28: ...rloaded 1 Reduce load 2 Insufficient ventilation 2 Move to adequate supply of fresh air No DC Output 1 DC circuit overloaded 1a Remove DC load and reset cut out after 5 min 1b If Battery charging check the polarity of the connections to the battery No USB Power output 1 Take the appliance to service centre ...

Page 29: ......

Reviews: