background image

7

their own weight. Supports must be placed under the 

panel on both sides, near the line of cut and near the 

edge of the panel.

e.


Do not use dull or damaged blades. 

Unsharpened 

or improperly set blades produce narrow kerf causing 

excessive friction, blade binding and kickback.

f.


Blade depth and bevel adjusting locking levers 

must be tight and secure before making cut.

 If blade 

adjustment shifts while cutting, it may cause binding and 

kickback.

g.


Use extra caution when making a “plunge cut” into 

existing walls or other blind areas. 

The protruding 

blade may cut objects that can cause kickback.

The protruding blade may cut objects that can  

cause kickback. 
a.


Check lower guard for proper closing before each 

use.

 Do not operate the saw if lower guard does not 

move freely and close instantly. Never clamp or tie the 

lower guard into the open position. If saw is accidentally 

dropped, lower guard may be bent. Raise the lower guard 

with the retracting handle and make sure it moves freely 

and does not touch the blade or any other part, in all 

angles and depths of cut.

b.


Check the operation of the lower guard spring.

 If the 

guard and the spring are not operating properly, they 

must be serviced before use. Lower guard may operate 

sluggishly due to damaged parts, gummy deposits, or a 

build-up of debris.

c.


Lower guard should be retracted manually only for 

special cuts such as “plunge cuts” and “compound 

cuts.” 

Raise lower guard by retracting handle and as 

soon as blade enters the material, the lower guard must 

be released. For all other sawing, the lower guard should 

operate automatically.

d.


Always observe that the lower guard is covering the 

blade before placing saw down on bench or floor.


An unprotected, coasting blade will cause the saw to 

walk backwards, cutting whatever is in its path. Be aware 

of the time it takes for the blade to stop after switch is 

released.

e. Do not use abrasive wheels
WARNING.

 We recommend the use of a residual current 

device with a residual current rating of 30mA or less.

Wear goggles
Wear earmuffs
Wear a breathing mask

Accessories

The 909 TIMBERCAT TCAT235 Circular saw is supplied 

with the following accessories as standard:
1. 235 mm (9 1/4”) TCT Blade (not fitted)
2. Blade Wrench
3. Parallel Fence 

The 909 TIMBERCAT LS1200 Circular saw is supplied  

with the following accessories:
1. 165 mm (6 1/2”) TCT Blade (fitted)
2. Allen Key
3. Parallel Fence

Unpacking 

Due to modern mass production techniques, it is unlikely 

that your 909 Power Tool is faulty or that a part is missing. 

If you find anything wrong, do not operate the tool until the 

parts have been replaced or the fault has been rectified. 

Failure to do so could result in serious personal injury.

Assembly

The 909 circular saw is packed fully assembled, except for 

the blade and the Parallel Fence which will need to  

be attached.

Summary of Contents for LS1200

Page 1: ...INSTRUCTION MANUAL LS1200 TCAT235 2000W 235MM 9 1 4 MAGNESIUM BASE CIRCULAR SAW 1200W 165MM 6 1 2 LASER GUIDED CIRCULAR SAW ...

Page 2: ... for laser lights 5 Additional safety rules for circular saws 6 Accessories 7 Unpacking 7 Assembly 7 Know your product 8 Overview 9 Adjusting the cutting depth 9 Adjusting the bevel angle 9 Switching on and off 10 Making a cut 10 Making a pocket cut 10 Using the parallel fence 11 Using the laser system 11 Changing the blade 12 Maintenance 13 Cleaning 13 General inspection 13 Power cord maintenance...

Page 3: ...d sound protection measures are necessary WARNINGS 1 Do not attempt to change the position of the laser under any circumstances it has been set at the factory and is accurately focused on the centre of the saw blade 2 It may be more difficult to see the laser line in conditions of bright sunshine and on certain surfaces Introduction Your new 909 power tool will more than satisfy your expectations ...

Page 4: ...tension cord suitable for outdoor use Use of a cord suitable for outdoor use reduces the risk of electric shock f To reduce the risk of electric shock the manufacturer recommends the use of a residual current device with a rated residual current of 30mA or less at all times 3 Personal safety a Stay alert watch what you are doing and use common sense when operating a power tool Do not use a power t...

Page 5: ...ardous situation h This appliance is not intended for use by persons including children with reduced physical sensory or mental capabilities or lack of experience and knowledge unless they have been given supervision or instruction concerning use of the appliance by a person responsible for their safety i Children should be supervised to ensure that they do not play with the appliance 5 Service a ...

Page 6: ... use damaged or incorrect blade washers or bolt The blade washers and bolt were specially designed for your saw for optimum performance and safety of operation Causes and operator prevention of kickback Kickback is a sudden reaction to a pinched bound or misaligned saw blade causing an uncontrolled saw to lift up and out of the workpiece toward the operator When the blade is pinched or bound tight...

Page 7: ...ower guard should be retracted manually only for special cuts such as plunge cuts and compound cuts Raise lower guard by retracting handle and as soon as blade enters the material the lower guard must be released For all other sawing the lower guard should operate automatically d Always observe that the lower guard is covering the blade before placing saw down on bench or floor An unprotected coas...

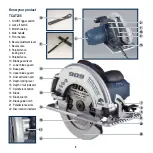
Page 8: ...l fence locking knob 9 Parallel fence 10 Blade guard lever 11 Lower blade guard 12 Base plate 13 Upper blade guard 14 Dust extraction port 15 Depth locking lever 16 Depth of cut indicator 17 Spindle lock button 18 Blade 19 Blade wrench 20 Blade guide notch 21 Parallel fence slots 22 Disc rotation indicator 11 7 8 20 17 18 10 13 14 19 3 15 4 16 1 2 6 9 5 12 22 21 ...

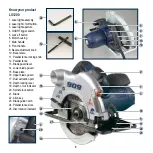
Page 9: ...nt knob 10 Bevel scale 11 Parallel fence locking knob 12 Parallel fence 13 Blade guard lever 14 Lower blade guard 15 Base plate 16 Upper blade guard 17 Dust extraction port 18 Depth locking lever 19 Depth of cut indicator 20 Spindle lock button 21 Blade 22 Allen key 23 Blade guide notch 24 Parallel fence slots 25 Disc rotation indicator 14 2 1 3 10 9 23 20 25 21 13 16 17 22 6 18 7 19 4 5 11 12 24 ...

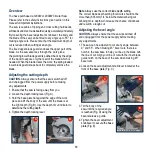
Page 10: ...ay from you 2 Loosen the depth locking lever Fig A 3 Hold the base plate flat against the edge of the work piece and lift the body of the saw until the blade is at the right depth Fig B Use the depth of cut indicator to determine the cutting depth 4 Tighten the depth locking lever Note Always use the correct blade depth setting The correct blade depth setting for all cuts should not be more than 6...

Page 11: ...edge of the base on the work piece Fig I 6 Start the motor by depressing the lock off button and squeezing theOn Off trigger switch Note Always let the blade reach full speed approximately 2 seconds before you begin to cut into the work piece 7 Slowly push the saw forward using both hands Fig J 8 When making a cut always use steady even pressure Forcing the saw causes rough cuts and could shorten ...

Page 12: ...wer supply before making any adjustments 1 Loosen the parallel fence locking knob Fig L 2 Slide the parallel fence through the parallel fence slots in the base plate Fig M 3 Adjust the parallel fence to the required width and secure it in position with the parallel fence locking knob 4 Ensure that the parallel fence rests against the wood along its entire length to give a consistent parallel cut F...

Page 13: ...Q 3 Whilst depressing the spindle lock button turn the blade bolt anti clockwise using the blade wrench or allen key provided Fig R 4 Remove the outer blade flange and the blade bolt 5 Raise the lower blade guard using the blade guard lever 6 Remove the saw blade from the inner flange and pull it out Fig S 7 Clean the saw blade flanges thoroughly before mounting the new saw blade Wipe a drop of oi...

Page 14: ...t be carried out by the manufacturer the manufacturer s agent or a qualified electrical service repairer to avoid a safety hazard Troubleshooting Trouble Problem Suggested remedy Saw will not start Power cord not plugged in Ensure that the cord is connected to the power supply Power fault fuse or circuit breaker tripped Check the power supply Cord damaged Use authorised service centre to repair or...

Page 15: ...15 ...

Page 16: ...16 ...

Page 17: ......

Reviews: