background image


 2


INDICE             


IMPORTANTE: 

Prima accensione                                          


   pag. 02


Introduzione 


pag. 02 


Avvertenze generali


pag. 02


Importanti precauzioni per la sicurezza 


pag. 03


Installazione


pag. 03


Preparazione del caffè


pag. 03 


Pulizia giornaliera


pag. 03


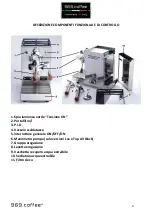
Descrizione componenti funzionali e di controllo


pag. 04


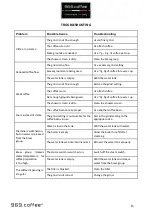
Troubleshooting


pag. 05


Contenuto della confezione e opzioni


pag. 16


IMPORTANTE:

 PRIMA ACCENSIONE


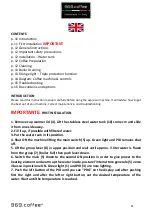
1. Togliere il coperchio scaldatazze (4). Sollevare il serbatoio dell’acqua (10) di qualche 

centimetro e sfilarlo da un lato


2. Riempire il serbatoio, utilizzando acqua potabile possibilmente addolcita.


3. Rimettere il serbatoio dell’acqua nella sua posizione.


4. Accendere la macchina spostando l’interruttore generale (5) verso l’alto in posizione 

ON; la spia verde (1) e il PID (3) NON si accendono.


5. Alzare la levetta del gruppo (8) in posizione erogazione, attendere che esca circa ½ 

litro d’acqua dal gruppo (7) (caldaia piena) quindi riabbassare la leva.


6.  Spostare  l’interruttore  generale  (5)  verso  il basso  in  posizione  ON  per  far partire  il 

riscaldamento della caldaia; la spia verde (1) e il PID (3) si accendono.


7. Premere il tasto sx (PRG) e successivamente, quando la scritta PRG viene sostituita 

dalla temperatura dell’acqua il dx o il sx per impostare la temperatura desiderata, poi 

attendere che l’acqua raggiunga tale temperatura.


INTRODUZIONE 


Prima di utilizzare la macchina per caffè espresso, leggere attentamente questo manuale di istruzioni. 

Esso  vi  fornisce  notizie  su  come  utilizzare  in  modo  ottimale  le  potenzialità  della  macchina,  su  come 

mantenerla efficiente e come comportarsi in caso di difficoltà.


AVVERTENZE GENERALI


La presa di collegamento elettrico deve essere munita di una regolare messa a terra.


E' sconsigliabile l'uso di prolunghe o adattatori elettrici comprese multiple.


Qualora  il  loro  uso  si  rendesse  indispensabile,  utilizzare  solamente  adattatori  rispondenti  alle  vigenti 

norme di sicurezza.


Non superare mai il valore di portata in kW indicato nell'adattatore o nelle prolunghe. 


Summary of Contents for ELBA Mini Lux

Page 1: ...1 ELBA Mini Solo Lux Top All Black ...

Page 2: ...na quindi riabbassare la leva 6 Spostare l interruttore generale 5 verso il basso in posizione ON per far partire il riscaldamento della caldaia la spia verde 1 e il PID 3 si accendono 7 Premere il tasto sx PRG e successivamente quando la scritta PRG viene sostituita dalla temperatura dell acqua il dx o il sx per impostare la temperatura desiderata poi attendere che l acqua raggiunga tale temperat...

Page 3: ...egare la macchina dalla presa di corrente Non lasciare esposta la macchina ad agenti atmosferici pioggia sole ecc Non permettere che la macchina sia utilizzata da minori o incapaci Non mettere le mani sotto la lancia a vapore o sotto il gruppo durante l erogazione di vapore per evitare ustioni In condizioni di funzionamento le lance a vapore le lance acqua le coppette portafiltro e il gruppo eroga...

Page 4: ...de Tensione ON 2 Portafiltro i 3 P I D 4 Vassoio scaldatazze 5 interruttore generale ON OFF ON 6 Manometro pompa solo versioni Lux e Top All Black 7 Gruppo erogazione 8 Levetta erogazione 9 Vaschetta recupero acqua estraibile 10 Serbatoio acqua estraibile 11 Filtro cieco ...

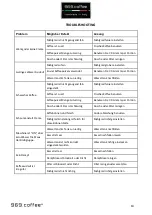
Page 5: ... macinatura più grosso Il caffè è vecchio Usare caffè fresco La quantità di polvere è troppo poca Usare 7 9 grammi per porzione La doccetta è sporca Pulire la doccetta Schiuma invece di crema I grani del caffè sono errati Cambiare tipo di grani Il grado di macinatura è sbagliato Aggiustare il grado di macinatura Macchina è accesa ma non esce acqua dal gruppo Mancanza acqua nel serbatoio Riempire i...

Page 6: ...arten Sie bis zirka Liter Wasser aus der Gruppe 7 ausläuft voller Kessel Schwenken Sie dann den Hebel wieder nach unten 6 Stellen Sie den Schalter 5 nach unten auf Stelle ON um die Heizung des Kessels zu starten die grüne Lampe und PID leuchten 7 Drücken Sie die Linke Taste vom PID bis auf dem Display PRG zu sehen ist Danach auf der Rechte u o Linke Taste die gewünschte Wasser Temperatur einstelle...

Page 7: ...e keinen Witterungseinflüssen aussetzen Regen Sonne usw Nicht erlauben dass die Maschine von Minderjährigen oder Unfähigen benutzt wird Die Hände während der Abgabe von Wasser oder Dampf nicht unter die Dampflanze oder unter die Gruppe legen um Verbrennungen zu vermeiden Bei Betrieb sind Dampflanze Siebträger und die Brühgruppe sehr heiß Seien Sie vorsichtig und fassen Sie das Gerät nur an den vor...

Page 8: ... rückspülen bis das Reinigungsmittel ausgespült ist und reines Wasser kommt aus Überdruckventil Wir empfehlen flüssige Reinigungsmittel Reinigung Siebe Brühkopf Ausläufe Kaffeefette lagern sich auf all diesen Komponenten ab 1 Die Siebträger Ausläufe und Siebe kann man laufend durchspülen nach der Zubereitung bzw mit Tüchern und Bürsten reinigen 2 Bei festhaltenden Ablagerungen können Sie diese auc...

Page 9: ...1 Grüne Lampe Heizstab ON 2 Siebträger 3 P I D 4 Tassenwärmer 5 Hauptschalter ON OFF ON 6 Manometer Pumpe nur auf Versionen Lux und Top All Black 7 Brühgruppe 8 Kaffeeauslauf Hebel 9 Wassersammlungsschüssel 10 Edelstahl Wasserbehälter 11 Blind Filter ...

Page 10: ...st zu alt Frisches Kaffee benutzen Kaffeepulver Menge zu Gering Benutzen Sie 7 9 Gramm per Portion Dusche oder Filter ist schmutzig Dusche oder Filter reinigen Schaum anstatt Crema Kaffebohnen sind falsch Andere Mischung benuzten Mahlgrad Einstellung ist falsch für diese Bohnen Sorte Mahlgrad richitg einstellen Maschine ist ON aber kein Wasser fließt aus der Brühgruppe Wassertand im Tank zu niedri...

Page 11: ...teel water tank 10 some cm and slide it from one side away 2 Fill it up if possible with filtered water 3 Put the water tank in its position 4 Shut ON the machine lifting the main switch 5 up Green light and PID remains shut off 5 Lift the group lever 8 in upper position and wait until approx liter water is flown from the group 7 boiler full then push lever down 6 Switch the main 5 down to the sec...

Page 12: ...m nozzle or the group head while water or steam is flowing otherwise you put yourself at risk of scalding and burns The group head and or steam wand will be hot during machine operation Take care when using the machine to avoid burns ATTENTION WHEN WORKING THE BOILER CONTAINS PRESSURISED HOT WATER AND STEAM INSTALLATION WATER TANK Before switching on the machine fill the provided water tank with w...

Page 13: ...ilter to rinse the system To finish run water through the group head without the portafilter locked into place for 10 seconds or until the water is clear DRIP TRAY Cleaning the drip tray each evening is also recommended STEAM WAND The steam spouts have to be cleaned after each use in order to avoid milk build up blocking the openings of the steam spout BOILER DRAINING NOTE The machine must be cold...

Page 14: ...warmer lid 5 Main switch ON OFF ON 6 Pump pressure gauge versions Lux and Top All Black only 7 Group head 8 Brew lever lift the lever upwards until level to start extraction When the desired quantity of coffee is reached push the lever down 9 Drip tray 10 Stainless steel water reservoir 11 Blind filter ...

Page 15: ...r screen is dirty Clean the shower screen Foam instead of crema The coffee beans are improper Use another coffee bean The grind setting is not suitable for the coffee beans in use Dial in the grind setting to the appropriate size Machine is switched on but no water is released from the brew group Water is low in the tank Refill the water tank with water The boiler is empty Allow the boiler to refi...

Page 16: ...16 Elba Mini Solo ...

Page 17: ...17 Elba Mini Lux ...

Page 18: ...18 Elba Mini Top All Black ...

Page 19: ...parti clausole di norme armonizzate EMISSIONE EN 55014 1 EN 61000 3 2 1995 EN 61000 3 3 1995 IMMUNITA EN 55014 2 DIR 73 23 Direttiva Bassa Tensione con applicazione delle seguenti parti clausole di norme armonizzate EN 60335 1 EN 60335 2 75 DIR 89 392 Direttiva Macchine con applicazione delle seguenti parti clausole di norme armonizzate EN 292 1 EN 292 2 Sede legale 969 coffee Mariano Matiz Haupts...

Reviews: