MAINTENANCE
Check every 50 hours of operation (refer to Recommended Maintenance Schedule).
Routine maintenance of the air filter helps maintain proper airflow to the carburetor. Occasionally check that
the air cleaner is free of excessive dirt.
AIR FILTER MAINTENANCE
To inspect and clean the air filter:
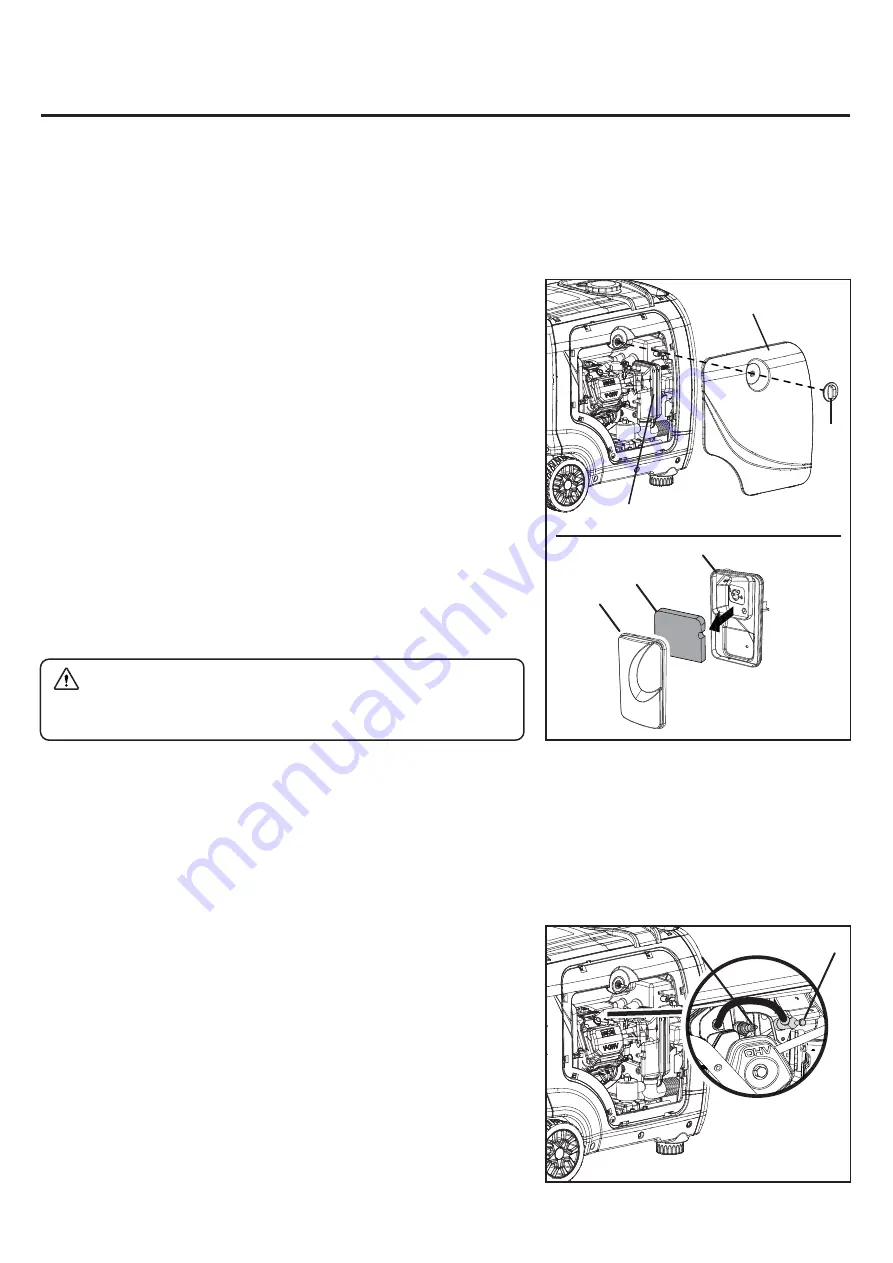
1. Unscrew the maintenance cover knob, and remove the cover
from the side panel.
2. Take the cover off of the air cleaner (Fig. 16). Remove the
sponge-like air filter element from the casing. Wipe excessive
oil and any dirt from inside of the air filter casing.
3. Check and clean the foam air filter element. Good elements
can be washed in soapy water. Dry the element in clean cloth (do
not twist it). Add a few drops of engine oil to the air filter element
and spread it evenly.
If the air filter element has been damaged, replace it with a new
one. Please contact your authorized service center.
4. Reinstall the air filter element, air filter cover and maintenance
cover.
Fig. 16
Air Filter
Maintenance Cover
Knob
WARNING:
Running the engine with a dirty, damaged or
missing air filter element can result in danger to the operator
and cause the engine to wear out prematurely.
Refer to Recommended Maintenance Schedule for maintaining the spark plug.
The spark plug must be properly gapped and free of deposits in order to ensure proper engine operation. If
the engine is hot, allow it to cool before servicing the spark plug.
SPARK PLUG MAINTENANCE
To inspect or replace the spark plug:
1. Unscrew the maintenance cover knob, and remove the cover
from the side panel (Fig. 16).
2. Remove the spark plug cap (Fig. 17).
3. Use the included spark plug wrench to unscrew and then
carefully remove the spark plug from the engine.
TIP: There is limited space for the wrench to turn. Use both
rows of holes in the spark plug wrench to gain leverage to
loosen the plug.
C
A
B
Fig. 17
A - Spark plug
B - Spark plug cap
A
B
24
Summary of Contents for SUA4000i
Page 1: ...10887 Commerce Way Unit A Fontana CA 92337 SUA4000i ...
Page 2: ...1 ...
Page 5: ...4 IMPORTANT SAFETY INSTRUCTIONS ...
Page 6: ...5 IMPORTANT SAFETY INSTRUCTIONS ...
Page 7: ...6 IMPORTANT SAFETY INSTRUCTIONS ...
Page 8: ...7 IMPORTANT SAFETY INSTRUCTIONS ...
Page 9: ...8 IMPORTANT SAFETY INSTRUCTIONS ...
Page 31: ...EXPLODED VIEW PARTS LIST 30 ...
Page 38: ......
Page 39: ......
Page 40: ...32082 02992 00 ...


