background image

Vertical contact toaster

14

P/N 1011097 Rev. A 03/12

A.J. Antunes & Co.

maIntenance (continued)

checking the roller tensioners  

(every 3–6 months)

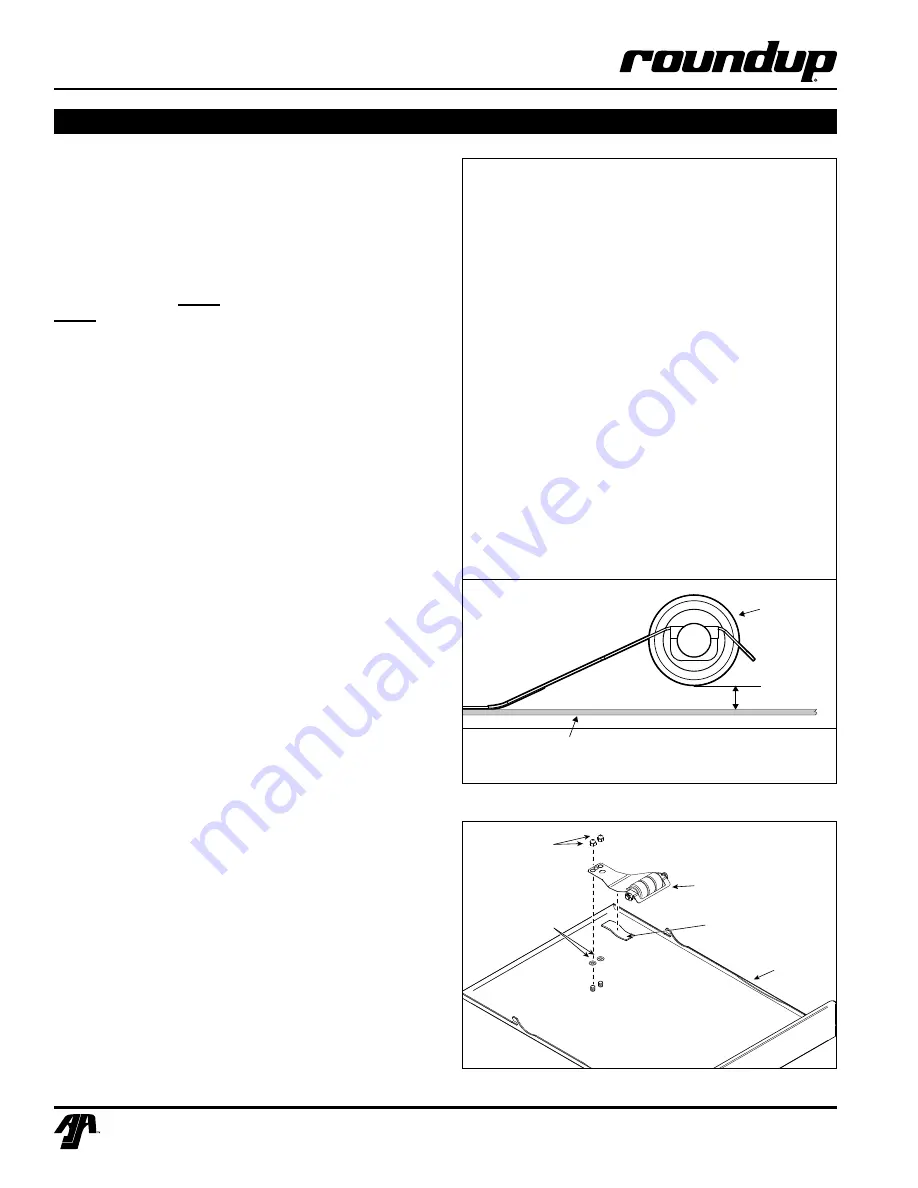
measUrInG the rOller tensIOners

  1.  Measure the Roller Tensioner on both inner 

Conveyor Covers (Figure 14).

  2.  The space between the inner Conveyor Cover 

and bottom of the Tensioner wheel should be no 

larger than 1/2 inch.

  3.  Adjust or replace tensioners as needed.

replacInG/aDJUstInG the rOller tensIOners

  1.  Remove the acorn nuts and old Roller Tensioner 

Assembly.

  2.  Install the new Tensioner Assembly according to 

Figure zx. 

  3.  Make sure the spacers are placed inside the 

Tensioner arm.  The spacers allow the Tensioner 

to pivot freely.

  4.  Make sure there is 1/2” between the bottom of the 

Tensioner wheel and the inside of the Conveyor 

Cover.

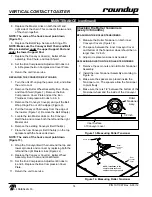
1/2 Inch

Roller

Tensioner

Assy.

Inner Surface

of Conveyor cover

figure 13. measuring roller tensioner

Acorn Nuts

Roller

Tensioner

Assy.

Tape

Spacers

Rear 

Conveyor 

Cover

NOTE

Installation is the

same for both the Front 

and Rear Conveyor Covers

  8.  Replace the Master Links on both the left and 

right side of the chain. This connects the two ends 

of the chain together.

nOte: the ends of the hooks must point down 

(figure 13).

  6.  Replace the Belt Wrap. Secure with Hinge Pin. 

nOte: make sure the conveyor belt chain and belt 

wrap is installed 

under

 the upper support rod and 

under

 the lower support rod.

  7.  Replace the Conveyor Cover(s), Butter Wheel 

assembly, Bun Chute, and Heat Shield.

  8.  Set the Bun Compression Adjustment Knobs to 4 

& 6. Replace the Bun Compression Cover Plate.

  9.  Return the unit into service.

replacInG the cOnVeyOr belt chaIns

  1.  Turn the unit off, unplug the power cord, and allow 

the unit to cool.

  2.  Remove the Butter Wheel Assembly, Bun Chute, 

and Heat Shield (Figure 1). Remove the Bun 

Compression Cover Plate and set the Bun 

Thickness Compression Knobs to 6 & 6.

  3.  Remove the Conveyor Cover(s) and pull the Belt 

Wrap Hinge Pin out of the zipper (Figure 9). 

  4.  Pull the Conveyor Chain away from the edge of 

the toaster (Figure 12). Remove the Belt Wrap(s).

  5.  Locate the two Master Links on the Conveyor 

Belt Chain and remove both the left and the right 

Master Link.

  6.  Remove the existing Conveyor Belt Chain(s).
  7.  Place the new Conveyor Belt Chain(s) on the top 

sprockets with the hook ends down

nOte: the ends of the hooks must point down 

(figure 13).

  8.  Wrap the Conveyor Belt Chain around the top and 

lower sprockets and connect by replacing both the 

left and the right Master Links (Figure zx).

  9.  Replace the Conveyor Cover(s), Butter Wheel 

Assembly, Bun Chute, and Heat Shield.

 10. 

Set the Bun Compression Adjustment Knobs to 

4 and 6. Replace the Bun Compression Cover 

Plate.

  11.  Return the unit to service.

figure 14. measuring roller tensioner

Summary of Contents for roundup VCT-2010

Page 1: ...Model VCT 2010 Vertical Contact Toaster Owner s Manual P N 1011097 Rev A 03 12 Manufacturing Numbers 9210312 C T I S L US E D A S D L I S T E CM O I N NIT A T ...

Page 2: ...es damaged contact the carrier imme diately and file a damage claim with them Save all packing materials when filing a claim Freight damage claims are the responsibility of the purchaser and are not covered under warranty The warranty does NOT extend to Damages caused in shipment or damage as result of improper use Installation of electrical service Normal maintenance as outlined in this manual Ma...

Page 3: ... have trou ble locating your Authorized Service Agency Owner information continued Service Technical Assistance If you experience any problems with the installation or operation of your unit contact your local Roundup Authorized Service Agency Fill in the information below and have it handy when calling your Authorized Service Agency for assistance The serial number is on the specification plate l...

Page 4: ...p it over the Upper and Lower Support Rods or permanent damage to belt will occur Make sure Belt Wrap is positioned inside the Upper and Lower Support Rods Make sure both ends of the Belt Wrap are aligned evenly before installing Belt Wrap Pin Failure to use Release Sheets may result in dam age to the equipment and loss of warranty cover age Do NOT clean this appliance with a water jet If supply c...

Page 5: ...Ratings Electrical Cord Plug Configurations Model Mfg No Description Configuration VCT 2010 9210312 Power Cord Assembly 20 Amp 250 Volt Right Angle Model Mfg No Volts Watts Amp Hz VCT 2010 9210312 208 3300 15 8 60 Model Mfg No Width A Depth B Height C VCT 2010 9210312 21 1 4 540 mm 15 1 4 387 mm 24 1 4 616 mm ...

Page 6: ...3 12 A J Antunes Co Heat Shield Conveyor Cover rear Conveyor Cover Front Bun Chute Belt Wrap Butter Wheel Heated Base Butter Pan Butter Wheel Release Sheet Control Panel and Power Switch Roller Tensioner Conveyor Belt Chain Specifications continued ...

Page 7: ...ecification plate for the proper voltage Installation Assembling the Unit NOTE The factory has pre installed a Release Sheet over the Platen Figure 1 Verify that it is properly in place before proceeding 1 Place the unit on a flat sturdy location 2 Install the Bun Chute so the hooks are installed over the lower rear yellow Support Rod Figure 1 3 Hang the Butter Wheel Heated Base on the front of th...

Page 8: ... approximately 18 sec onds 6 Test at least 4 buns before putting the toaster into service 7 Turn the power off for the unit and the Butter Wheel when finished toasting for the day and pro ceed with the Daily Cleaning as outlined in the Maintenance section of this manual Temperature Adjustments The VCT 2010 uses a Platen Heater and two Auxiliary Air Heaters The Platen Heater consists of a heating e...

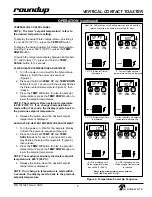
Page 9: ...it for Temperature Display to finish the power up sequence Figure 4 2 Press and hold both TEMP UP and TEMP SCALE buttons for over 1 second until the dis play flashes the setpoint temperature Figure 6 then release 3 Press the TEMP UP button to raise the setpoint temperature or press the TEMP DOWN button to lower the setpoint temperature NOTE The maximum Auxiliary Air Heater setpoint temperature is ...

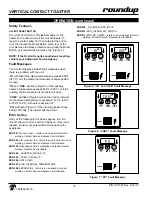
Page 10: ...rs will shut off PO will flash Figure 7 if the incoming power drops below 190 Volts The toaster will shut down TEMP UP TEMP DOWN TEMP SCALE F C POWER TEMP UP TEMP DOWN TEMP SCALE F C POWER HI USE Figure 5 HI and USE Fault Message Figure 6 CHEC Fault Message TEMP UP TEMP DOWN TEMP SCALE F C POWER CHEC TEMP UP TEMP DOWN TEMP SCALE F C POWER PO Figure 7 PO Fault Message Error Codes If any of the foll...

Page 11: ...with a clean towel dampened with Multipurpose Detergent Solution immediately followed by a sec ond clean towel dampened with sanitizer 8 Close the front Conveyor Cover open the rear Conveyor Cover and clean the Belt Wrap as described in Step 7 9 Close the rear Conveyor Cover Reinstall the Heat Shield plug in the power cord turn the unit on count 18 seconds then turn the unit off and unplug the uni...

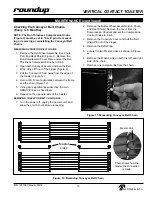
Page 12: ...port Rods with the zipper flap exposed and hanging down Figures 10 11 7 Close the Conveyor Cover s set the Bun Thickness Compression Knobs back to their normal settings and reinstall the Heat Shield Butter Wheel and Pan INCORRECT CORRECT Figure 10 Aligning Belt Teeth Caution Position the Belt Wrap inside the Upper and Lower Support Rods or damage to the unit may occur Caution Align the ends of the...

Page 13: ...e 12 4 Hold a U S Dime horizontally between the frame and the chain Figure 12 5 If the gap is significantly wider than the coin REMOVE links as described 6 Repeat on the opposite side of the toaster Removing conveyor belt Chain Links 1 Turn the power off unplug the power cord and allow the unit to cool before proceeding Figure 11 Measuring Conveyor Belt Chain Maintenance continued 2 Remove the But...

Page 14: ...e sure the Conveyor Belt Chain and Belt Wrap is installed under the upper Support Rod and under the lower Support Rod 7 Replace the Conveyor Cover s Butter Wheel assembly Bun Chute and Heat Shield 8 Set the Bun Compression Adjustment Knobs to 4 6 Replace the Bun Compression Cover Plate 9 Return the unit into service REplacing the conveyor belt Chains 1 Turn the unit off unplug the power cord and a...

Page 15: ... Platen Relay Auxiliary Relay Transformer Rear Auxiliary Air Heater Butter Wheel Connector Receptacle Butter Wheel Connector Receptacle Front Auxiliary Air Heater Power Switch Control Board Drive Chain Drive Sprocket Digital Potentiometer Idler Sprocket Platen Conveyor Safety Interlock Switch Speed Control ...

Page 16: ...tact your maintenance person or Authorized Service Agency for service Failed Cooling Fan Failed Control Board Control Display flashes HI continu ously Buns burn Failed Platen Solid State Relay Contact your maintenance person or Authorized Service Agency for service Failed Control Board Failed Platen Thermocouple Control Display flashes HI continu ously Buns not toast ing properly Loose Platen Ther...

Page 17: ...n the Mainte nance section of this manual Drive Motor has failed Contact your maintenance person or Authorized Service Agency for service Buns not toasting adequately Compression Settings are incorrect Use the recommended settings Set Heel to 2 and Crown to 6 Temperature Setting is incorrect Verify that the Platen SP P is set to 540 F 282 C and the Auxiliary SP A is set to 400 F 204 C For making c...

Page 18: ... Conveyor Belt Chains as described in the Maintenance section of this manual Conveyor Safety Interlock Switch is not being activated by the Heat Shield Heat Shield is ajar Reposition Heat Shield Heat Shield is damaged Replace if necessary If the Conveyor Safety Interlock Switch is damaged contact your maintenance person or Authorized Service Agency for service Belt Wraps slipping over Conveyor Bel...

Page 19: ...is manual Conveyor Belt Chains have stretched Measure and adjust the conveyor Belt Chains as described in the Maintenance section of this manual Conveyor Belt Chains adjusted incorrectly Sugar and or carbon has accumu lated inside the Conveyor Belt Wrap and between the Conveyor Belt chain and Tensioner Slide Rails Remove Belt Wraps clean conveyor Belt Chain links just as you clean the Belt Wraps d...

Page 20: ...Vertical Contact toaster 20 P N 1011097 Rev A 03 12 A J Antunes Co 22 24 26 32 34 35 37 38 33 25 27 26 20 12 15 16 21 5 17 13 14 18 23 24 28 29 30 40 31 36 39 1 Replacement parts continued ...

Page 21: ...21 Vertical Contact toaster P N 1011097 Rev A 03 12 A J Antunes Co 41 44 103 46 47 47 95 102 48 49 52 50 51 56 42 53 54 43 45 96 97 98 99 Replacement parts continued ...

Page 22: ...aster 22 P N 1011097 Rev A 03 12 A J Antunes Co 57 64 94 65 82 89 84 85 88 85 86 90 91 92 83 81 66 67 71 72 68 73 74 75 67 12 76 86 87 78 55 87 82 82 93 69 70 12 63 58 59 62 60 61 60 62 100 104 Replacement parts continued ...

Page 23: ...50 0505950 Inner Base 1 51 0200292 Base Gasket 17 Lg 2 52 0012484 Control Housing Cover Assy 1 53 0012488 Conveyor Cover Rear Assy 1 54 0012478 Heat Shield Assy 1 55 304P105 Nut Hex KEPS 4 40 56 0200293 Base Gasket 8 5 Lg 2 57 7000542 Rocker Switch Kit 1 58 0505952 Speed Control Cover 1 59 306P104 Mach Screw 6 32 x 1 4 60 4051005 Receptacle 250V 15A 2 61 0505980 Outer Retainer 2 62 306P103 Mach Sc...

Page 24: ...LK WHT PLATEN T WHT BLK WHT BUTTER WHEEL PLUG LEFT RIGHT GRN WHT BLK M 2 1 8 7 6 5 4 3 1 2 3 4 5 6 WHT YEL BLU RED RED BLK ORG BRN BRN WHT B L K GRY RED Y E L K TYPE CHASSIS TEMP CONTROL PLATEN THERMOSTAT HI LIMIT AUX HEATER 1 MOTOR GRN YEL WHT BLU BLK BRN GRN 240VAC TRANSFORMER 4 PLATEN HEATER AUX HEATER 2 1 240 VAC 3 2 12VAC 16 GA AWM 105 C 14 GA TFE 200 C 14 GA AWM 105 C 22 GA AWM 105 C 16 GA T...

Page 25: ...25 Vertical Contact toaster P N 1011097 Rev A 03 12 A J Antunes Co NOTES ...

Page 26: ...Vertical Contact toaster 26 P N 1011097 Rev A 03 12 A J Antunes Co NOTES ...

Page 27: ...27 Vertical Contact toaster P N 1011097 Rev A 03 12 A J Antunes Co NOTES ...

Page 28: ...ll Assembly due to abuse misuse dropping of unit shock loads or exceeding maximum weight capacity 4 lbs This warranty does not cover water contamination problems such as foreign material in water lines or inside solenoid valves It does not cover water pressure problems or failures resulting from improper incorrect voltage supply This warranty does not cover Travel Time Mileage in excess of 2 hours...

Reviews: