4
Operation controls & Functions
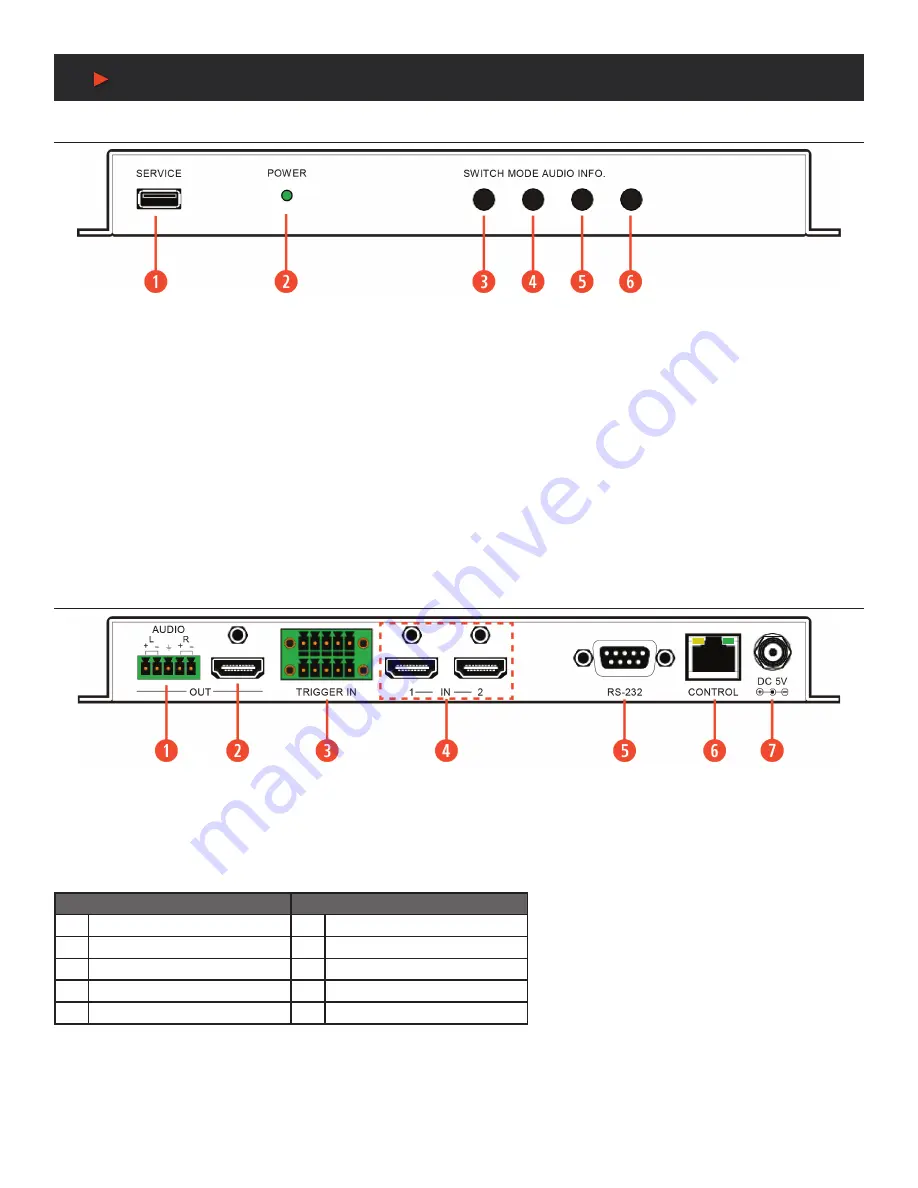
Front Panel
q
SERVICE:
This port is reserved for firmware update use only.
w
POWER LED:
This LED will illuminate to indicate the unit is on and receiving power.
e
SWITCH BUTTON:
Press to toggle between the two HDMI inputs and output the selected source full screen.
NOTE:
Press and hold this button for 2 seconds to change the output resolution to 1920x1080p@60Hz.
r
MODE BUTTON:
Press to sequentially switch between the Full Screen (NONE), Picture-in-Picture (PIP), Side-by-Side (SBS), and
Picture- outside-Picture (POP) windowing modes.
NOTE:
Press and hold this button for 2 seconds to change the output resolution to 1024x768@60Hz.
t
AUDIO BUTTON:
Press to toggle between the audio from the (2) HDMI inputs.
y
INFO. BUTTON:
Short press to show the current input/output resolution status, audio selection and IP information. Long press to show
the current contrast, brightness, hue, sharpness, color format, chroma and color temperature settings for each source channel.
BACK Panel
q
AUDIO OUT:
Connect to powered speakers or an amplifier for balanced stereo analog audio output.
w
HDMI OUT:
Connect to an HDMI TV, monitor or amplifier for digital video and audio output.
e
TRIGGER IN:
This 10 pin terminal block provides (8) trigger pins (plus 5V & Ground) for activating pre-designated functions within the
unit. Compatible with the optional Trigger Keypad unit.
Pins are numbered from left to right:
TOP ROW
BOTTOM ROW
1
Vcc (5V)
6
GROUND
2
POP Windowing Mode
7
Image Freeze (Toggle)
3
SBS Windowing Mode
8
Display Logo (Toggle)
4
PIP Windowing Mode
9
A/V Mute (Toggle)
5
Full Screen Window (Toggle)
10 Window Source Swap (Toggle)
r
HDMI IN 1~2:
Connect to HDMI source equipment such as media players, game consoles or set-top boxes.
t
RS-232:
Connect directly to a PC, laptop or other serial control device to send RS-232 commands to control the unit.
y
CONTROL:
Connect directly, or through a network switch, to your PC/laptop to control the unit via Telnet/WebGUI.
u
DC 5V:
Plug the 5V DC power adapter into the unit and connect it to an AC wall outlet for power.
A
NEU
VIDEO


