4
Operation controls & Functions
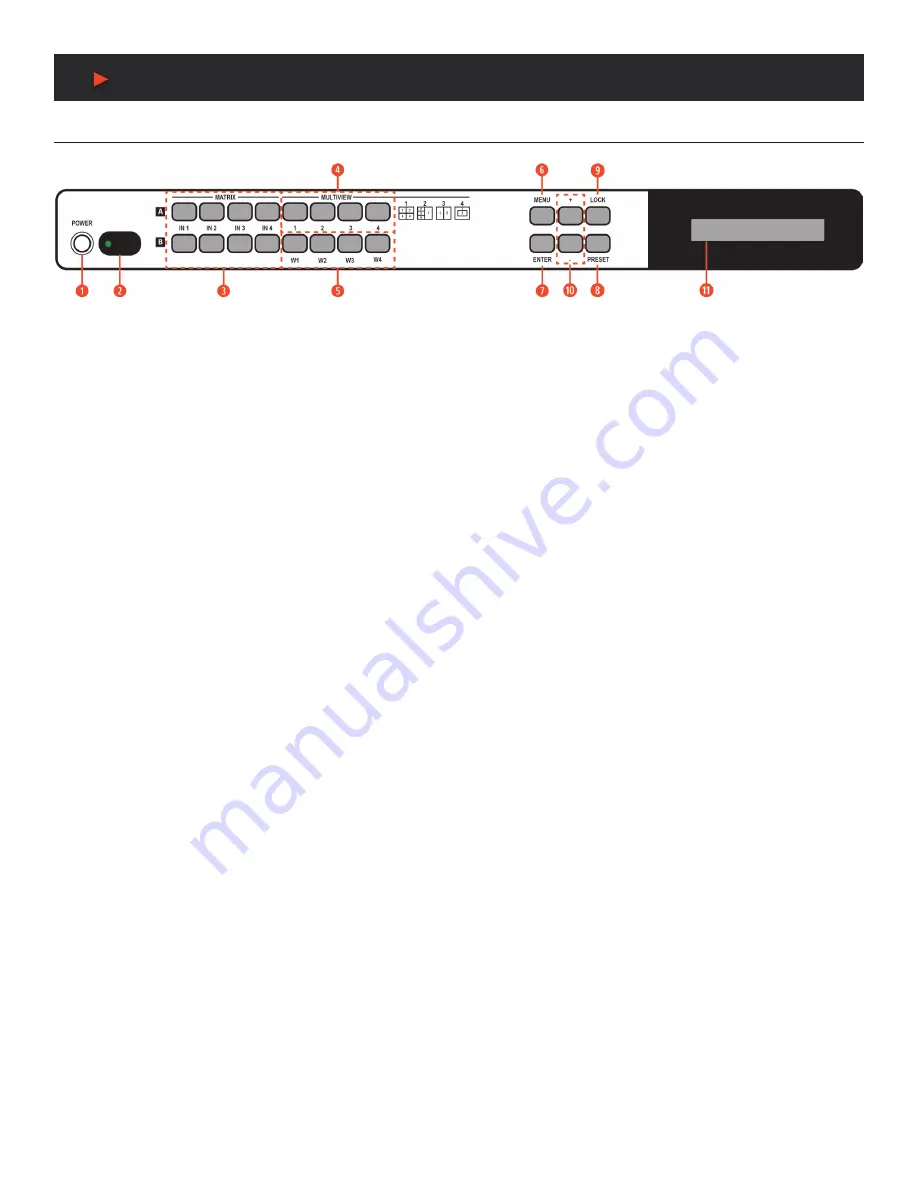
Front Panel
q
POWER:
Press this button to power the unit on (green LED) or place it into stand-by mode (red LED).
w
IR WINDOW:
Accepts IR signals from the included IR remote for control of this unit only.
e
MATRIX A/B IN1~IN4:
These input selection buttons behave differently depending on the current input and output resolutions in use.
A. ALL INPUTS AND OUTPUTS ARE BELOW 4K:
Press any of these buttons to seamlessly switch to the selected input (IN1~IN4)
for display on the associated output (A or B).
B. ANY INPUT OR OUTPUT IS 4K:
Press any of these buttons to seamlessly switch to the selected input (IN1~IN4) for display on
both outputs simultaneously.
NOTE:
Audio for both outputs will follow the most recently selected input (from A or B) in both modes.
r
MULTIVIEW:
Press any of these buttons to switch immediately to the corresponding Multiview output mode.
t
WINDOW SOURCE SELECT:
Press these buttons to sequentially switch through the available inputs for each window in Multiview
output modes.
y
MENU:
Press to enter the LCD menu, or to back out from menu Items.
u
ENTER:
Press to confirm a selection within the LCD menu or to go deeper into a menu item.
i
+ & −:
Press to move up and down or adjust selections within menus.
o
LOCK:
Press to lock all button functions on the front panel. Press the button again to release the lock function. The LCD will display a
“Lock”
message when the function is active.
a
PRESET:
Press this button to switch between the
“Preset Load”
and
“Preset Save”
modes. Pressing the button a 3rd time exits the
Preset menu.
A. PRESET SAVE:
When in
“Preset Save”
mode, pressing the
“Enter”
button will save the currently displayed window layout.
B. PRESET LOAD:
When in the
“Preset Load”
mode, pressing the
“Enter”
button will load the previously saved window layout.
NOTE:
The audio selection is not saved as a part of the preset, only the window layout.
s
LCD WINDOW:
Displays the unit’s menu, settingss and information.
A
NEU
VIDEO


